*My posts may contain affiliate links, which means I may receive a small commission, at no cost to you, if you make a purchase through a link! Thank you for supporting my website!*
Last updated on September 11th, 2024 at 09:14 am
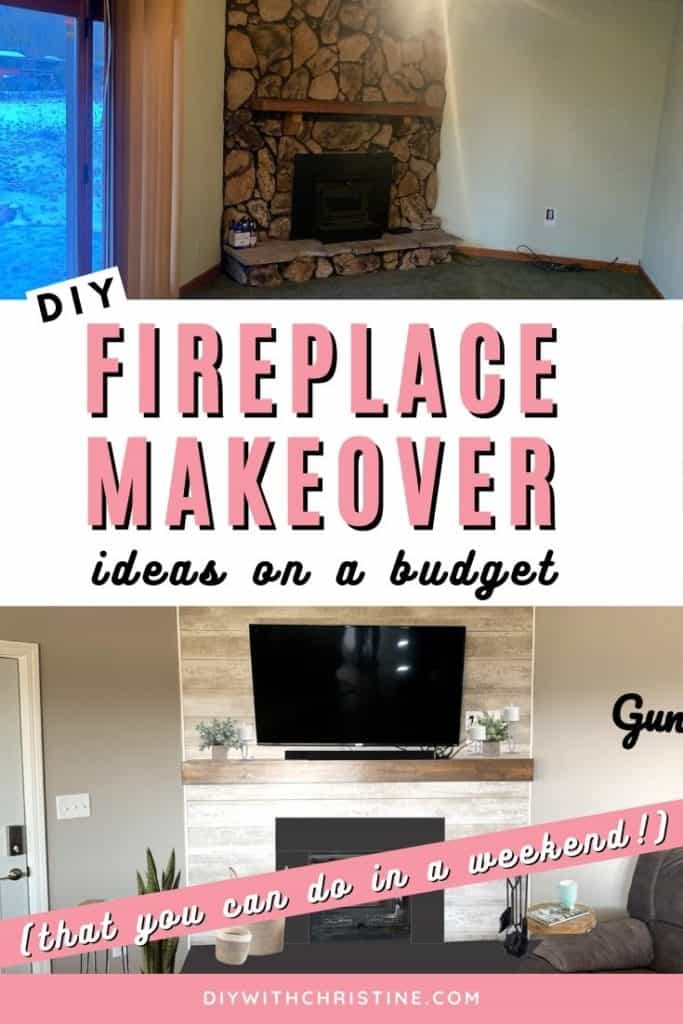
Cheap Fireplace Makeover Ideas To Update An Old Fireplace
I hear you’re looking for DIY fireplace makeover ideas on a budget? Well, you’ve certainly come to the right place because I have a few ideas for you!
If you’re new around here, you might not know that we completely gutted and renovated our 1950s Ranch to make some extra money.
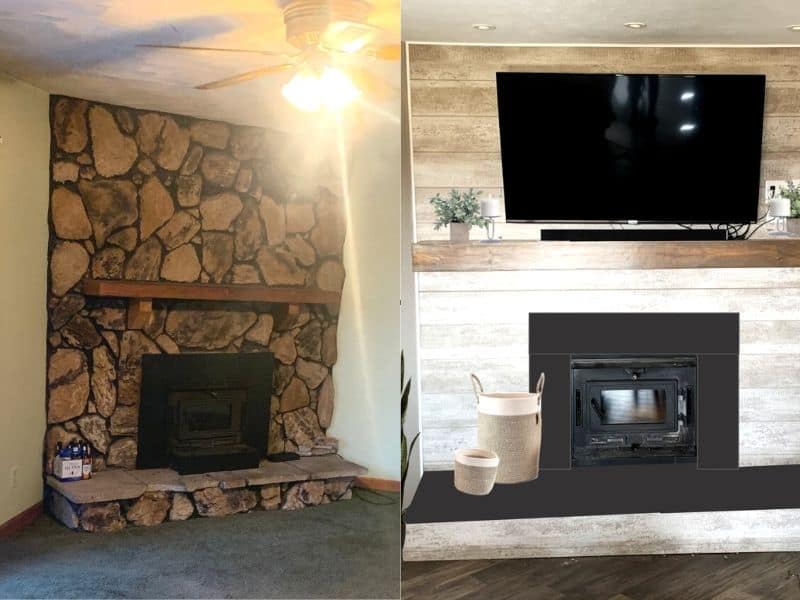
Part of that renovation included redoing the entire fireplace (which is something I did NOT want to do!) because we had to raise the step-down family room to the rest of the house.
Alas, we had to tear out the old stone, move the entire stove, replace the entire chimney (bc it was now too long to fit the stove back into place with the floor raised), put the stove back in, and reframe the fireplace walls.
After those extra expenses, I was on a mission to finish the fireplace makeover on a major budget!
I’ll show you exactly how we updated our fireplace for less than $300, and I’ve even got a few more awesome ideas that will help you upgrade the look of your fireplace for cheap!
(Side note: Our fireplace isn’t finished – we still need to cut the hearthstone and install it, and re-install the metal decorative sides around the fireplace. But you’ll get the idea still!)
Let’s dive in!
DIY Fireplace Makeover Ideas
- Cover Your Fireplace Walls With Wall Paneling (No Demo or Painting Required!)
- Paint Your Brick Fireplace Walls
- Install Tile Over Your Fireplace Walls
- Build A New DIY Floating Mantel
- Spray Paint The Metal Around The Fireplace & The Stove With Heat Resistant Paint
- Mount Your TV On Your Fireplace
- Build A Raised Fireplace Hearth
- Final Thoughts
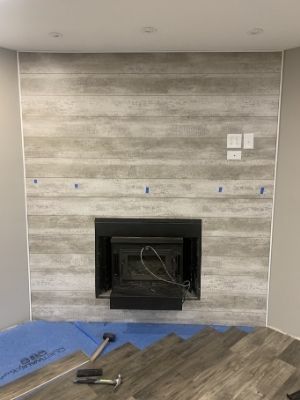
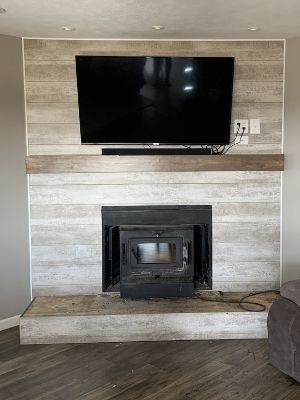
One: Cover Your Fireplace Walls With Wall Paneling (No Demo or Painting Required!)
The first DIY fireplace makeover idea on a budget is to cover your fireplace walls with wall paneling. This is the cheap fireplace makeover idea that we did!
Wall paneling comes in huge 4-foot by 8-foot sheets (much like drywall) and in several different colors and patterns. And the best part? It costs anywhere from $15-$45 a sheet which means to cover a fireplace from floor to ceiling on an 8-foot ceiling, it only takes 2-3 sheets!
Plus, it can be cut with any power tool and only takes some strong adhesive to apply to the walls. It doesn’t get much easier and cheaper than that!
Can you cover over a fireplace?
You most certainly can cover over a fireplace! The outside of the fireplace walls themselves don’t get hot, and even directly next to the stove doesn’t get hot enough to do any damage to whatever material you decide to cover over your fireplace.
So you can get creative with the way you cover over a fireplace that you just don’t like the looks of anymore!
How To Cover Over A Fireplace With Wall Paneling
Covering over a fireplace with wall paneling works well if your fireplace walls are made of drywall or tile. But you can even use it on brick walls if you use the right glue!
List Of Materials & Tools To Cover Over A Fireplace With Wall Paneling
- 2-3 sheets of wall paneling (you can choose faux brick, faux shiplap, faux tile, faux stone, etc!)
- 2 tubes of Loctite Power Adhesive
- 3+ pieces of plastic inside corner trim
- Optional: 2+ pieces of plastic outside corner trim
- Circular saw
- Optional: miter saw
- Caulk gun
- Tape measure
- Contractor pencil
Step One: Remove Items In The Way
Regardless of the material that your fireplace wall is made out of, we first need to remove any obstacles in the way. This includes, but is not limited to a mantel, the metal decorative covers around the stove, the fireplace hearth (if it’s detachable), etc.
Of course, you can always build around these items, but you will be able to hide your cut edges behind these items (which makes everything look clean and finished) if you can remove and reinstall them later.
Since we had to demo the entire existing fireplace structure, we had all of these items out of the way already.
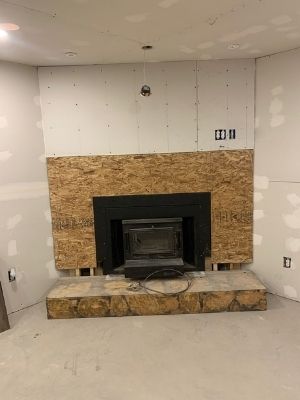
Step Two: Measure, Cut, and Glue Wall Panels Into Place
Now you can measure and cut the wall paneling to fit your fireplace wall! We wanted the top piece to be full, so we cut and glued that one into place first.
After you have your piece cut, I recommend dry-fitting it to make sure it fits properly before you add glue.
After you know your piece fits nicely, apply a liberal amount of Loctite power grab adhesive found at Amazon to the back of the panel. Be sure to add a good amount to the edges, so it sticks well.
After the glue is applied, stick that bad boy up there and press it into place! It might help to add a Brad nail (if your wall is made of drywall or OSB) to help support the piece until it dries.
If your fireplace is brick or tile, you might have to get a little creative on how you support the piece. Or you can always start on the ground and work your way up, which is much easier since you don’t have to fight gravity!
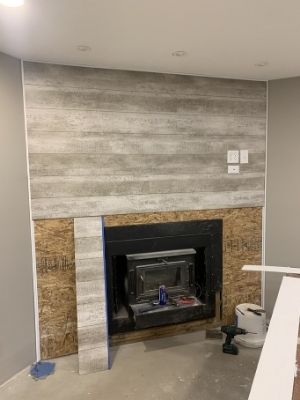
After the first panel is up, repeat the process to add the rest of the panels.
Step Three: Measure, Cut, And Install Plastic Inside Corner Trim In The Corners
Next, we decided to use plastic inside corner trim in the corners to hide the ends of wall paneling and give the fireplace a framed, finished look.
Since our fireplace is a corner fireplace, this inside corner trim was easiest to cut and glue into the corners. You could also use thin pieces of wood trim to frame out the ends of the wall paneling as well.
To install the inside corner trim, we measured the wall from floor to ceiling and cut the inside corner trim to that length using a miter saw. We also measured across the ceiling where the top piece of wall paneling was going to touch the ceiling, so we could install trim there as well.
Then we used more Loctite Power Adhesive to glue it into the corners and across the ceiling.
Since our fireplace wall had drywall and OSB behind it, we used brad nails to nail the trim into place while the glue dried. If your fireplace is made out of brick or tile and you can’t use brad nails, you can use painter’s tape to help hold the trim in place until the glue dries!
If your fireplace wall has outside corners, then you’ll want to use outside corner trim to finish out the outside corners! Cut and glue them into place just like we did with the inside corner trim.
Step Four: Install A Mantel & Other Decorative Pieces
Last but not least, it’s time to install a fireplace mantel and reconnect the metal decorative pieces around the stove.
Since you’ve gone through all this effort to makeover your fireplace, you might as well make a custom, modern floating mantle to finish off the makeover!
I have a full tutorial that shows you how to make a gorgeous DIY floating mantle for less than $60. It’s pretty freaking cool!
To finish off our fireplace, we made and installed our custom floating mantle and re-installed the wooden hearth box.
All that’s left is to install a new hearthstone and reconnect the metal panels to finish off the makeover! So exciting and cheap!! My favs haha!
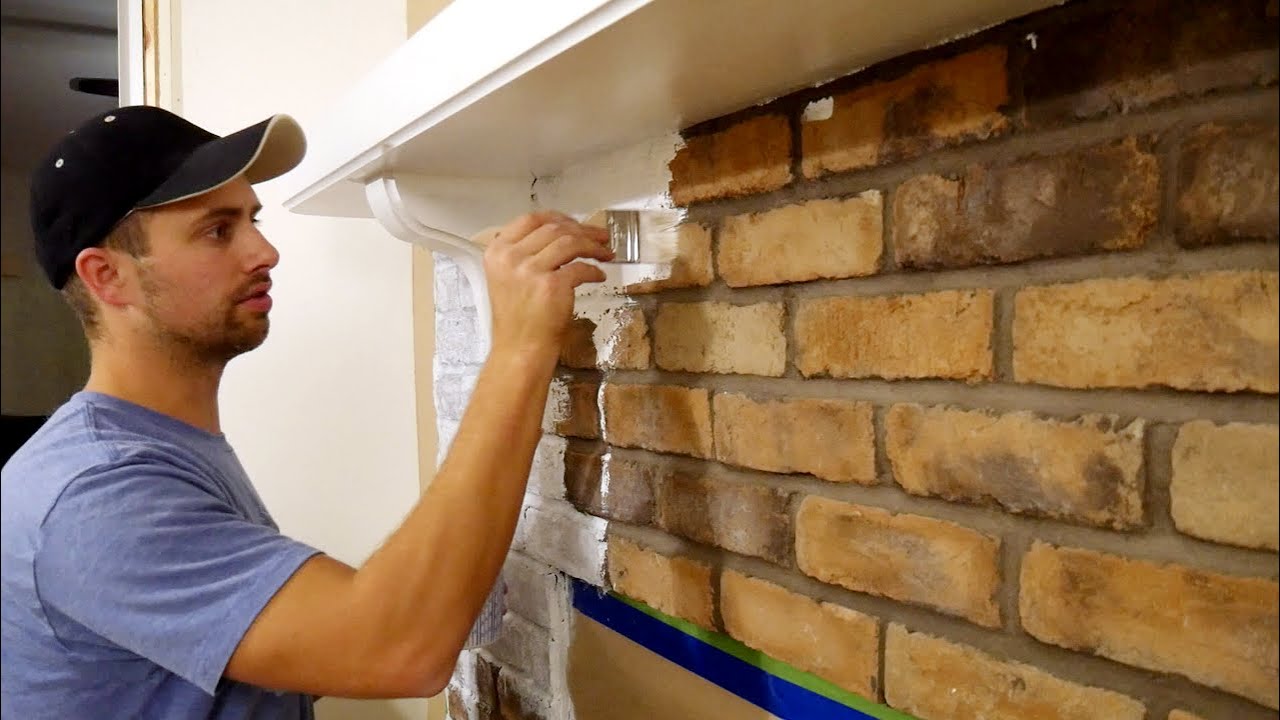
Two: Paint Your Brick Fireplace Walls
The next DIY fireplace makeover idea on a budget is to paint your brick fireplace.
If you have a brick fireplace then I’m a little jealous because I think they are gorgeous and give a great, new texture to a room!
But I get why you might want to give the fireplace a makeover. Sometimes brick can just be too RED or too ORANGE and give off a total 1970s vibe.
Luckily, whitewashing brick is a very cheap and easy way to bring an old brick fireplace back to life!
What paint should you use on a brick fireplace?
Any type of water-based paint will work on a brick fireplace.
This video does a fantastic job of showing how to whitewash your brick! By the end of this weekend, you can completely transform the vibe of your room through this cheap fireplace makeover technique!
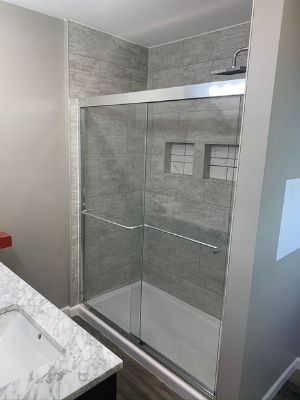
Three: Install Tile Over Your Fireplace Walls
The next DIY fireplace makeover idea on a budget is to install tile over your fireplace walls.
Tile? Really? What if your fireplace is made of brick? I know, I had the same questions when I learned about this DIY fireplace makeover idea!
No worries, it is possible, and it can be a cheap way to makeover an old fireplace – regardless of it currently being brick, drywall, or whatever!
Can you tile directly onto brick?
Yes, you can tile directly onto brick! If you think about it, bricks are secured together with mortar… which is the exact stuff you would use to secure the tile to a wall or floor!
All you have to do is make sure your brick fireplace is clean of debris and that the current mortar isn’t crumbly and breaking apart.
Then, you can apply the mortar and set your tiles just like you would on a kitchen backsplash.
(If you wanna makeover your kitchen with timeless subway tile backsplash for less than $150 next, check out this easy tutorial.)
This Old House has a quick and simple tutorial on how to tile over a brick fireplace.
Do you need special tiles for a fireplace?
No, you do not need special tiles for a fireplace. Like we mentioned above, the outside of the fireplace walls don’t get hot, so any sort of stone or ceramic tile would work.
If you want tiles that install as easily as the wall panels, but have more color options and look more like high-end tile, check out Palisade tile found at Amazon!
It’s a waterproof tile that is perfect for showers (check out my tutorial for how to install DumaWall tile in a master shower), but it also makes a beautiful and easy-to-install backsplash or accent wall!
All it takes is glue (like the Loctite Power Adhesive we talked about earlier), and clicking them together like laminate flooring to create a beautiful new cover over your fireplace!
I will admit that this product is a little pricier than the other DIY fireplace makeover ideas I’ve suggested, but it does look stunning when installed. And it’s too easy to install to not mention it here as a makeover idea!
Check it out and let me know what you think (for shower walls, fireplace walls, a new backsplash, or more).
Four: Build A New DIY Floating Mantel
The next DIY fireplace makeover idea on a budget is to build a new modern floating mantel! Floating mantels are extremely easy to build. Plus, you can customize the size and color for LESS THAN $60.00.
How much does it cost to build a fireplace mantel?
Yes, you heard that right! It costs less than $60 to build a custom fireplace mantel.
Most store-bought mantels cost $150-$350+, and if you do go for a customized one, it can skyrocket the price even higher.
Why spend all that money when you could make one yourself in a weekend that fits your fireplace and room color scheme perfectly while saving money?
Yes, girl, I’m telling you to use that extra money you save to go treat yourself with a coffee or tea because you’ll deserve it once you build your new floating mantel!
Like I mentioned above, I have the perfect tutorial that walks you through all the steps (and all the mistakes to avoid) to create the new showstopping floating mantel on your fireplace. I also talk about how to mount it on drywall or a brick fireplace.
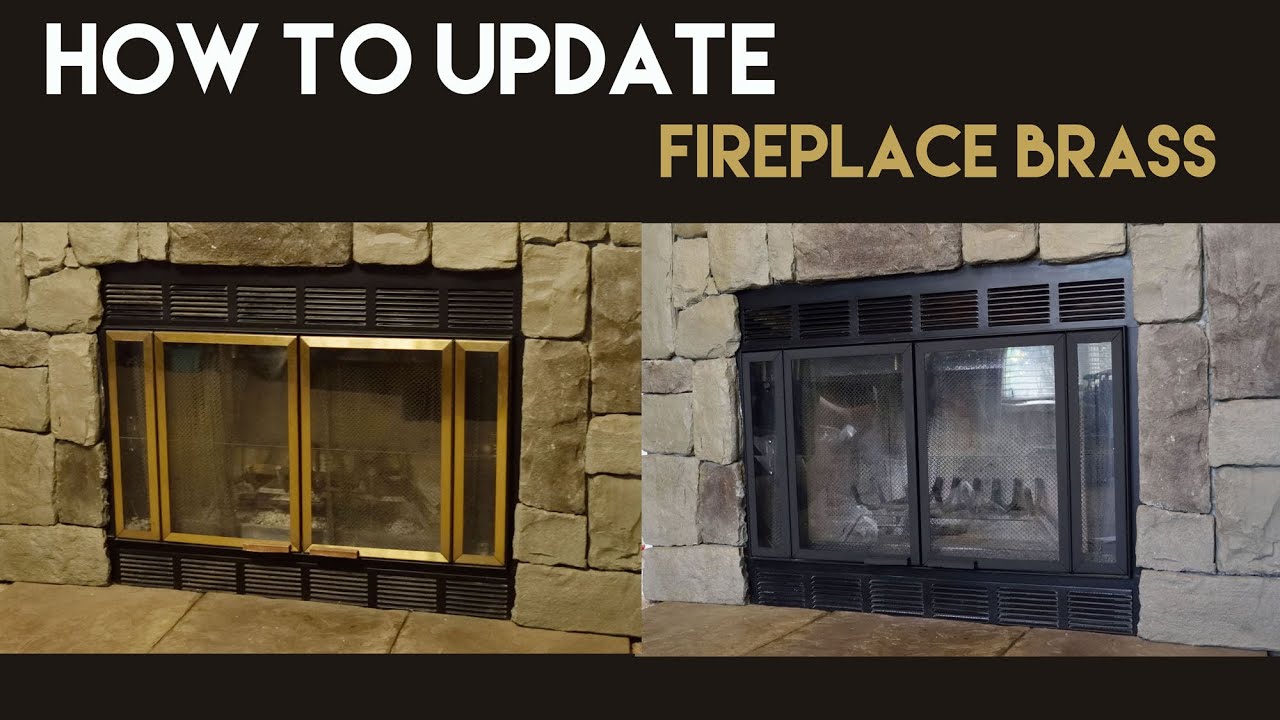
Five: Spray Paint The Metal Around The Fireplace & The Stove With Heat Resistant Paint
The next DIY fireplace makeover idea on a budget is to spray paint the metal around the fireplace.
How do you make a brick fireplace look modern?
The easiest and cheapest way to make a brick fireplace look modern is to break out a can of heat-resistant spray paint found at Amazon and freshen up the metal around your fireplace.
Just think about it; outdated metals (like bright yellow gold or dingy brass) instantly make a fireplace look aged. (Not to mention when you mix those outdated metals with outdated bright red brick, it’s hard to get the “focal point” of the room to match with the rest of your room decor.)
So why not change the color to something more modern like silver or an updated gold or even black?
Also, did you know you can paint the fireplace stove directly as well to make it look brand new? Yes! Paint is the magical tool that can make anything brand new again.
Black heat-resistant spray paint found at Amazon is what you want to use on your stove to make it look black and brand new. Or you can use stove black found at Amazon, which is a type of black polish to blacken your stove and prevent it from rusting.
Both methods are easy and cheap to make the actual stove look brand new again. This article does a fantastic job of explaining how to blacken a wood-burning stove with both the heat-resistant painting method and the stove black polishing method.
Can I paint the brass trim on my fireplace?
As mentioned above, you can and should paint the brass trim on your fireplace to make it more modern.
This quick video tutorial does a fantastic job of showing you just how to paint the metal trim around your fireplace to make it look modern and brand new!
Can you use chalk paint on a fire surround?
Chalk paint is not heat-resistant paint, so you do not want to use it on a fire surround. Opt for this heat-resistant spray paint or stove black to avoid the paint blistering and peeling off after getting too hot.
Six: Mount Your TV On Your Fireplace
The next DIY fireplace makeover idea on a budget is to mount your TV on your fireplace.
Nothing makes a room look more modern and complete as your TV is mounted on the wall (or in this case, on the fireplace!)
This is because a mounted TV clears up a ton of space in your room (bye-bye bulky TV stand) and adds height to the room by lifting a bulky item into the air. (We love some good design elements in a room!)
In our house, the fireplace is in a corner that is an awesome angle for people sitting at the island, but a less awesome angle for anyone sitting on the couch.
It’s not ideal, but instead of sitting the TV on the ground to make a better viewing angle for the couch, we mounted it above the fireplace and used this awesome swiveling and tilting TV mount found at Amazon!
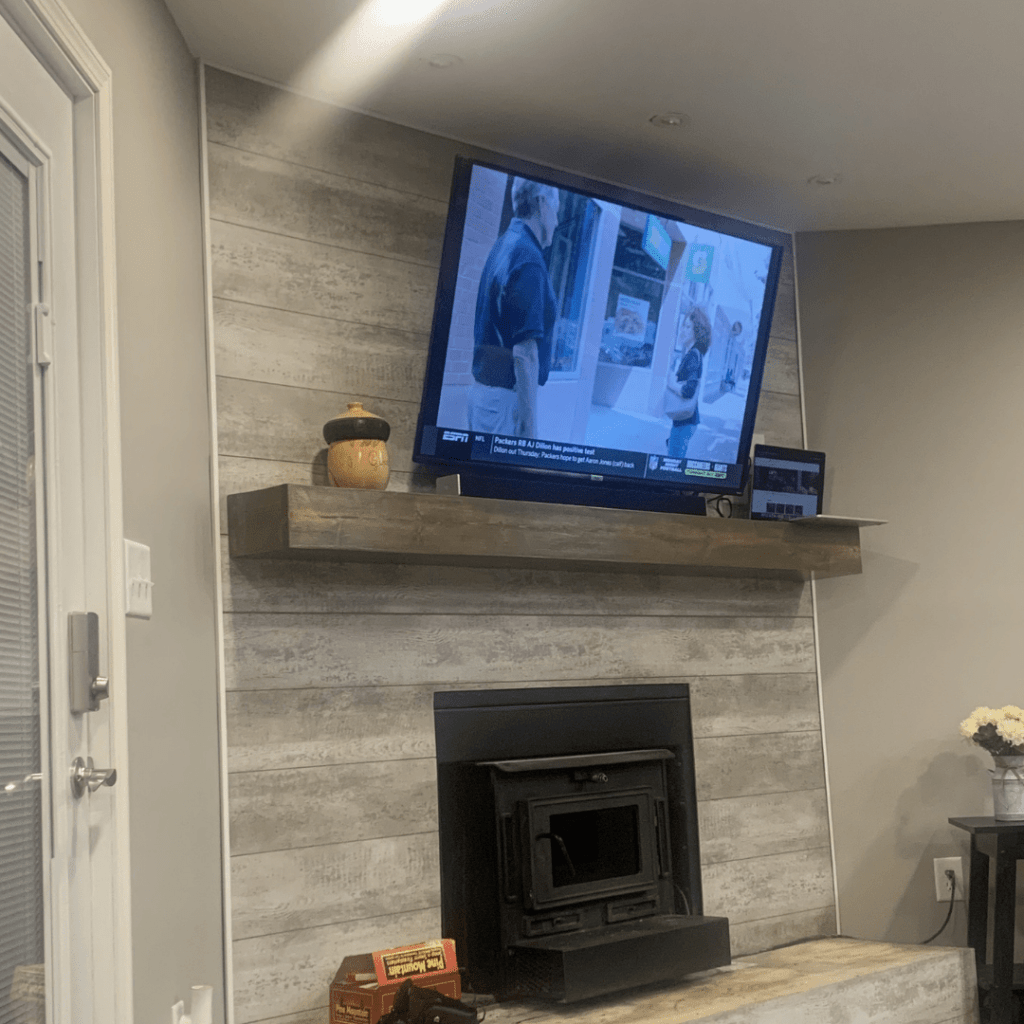
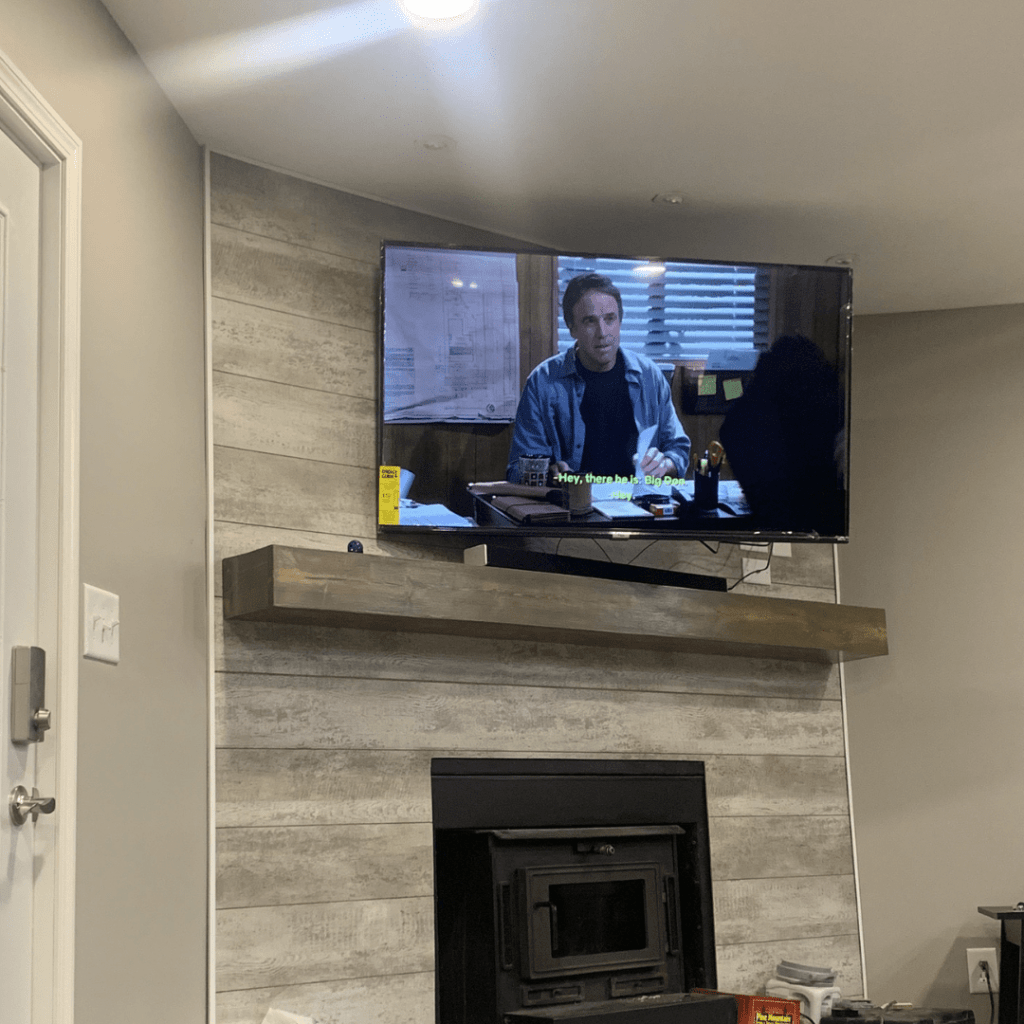
Look at the difference the TV mount makes in the angle of the TV from the couch. This TV mount is fancier than I’ve ever heard of one being and it’s cheaper than most other TV mounts. Win-win!
Here is a fantastic video that will show you how to install a TV mount onto brick or concrete.
And here is a fantastic video that shows you how to install a TV mount onto studs within the drywall.

There you have it! A simple way to makeover your fireplace and your TV on a budget.
Seven: Build A Raised Fireplace Hearth
The last DIY fireplace makeover idea on a budget is to build a raised fireplace hearth. If you don’t already have a fireplace hearth (other than some tile on the ground), then this could be an easy makeover for you.
Fireplace hearths are fantastic for keeping the messy wood off the ground. They also provide another place to add decor and/or extra seating within a room.
You can easily build your own wood fireplace hearth box, attach it to your fireplace wall, cover the top with hearthstone or tile, and cover the sides with the same material as your fireplace walls on a budget.
This tutorial shows a simple way to build a raised fireplace hearth. The only thing I would do differently is to install tile or hearthstone overtop the hearth box to protect it from the fire (and make it look more high-end).
A gorgeous black slate tile added to the top of the hearth would make it look even more stunning. And as a bonus, 2x4s and tile are pretty cheap!
Final Thoughts On DIY Fireplace Makeover Ideas On A Budget
There you have it! You can pick and choose from the different DIY fireplace makeover ideas on a budget above to truly transform your fireplace into one you love!
Plus, after you’ve accomplished this DIY makeover, you’ll be ready to tackle any DIY project in your house! Every new project helps you learn and build confidence, which is exactly why I LOVE DIY.
You can literally create your dream home with your bare hands. How cool is that?
Catch you in my next post!

By Christine
Christine is a blogger and DIYer who tackles home renovation and decorating projects alongside her husband, Adam, for their personal residence and rental properties. Although she successfully tackles large renovation projects to avoid expensive contractor fees and bring her vision to life now, her path to success was not easy.
Go here to read her story, “From a Clueless First-Time Homebuyer To A Confident DIYer Creating Her Dream Home One Project At A Time“.
Popular Posts


DIY With Christine is a participant in the Amazon Services LLC Associates Program, an affiliate advertising program designed to provide a means for sites to earn advertising fees by advertising and linking to Amazon.com.