*My posts may contain affiliate links, which means I may receive a small commission, at no cost to you, if you make a purchase through a link! Thank you for supporting my website!*
Last updated on September 11th, 2024 at 09:13 am
Waterproofing Shower Walls For Palisade/Dumawall Tile The EASY Way
UPDATE: Palisade Waterproof Grout-Free Tiles have replaced Dumawall tiles in the U.S. They are the same product, just simply rebranded, so I will use them interchangeably throughout this article.
Wondering if waterproofing shower walls for Palisade/Dumawall tile is necessary?
That’s an excellent question!
Yes, Palisade/Dumawall is waterproof, but I have a hard time believing anything that says it’s “100% waterproof”. There is always room for failure. So for those that like to air on the side of caution as I do, there are a few simple steps we can take to truly make this tile 100% waterproof.
And you can do it all for less than $60! (Not including the backer board cost.) That’s the kind of DIY project I can get behind.
Let’s dive in!
P.S. Check out my full, honest review of our Palisade/Dumawall shower to learn more about all of the benefits (and the cons) of using this product instead of a traditional tile shower installation.
Quick Navigation For How To Waterproof Shower Walls For Palisade/Dumawall Tile
- Install Moisture-Resistant Drywall, Cement Board, Go Board, Kerdi Board, etc.
- Caulk The Corners
- Paint on RedGard
- Final Thoughts
| Level Of Difficulty | Time To Complete |
|---|---|
| Easy | 2-3 Days (Mostly caulk and RedGard dry-time) |
| Material List | Tool List |
|---|---|
| 100% silicone caulk (white and clear) | Caulk gun (I recommend two for fast Dumawall installation!) |
| 1 gallon of RedGard waterproofing membrane per shower enclosure | Disposable cheap paintbrush and paint roller |
| Moisture-Resistant Drywall, Cement Board, Go Board, Kerdi Board, etc (whichever one you want to install to glue the Dumawall tile to) | (For drywall installation) 1-¼ inch drywall screws |
Step One: Install Moisture-Resistant Drywall, Cement Board, Go Board, Kerdi Board, etc.
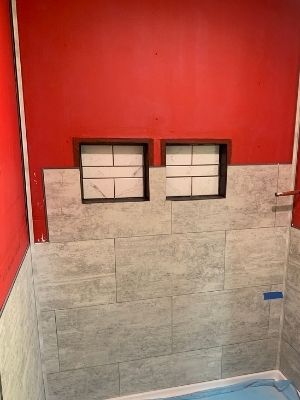
The first step to waterproof shower walls for Palisade/Dumawall tile is to install fresh new backer boards over the studs of a demolished shower.
Now, if you’ve already done this part and you’re just looking for the waterproofing steps, then skip to step two.
Otherwise, I must leave you with a small disclaimer before we start!
Shower Waterproofing Disclaimer
This waterproofing tutorial is designed specifically for Palisade/Dumawall tile installation only. Palisade/Dumawall is different from the traditional tile (ceramic, glass, stone, etc.) because it is waterproof in itself. So technically, all of these waterproofing steps aren’t necessary for Palisade/Dumawall installation (although, I like to air on the side of caution, so I’d recommend you take these steps as a minimum precaution to make your shower or bathtub surround last a lifetime.)
Traditional tile, on the other hand, is not waterproof, and the grout is not waterproof. So the type of backer board and additional waterproofing materials needed is much more important to protect the longevity of your shower.
If you are planning on waterproofing a shower for traditional tile installation, then refer to my full Palisade/Dumawall waterproofing tutorial for the complete process!
But from here on out, I’m going to assume you’re installing Palisade/Dumawall tile, which has a much more simple waterproofing process before installation. (Which happens to be one of the many reasons why this tile is perfect for DIYers and why it can be a little more budget-friendly than a traditional tile installation!)
How To Choose Which Type Of Backer Board To Install
Now that we’ve got that out of the way, let’s discuss the various types of backer boards and how to choose which one to use to waterproof your shower for Palisade/Dumawall.
You can choose to install moisture-resistant drywall, cement board, Kerdi board, or any of the other variations of the backer board out there simply because Palisade/Dumawall tile is waterproof itself.
Yes, you can even install moisture-resistant drywall (which is the cheapest of all of these options) because, by the time we’ve completed this process, water will never get to it.
You’ll most likely want to remodel your shower again because you’ll want a different style long before you’ll have to remodel it because of water damage.
Because of this, we simply went with the green moisture-resistant drywall for our shower and tub surround.
That type of backer board is cheap ($12ish a sheet) and is easily installed with 1-¼ inch drywall screws. Also, there’s no need to tape the seams with this type of application!
Here is a fantastic video that shows you exactly how to hang the backer board in a tub/shower enclosure to avoid water damage.

Although, if you’re still worried about water leaking, then you can always install Go board, which is also waterproof!
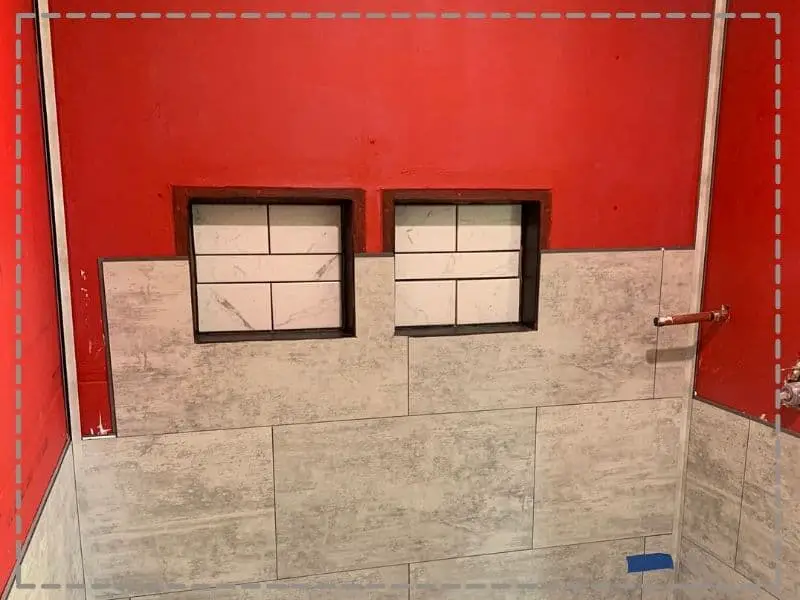
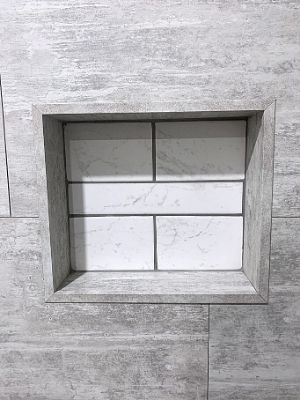
Can You Install A Shower Niche With Palisade/Dumawall?
You most certainly can install a shower niche with Palisade/Dumawall! I would highly recommend installing one to give a custom shower shelf in your new shower.
You need to install the shower niche before installing your backer board, however. Luckily, I have a tutorial that will walk you through this simple Palisade/Dumawall shower niche project.
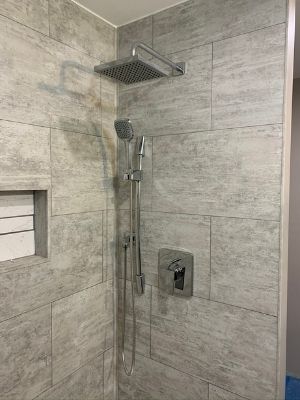
Adding this “sizzle” feature (along with a rain showerhead) to your new shower remodel is a simple way to increase the value of your home!
Once you have your choice of backer board installed, you can move on to the next step!
Step Two: Caulk The Corners
The next step to waterproof a shower wall for Palisade/Dumawall tile is to caulk all of the corners.
Oftentimes, the weakest points in showers are the inside corners where two walls meet. To provide one more extra layer of protection for these weak points, we can simply fill them with a bead of caulk.
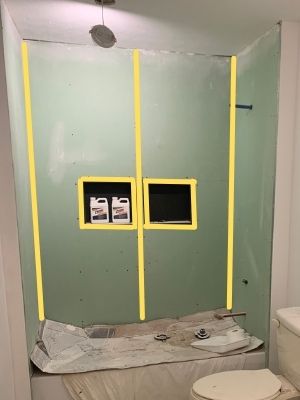
I also caulked around the shower niches (and the screws on the shower niche), and the other seam to fill the gap there as well. I didn’t worry about the screw heads in the drywall though because the next step will completely waterproof those areas.
Run a nice, thick bead of 100% silicone caulk along with the inside corners, the other seams, and around the shower niches, and let that dry completely. This step can be completed even faster if you and a friend each have a caulk gun and go crazy!
Once the caulk is dry, you can move onto the next step!
Step Three: Paint on RedGard
The last step to waterproofing shower walls for Palisade/Dumawall tile is to paint RedGard on everything!
What is RedGard?
RedGard is a thick, paintable waterproofing membrane. It starts bright pink as you paint it on, then dries red.
It is extremely thick and dries like a thick coat of plastic. That makes it perfect to waterproof a shower!
Besides Palisade/Dumawall tile being waterproof itself, RedGard is the other reason why moisture-resistant drywall is good enough to waterproof your shower in this scenario.
Paint this stuff on everything and your shower will be waterproofed well above code standards.
How To Apply RedGard
To apply RedGard, I highly recommend using a cheap disposable paintbrush and paint roller because this stuff will ruin your tools.
You’ll want to just discard the brushes and rollers once you’re done.
Also, RedGard has an intense smell to it, so make sure your room is well ventilated while you’re painting this on. I was not a huge fan of the smell haha!
While applying RedGard, you do not want to skimp out on it. Apply it heavily, so that it can properly waterproof your walls. (By the last coat, the membrane should be as thick as a credit card.)
Use your paintbrush to apply a thick layer to all of the seams, corners, and screw heads of the drywall. I also painted heavily around the shower niches over where I had caulked previously.
After all of the seams, corners, and screw heads have the membrane on them, break out your paint roller and paint the rest of the walls with a thick coat as well.
Once the RedGard is dry, apply another layer (I recommend 3 complete layers) to make it as thick as a credit card.
We used 1 full gallon of RedGard found at Amazon per shower/tub enclosure.
How To Install Palisade/Dumawall Tile
Once the RedGard is dry completely, you are ready to install your Palisade/Dumawall Tile! Check out my complete tutorial on how to easily install Palisade/Dumawall Tile.
I found that the hardest part of the installation process was the planning of the layout, so I broke it down exactly how we calculated the sizes to cut each piece of tile.
That way, you can calculate your tile cuts much more simply as well! Score!
Final Thoughts On Waterproofing Shower Walls For Palisade/Dumawall
There you have it! Now your shower is completely waterproofed and ready for Palisade/Dumawall to be installed.
You can now rest in peace knowing that your shower will last longer than you’ll ever need it too haha!
Also, how awesome is it that you completed this DIY project all by yourself? That saved you THOUSANDS of dollars in contractor fees and the headaches of managing their work.
And now, when people come over, you can show off your new shower and tell them you did it all by yourself. That’s a cool and empowering feeling!
Catch you in my next post!

By Christine
Christine is a blogger and DIYer who tackles home renovation and decorating projects alongside her husband, Adam, for their personal residence and rental properties. Although she successfully tackles large renovation projects to avoid expensive contractor fees and bring her vision to life now, her path to success was not easy.
Go here to read her story, “From a Clueless First-Time Homebuyer To A Confident DIYer Creating Her Dream Home One Project At A Time“.
Popular Posts


DIY With Christine is a participant in the Amazon Services LLC Associates Program, an affiliate advertising program designed to provide a means for sites to earn advertising fees by advertising and linking to Amazon.com.