*My posts may contain affiliate links, which means I may receive a small commission, at no cost to you, if you make a purchase through a link! Thank you for supporting my website!*
Last updated on September 11th, 2024 at 09:20 am
Tiling Your Own Bathroom – The Easiest Type Of Tile To Install – Palisade/Dumawall Tile
UPDATE: Palisade Waterproof Grout-Free Tiles have replaced Dumawall tiles in the U.S. They are the same product, just simply rebranded, so I will use them interchangeably throughout this article.
Are you looking for a DIY shower tile that will help you upgrade your old bathroom on a budget? You’re in luck because I have JUST the solution for you!
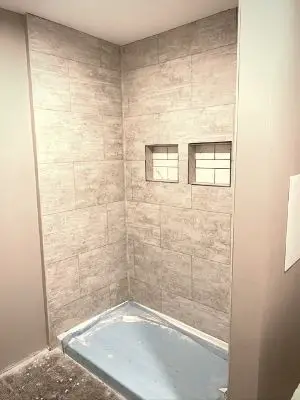
Part of our old house renovation included a fully updated master bathroom. All I can say is I’m in LOVE!!
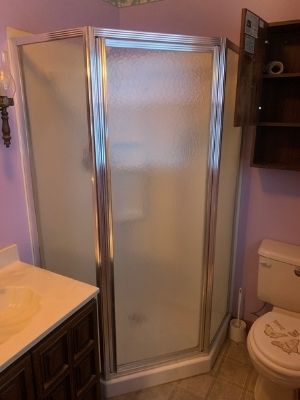
First, let’s all admire the state that this master bathroom was in when we bought the place.
I knew upfront I wanted a tiled from floor to ceiling walk-in shower to make it feel like a spa right in our own home. So I spent some quality time researching every type, color, and pattern of tile out there that would make my dream come to life.
I also wanted to do this #OnABudget because, at the end of the day, we’re trying to make some money, money, moneyyy from this house. The standard white tub surrounds would have been the cheapest, but they weren’t giving me the high-end look I craved so I kept researching.
One day, I wandered across a new tile product called Palisade (Palisade/Dumawall).
Meet Palisade (Previously Known as Dumawall)
Straight from the internet, this is what Palisade is:
“Palisade Waterproof Interlocking Wall Tiles do not require grout and are waterproof, making them ideal for moist environments. They are easily installed with nails or tube adhesive; simply interlock the edges. No special tools or saws are required, eliminating the need for contractors. The engineered rigid core technology provides warmth in a durable tile that is not susceptible to scratching or fading.”
As soon as I saw “does not involve grout and is waterproof” I was hooked. And after doing some math, it was cheaper than actual tiling… and easier? Sign. Me. Up.
Adam, my husband, and I decided Palisade/Dumawall was one of the best groutless DIY shower tiles out there. So we bought & installed that bad boy, and I can’t express how much I love our walk-in shower because of this tile.
However, we quickly found out that this product hasn’t been widely used, so when you search for installation instructions, there’s not much help.
It has been used enough to get fantastic reviews though! Check out the reviews on Amazon here to make your own decision whether this product is a good fit for you or not.
I also wrote a full review of our experience installing and using it for the last 6 months. You can check out my Palisade/Dumawall shower review here and let me know if you have any other questions about it!
I want to help you avoid the struggles and mistakes we had, so you can quickly install this tile and start loving your shower as much as we do!
Let’s dive in!
Quick Navigation On Palisade/Dumawall DIY Shower Tile Installation
- Prepare Your Surface
- Determine Your Pattern
- Install The Inside Corner Trim
- Install (And Level!) Your First Row (Starting In The Center Of The Back Wall)
- Install The Rest Of Your Rows
- Install The J-Trim On The Unfinished Edges
- (Re) Install Shower Fixtures
- Caulk, Caulk, Caulk!
- Final Thoughts
| Level Of Difficulty | Time To Complete |
|---|---|
| Medium | 8-10 hours |
| Material List | Tool List |
|---|---|
| Palisade Tile (in amount and color of your choice – for a 32” x 60” walk-in shower tiled to the ceiling (8 ft), we needed 5 packs of their largest sized tile) | Jigsaw |
| 2 Inside Corner Trim pieces (in matching color) | Circular saw |
| 2 J-Trim pieces (1 more for the top if you don’t tile to the ceiling like we did – in matching color) | Optional: Table Saw (for perfectly straight cuts) |
| Optional: 2 Outside Corner L-trim pieces (only if you install a shadow box/shower niche like we did or you have an outside corner – in matching color) | Optional: Hole saws in various sizes (for clean cuts to stick plumbing through – the jigsaw works just as well) |
| 5 tubes Loctite Power Grab Adhesive | 2 Caulk Guns |
| 5 Tubes Clear DAP Waterproof Caulk | Measuring Tape |
| 2 Tubes White DAP Waterproof Caulk | Contractor Pencil |
| A handful of tile spacers (or something that’s ⅛” thick to slide under the first row) |
Step One: Prepare Your Surface
The first step to installing this DIY shower tile is to prepare your surface. Yes, Palisade/Dumawall can be installed in a new shower renovation or directly over existing tiles!
This makes it the perfect material for your DIY shower renovation. Simple power tools, this easy-to-cut material, glue, and caulk are about all you need to get an elegant, custom-looking shower.
Installing Over Existing Tile
If you’re tiling over existing tile, then you already have a pretty simple installation process. Your current tile is already waterproofing your shower, so all you need to do is clear and clean your work area.
First, remove all the shower fixtures (showerhead, bathtub faucet, handle, and (possibly) shower door). You need to remove these items so the Palisade/Dumawall tile can be installed underneath the fixture faceplates.
The faceplates have two functions; one, they give a finished appearance, and two, they help waterproof where the waterline comes into the shower.
Because of this, you will definitely want to remove them (by cutting the caulk around them and unscrewing them) now.
Plus, this is a great time to replace them because updated shower fixtures are an easy way to give your bathroom a makeover for a cheap price!
Second, clean everything. Once all the shower fixtures are removed, you want to scrub all the soap residue and old caulk off all the walls and around the top of the bathtub or shower base. Removing the old crud will help the new glue and caulk adhere to the old shower tile better.
Alright, that’s all you need to do to prepare your surface!
Installing In A New Shower Renovation
On the other hand, if you are ripping out the old shower and starting over, then you need to make sure your new shower is properly waterproofed.
Yes, Palisade/Dumawall is a waterproof tile, so you’re already in better shape than ceramic tile and grout! However, I’m a firm believer that the more waterproofing things you can implement, the longer your shower will last. Therefore, you will protect your property even longer (which is an awesome future selling point!)
You can follow my complete tutorial on waterproofing shower walls for Palisade/Dumawall tile here. It’s rather simple, but it adds a HUGE amount of protection to your shower!
Step Two: Determine Your Pattern
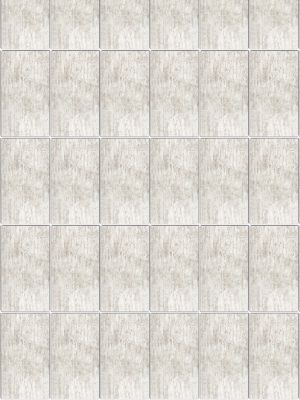
The second step to installing this groutless shower tile idea is to plan out your tile pattern. For Palisade/Dumawall, there are four patterns you can choose to execute.
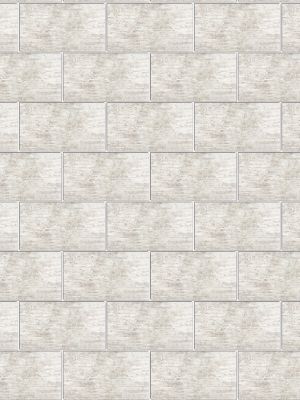
Staggered Horizontal
Staggered horizontal is the closest look to a subway tile pattern. Your tiles will be horizontal and the seams will be staggered at a 33% to 50% offset. This pattern is one of the best ways to avoid waste.
As long as the seams in every other row line up relatively closely, this pattern will look beautiful to the bare eye.
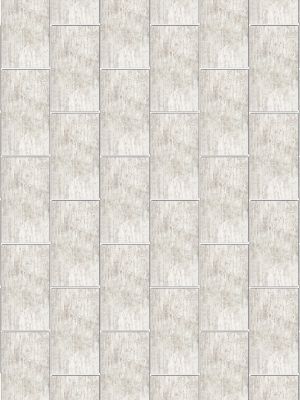
Stacked Horizontal
Stacked horizontal gives a crisp, grid appearance. Your tiles will be horizontal and the seams will be in line from top to bottom and left to right. This pattern is one of the easiest ones to cut because all of the tiles should be the same width all the way up the wall.
However, this pattern can be one of the hardest if your walls are not the same width going all the way up the wall. It’s also more important that the seams line up perfectly from row to row.

Staggered Vertical
Staggered vertical is the same pattern as staggered horizontal, except the tiles are running vertically.
Stacked Vertical
Stacked vertical is the same pattern as stacked horizontal, except the tiles are running vertically.
I chose the staggered horizontal pattern because it is the most popular. So that is the pattern I am going to describe how to calculate in the next section.
How To Calculate Your Cuts
To determine the cuts for your first row of tiles, you need to determine how high you are tiling.
Where To Stop Tile In A Shower
For a more luxurious, high-end look, you should tile all the way up to the ceiling. This is because your shower is the show-stopper of the bathroom. It’s the area that you want your eyes to be drawn to first.
A tub/shower base to ceiling tile enclosure immediately captures your attention and makes your walls (and your room) look taller. And taller walls make your room look larger as a whole.
However, if you can’t or simply don’t want to tile to the ceiling, then there is a recommended height to stop at. You should make your last row of tiles stop either at 6 feet 2 inches OR a couple of inches above the glass enclosure (the shower door). Choose whichever one makes the math work out the simplest.
For my personal preferences, I love the look of a ceiling to floor tiled shower enclosure and the math worked out well.
Calculate The Height Of The First and Last Rows
How To Calculate The Top OR Bottom Row
Measure from the shower/tub base to the ceiling (or your designated stopping point). Take that number and divide it by the width (the shorter dimension) of one Palisade/Dumawall tile. (If you are using a vertical pattern, then take the base to ceiling height and divide it by the height (the longer dimension) of one Palisade/Dumawall tile.)
For example, my base to ceiling measurement is 92.5 inches and the Palisade/Dumawall tile width is 14.75 inches. 92.5 / 14.75 = 6.27. This number gives the number of rows you will need.
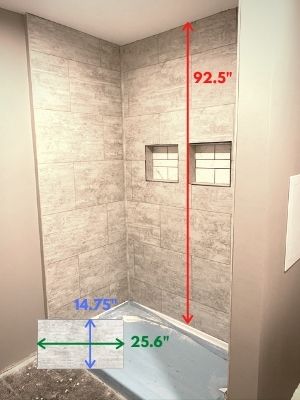
Next, take the remainder (in my case, the 0.27), and multiply it by 14.75. This number gives us the height dimension of the top or bottom row. So, 14.75 x 0.27 = 4 inches.
Usually, it looks better for the small piece to be the starting row.
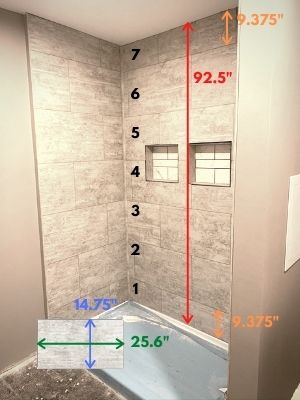
How To Calculate Even Top and Bottom Rows
Or you could do it the way we did it and took off a little from the top and the bottom rows so they would be even. To do this, take the same measurement (92.5 / 14.75 = 6.27), get rid of the remainder (the 0.27) and subtract 1.

This number gives you the number of full rows you will have. In our case, it is 5. Then take the number of full rows times the width of the Palisade/Dumawall tile (5 x 14.75 = 73.75) and subtract that from your base to ceiling measurement. 92.5 – 73.75 = 18.75. That is the remaining space that you have to split evenly between the top and bottom tiles.
Divide 18.75 by 2 (18.75 / 2 = 9.375). This is the height dimension of your top and bottom rows. They’re now even!
Later, we will talk about the tile width measurements.
Step Three: Install The Inside Corner Trim
The third step to installing this DIY groutless shower tile is to install the inside corner trim. Now it’s time to actually start the work!
Take your two inside corner trim pieces and cut them to fit snug between your tub base and stopping point. (I cut mine to fit from base to ceiling.)
That leads me to a question you’re probably wondering. How do you cut Palisade/Dumawall tile?
How To Cut Palisade/Dumawall Groutless DIY Shower Tile
That’s the beauty behind this DIY-friendly product! You can use any standard power tools to cut it. (Fun fact: it’s just made of PVC! That’s how it’s waterproof!)
For example, we cut most of the Palisade/Dumawall tiles using our table saw because we wanted really straight pieces. However, that was only necessary for the bottom of the first row.
For the rest of the cut edges, they are covered by J-trim, L-trim, or your bathroom fixture cover plates. So that means a circular saw or jigsaw would do the trick!
To cut around the bathtub fixtures, we used a hole saw, but a jigsaw could easily do it too!
To cut the inside corners and J-trim, we used our miter saw. (Again, any of the saws would work.)
However, if you use L-trim like we did to frame out our shower niches AND you want mitered corners, the miter saw will NOT be your friend. What should have been the easiest part of this whole project proved to be the toughest. Typical haha!
We probably spent 4 hours trying to figure out how to cut the L-trim without it splitting apart. We ended up clamping it to the corner of a 2×4 and cutting into that with a really fine toothed blade on the miter saw.
I’ve seen other people hold it and use a jigsaw, but that turned out to be more difficult than it looked.
If you don’t need L-trim in your shower makeover, then you’re a lucky duck! You shouldn’t have much trouble cutting any of the other pieces.
Glue The Inside Corner Trim
After your inside corner pieces are cut and dry-fit, use Loctite PowerGrab adhesive to firmly secure it in place. You might have to hold it there for a few seconds, but Loctite grabs and holds rather quickly.
Make sure they sit all the way back into the corner. If you have to cheat them one way or the other, cheat them towards the outside of the tub so the pieces that go on the right and left walls of the shower look and sit flush with the wall.
The inside back wall will be able to hide a little unevenness if your shower corners aren’t perfectly square.
Once they’re in place, I recommend letting them dry a little bit. That way, you won’t be fighting them the entire time! They won’t take long to get pretty hard.
Step Four: Install (And Level!) Your First Row (Starting In The Center Of The Back Wall)
The fourth step to installing this DIY shower tile is to install the first row of tiles. This step is probably the most crucial to spend some time getting right so the rest of your rows go smoothly.
In fact, this step is so important, I’m going to repeat it again; take the time now to perfectly level out this first row. If this row is level, then all your other rows will be level as well.
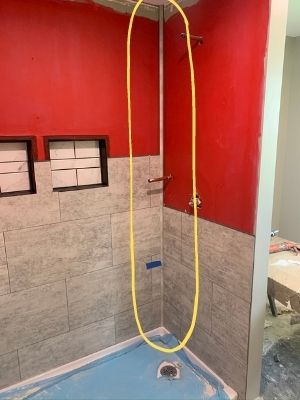
Now, let’s talk about the width measurements. No matter which pattern you go with, start in the center of the back wall making that your first full piece. Then, take your measurement from the edge of the face of that piece to the right inside corner (and also from the face of that piece to the left inside corner).
How To Waste Less Tile
The part that you cut off will be the starting piece on the wall next to it! This will significantly reduce your waste and make your pattern look like it wraps around the wall. Check out the picture below for what I’m referring to.
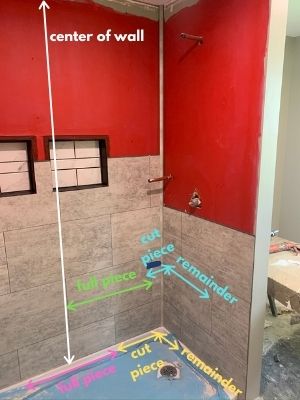
See how the cut piece to the left of the back centerpiece “wraps around” to be the first piece on the left wall? That is how you make sure you always have all the edges that will “click” together and save lots of money from less waste.
Pro Tip #1: Before you start gluing, take your level and mark a line on the wall exactly where you want the top lip to line up. That will help you avoid picking up your level a thousand times. Or you can use this laser level found at Amazon, so you quickly level each row as you go.
Pro Tip #2: Set your first row of tiles 1/16” to ⅛” off the tub base to prevent the tile from “rubbing” against the base and making a squeaking noise. I used little ⅛” tile spacers found at Amazon along the bottom to help hold them up until they dried.
This article also gives a good demonstration of how far to tile past your shower base and how to make sure your tile pieces aren’t too small. (I know it’s for ceramic tile, but Palisade/Dumawall tile dimensions should be calculated the same way.
Time To Glue And Caulk
Now it’s time to set your first row!
- Mark the center of your tile and the center of your wall
- Apply a liberal amount of glue in an “S” pattern to the back of the tile
- Apply clear caulk to all the lips (clickable edges) except the top lip (caulk the top lip once you start the next row to avoid the caulk drying before you get there)
- Line up the top lip with your leveled line on the wall and also line up the centerline on the tile with the centerline on the wall
- Press the tile firmly against the wall
Ta-da! You have your first tile secure! Do the same process for the rest of the first row.
Make sure to apply caulk to each seam before you click them together as this is what also makes the seams waterproof. Trust me, caulk is much EASIER to work with than grout!
Also, when clicking two tiles together, immediately wipe away excess caulk that squishes out with water, so it doesn’t leave a glossy, bumpy residue between each tile.
Pro Tip #3: Use two caulk guns for rapid-fire gluing and caulking action! It will get old quickly if you have to constantly swap out glue and caulk since you need both for every piece.
I love this caulk gun found at Amazon because the rod retracts after each squeeze so caulk doesn’t come gushing out after you’re done and make a mess. Also, the handle and trigger are padded, which is so much friendlier on your hand than unpadded guns! And lastly, you can snip the tip of the caulk right on the gun! Much easier than using a utility knife the old-fashioned way.
Step Five: Install The Rest Of Your Rows
The fifth step to installing this DIY shower tile is to install the rest of the rows. Following the same steps as above, apply glue and caulk to each piece and stick it to the wall.
Pro Tip #4: Always dry-fit (test) all the pieces in one row before gluing and caulking. That Loctite glue sticks and holds FAST, so you won’t want to peel off, cut, and re-stick pieces of tile constantly.
As a general rule of thumb, you always want to start with the center tile on the back wall then finish the rest of the row to the left, then to the right. (Or you can start in the center then go to the right, then to the left. That part’s a personal preference.)
If you chose a staggered pattern, then stagger the first tile of your second row 33% to 50% from your first tile in the first row (and repeat the pattern from those two rows all the way to the top).
If you chose a stacked pattern, then stack the first tile of your second row directly above the first tile of your first row (and repeat the pattern in every row all the way to the top).
Lastly, remember the order; measure, cut, dry-fit, glue, caulk, wipe excess, repeat. You’ve got this!
The Difference Between Ceramic Tile And Palisade/Dumawall
The beauty behind gluing each tile is the fact that you can glue only a few today then stop and pick the project back up tomorrow. When you use mortar and grout, it’s a little harder to stop and pick back up the next day.
Plus, grout and ceramic tile aren’t waterproof themselves. That’s why it’s so important to waterproof them underneath. It’s always important to waterproof under any tile you use in a shower, however this is one of the only tile products that is waterproof itself (because it’s PVC) and has waterproof seams (when they’re caulked).
Step Six: Install The J-Trim On The Unfinished Edges
The sixth step to installing this DIY shower tile is to install the J-Trim (edge pieces). Wow, we are almost done!! Now we just need to finish the tile edges with a gorgeous, clean edge trim!
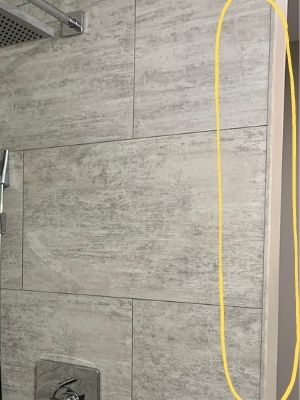
How To Finish DIY Shower Tile Edges
Palisade/Dumawall J-trim is made to beautifully finish the ugly cut edges of the Palisade/Dumawall tile. They come in the same color as the tile just like the inside corners came, so they create a clean finished edge.
Measure the edge you want to cover and cut the J-trim with any of the power tools mentioned above.
Now, this part is a little difficult if you let the glue dry overnight, but not impossible. First, grab a hammer and something kinda soft to tap against (like a small block of 2×4).
Next, slide the top of the J-trim behind the top tile. Then, slowly work your way down tapping against it with the hammer and 2×4 until it slides completely into place.
Finally, use a clear caulk to run completely down the j-trim. You also can try to put caulk inside the J-trim before you slide it on. Some of it will get in it and some of it will get squished out. Ultimately it’s your call. The edges of the shower that have J-trim don’t usually see much water, so use that information as you see fit.
How To Finish An Outside Corner
Now, if you have an outside corner for a shower niche or a window ledge, you need to use L-trim. Just as the name suggests, it’s shaped like an L to fit over 90-degree corners.
Like we talked about above, you can miter your corners to give a fancy finish, but for some reason, this trim is extremely hard to cut that way.
Butt cuts (straight cuts) are a little easier to cut and still give a gorgeous finish to these outside corners.
To apply these, we put the tiniest bit of glue right in the corner of the L-trim. (Not too much so it doesn’t seep out and leave residue. The caulk secures it pretty well anyways.) Then we put caulk on the inside, stuck it to the outside corner, and wiped the excess caulk away with water.
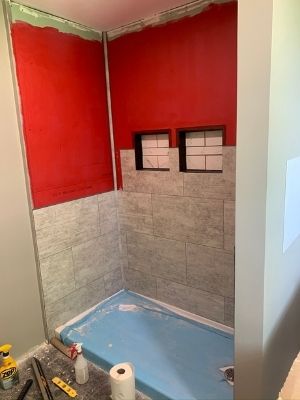
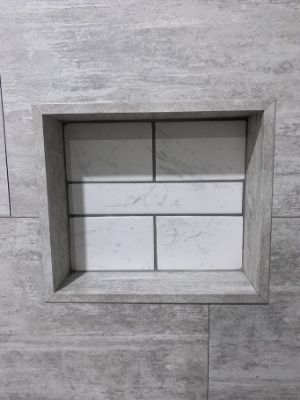
You can also check out my full tutorial on how to install a Palisade/Dumawall shower niche if you really want to level up the elegance of your shower! Ours turned out to be the perfect accent piece to really make this shower a showstopper.
Finally, you can start to see all your hard work come to fruition!
Step Seven: (Re) Install Shower Fixtures
The seventh step to installing this DIY shower tile is to install (or re-install) your shower fixtures! Follow the instructions on how to install. However, in general, you’ll need to apply plumber’s tape and screw on each piece.
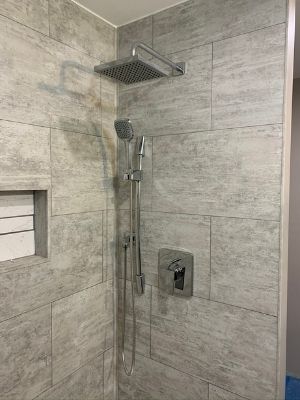
To give our shower a sizzle feature (an extra feature that helps sell your property later), we installed this rain showerhead found at Lowes! Gah, I am in LOVE! It feels like I am at a spa every single time I step into my shower.
Check out my other article to help you decide whether to go with a rain showerhead or regular showerhead.
Step Eight: Caulk, Caulk, Caulk!
The last step to installing this DIY shower tile is to caulk everything. This is your final waterproofing step!
Heads up! Be prepared to go through a lot of paper towels while caulking haha. It’s time to go over all the areas that need a solid layer of caulk, so your new DIY shower tile will last for decades to come.
Use white caulk and apply a layer along the:
- Shower base and first row of tiles
- Ceiling and last row of tiles (if you didn’t use J-trim along the ceiling)
- Shower base and floor
Use clear caulk and apply a layer along the:
- Shower fixtures (except along the bottom – that part needs left uncaulked so water can escape if it gets behind there)
- Shower door (if applicable)
Final Thoughts On How To Easily Install Palisade/Dumawall DIY Shower Tile
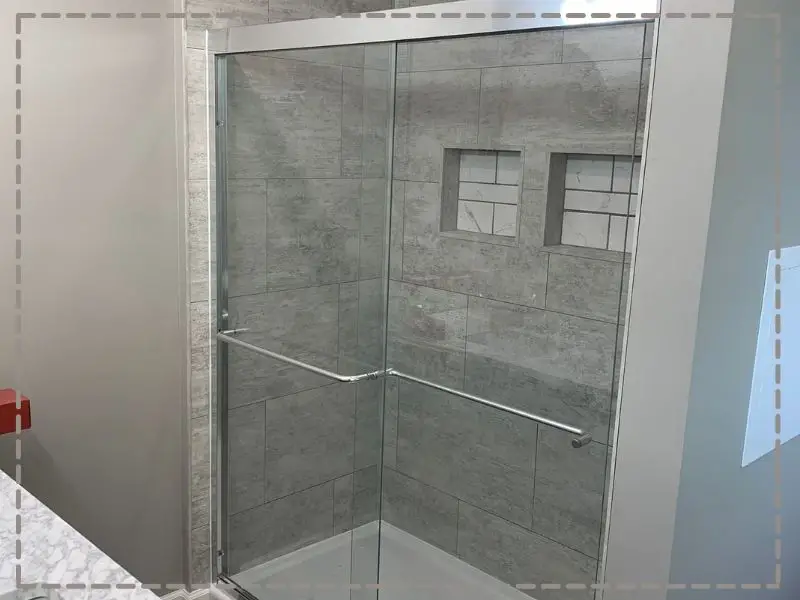
That’s it! You now have a beautiful, custom DIY shower tile in your new bathroom that will surely be the showstopper of the room.
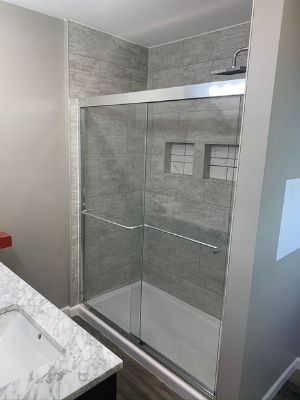
I mean, look at how gorgeous our shower turned out! And again, for those that missed it in our post about how to remodel an old house on a budget to make money, here is what the master bathroom situation looked like before we renovated it.
It looked like a perfect setup for a cute, old lady, but it definitely needed a makeover!
Yes, yes, I agree, This new look it’s got going on is definitely much better! Thank you, Palisade/Dumawall DIY SHOWER TILE!
Before you go, are you looking for other ways to makeover your outdated bathroom on a budget? Check out my post for 10 easy ways to do just that! For less than $300, your bathroom could get the facelift it deserves!
Catch you in my next post!

By Christine
Christine is a blogger and DIYer who tackles home renovation and decorating projects alongside her husband, Adam, for their personal residence and rental properties. Although she successfully tackles large renovation projects to avoid expensive contractor fees and bring her vision to life now, her path to success was not easy.
Go here to read her story, “From a Clueless First-Time Homebuyer To A Confident DIYer Creating Her Dream Home One Project At A Time“.
Popular Posts


DIY With Christine is a participant in the Amazon Services LLC Associates Program, an affiliate advertising program designed to provide a means for sites to earn advertising fees by advertising and linking to Amazon.com.
Comments are closed.