*My posts may contain affiliate links, which means I may receive a small commission, at no cost to you, if you make a purchase through a link! Thank you for supporting my website!*
Last updated on September 11th, 2024 at 09:23 am
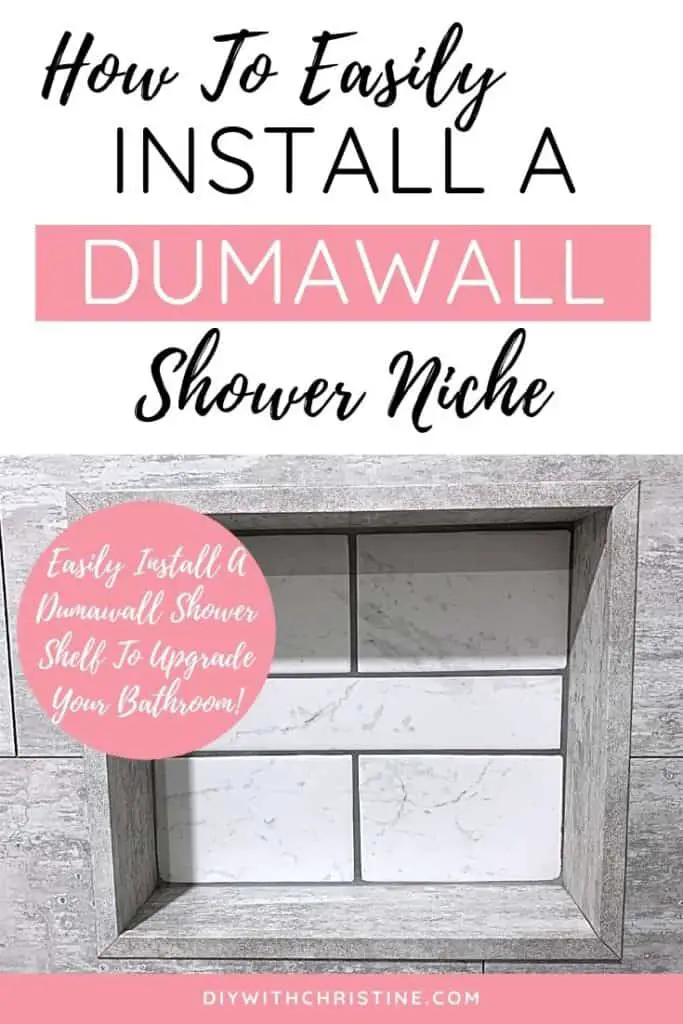
Easily Install A Palisade/Dumawall Shower Shelf To Upgrade Your Bathroom
UPDATE: Palisade Waterproof Grout-Free Tiles have replaced Dumawall tiles in the U.S. They are the same product, just simply rebranded, so I will use them interchangeably throughout this article.
Are you looking for an easy way to install a shower niche along with your Palisade/Dumawall tile installation?
Well then, you’ve come to the right place!
We installed Palisade/Dumawall into our shower and bathtub during our 1950s ranch full-house renovation, and have loved it ever since. To enhance the “custom-feeling” that Palisade/Dumawall tile brings, we also installed a shower niche (also known as a shower shelf) into our bathroom remodel.
I hands-down think the reason our Palisade/Dumawall shower looks so elegant is because of the accent within the shower niches.
So if you’re going to go through all of the extra efforts to re-tile your shower, I highly recommend you take the extra step to install and tile a shower niche as well!
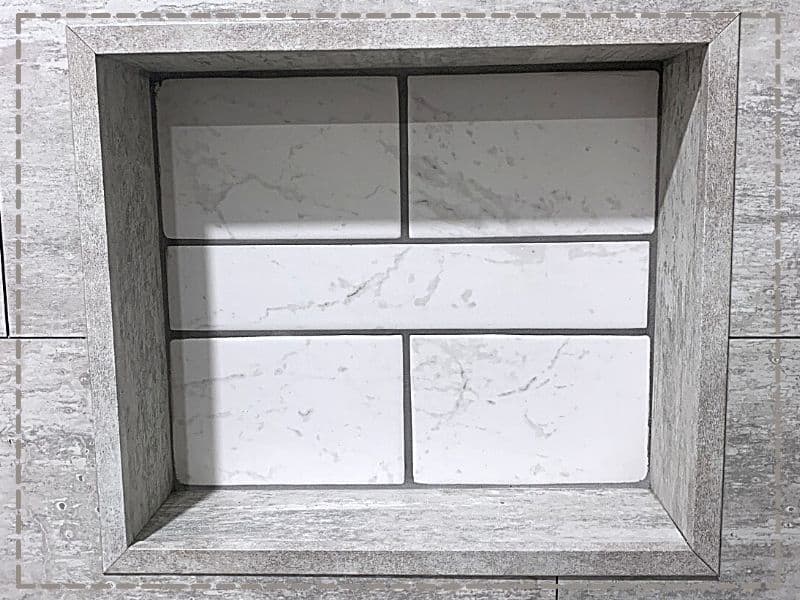
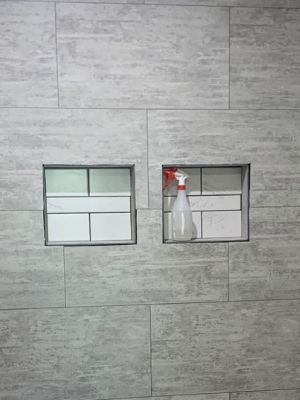
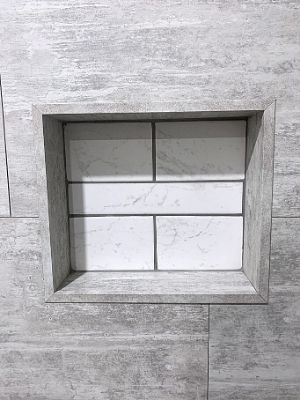
There are two ways you can finish your shower niche – either by using Palisade/Dumawall to tile the entire inside of the shelf or by using traditional ceramic tile to the back wall of the shelf to create an accent piece. (This is the option we chose.)
Regardless of the direction you choose, I’ve covered how to complete both in this tutorial! I think you’ll be extra proud of your new shower after you’ve added this extra element.
Let’s dive in!
P.S. Check out my honest review of our Palisade/Dumawall shower (since we’ve been able to use it for several months now) to see if it’s a good fit for you and your bathroom remodel!
Quick Navigation On How To Install A Palisade/Dumawall Shower Niche
- Screw Shower Niche Into Studs
- Install Backer Board Around Shower Niche & Waterproof
- Install Palisade/Dumawall Tile
- Tile The Inside Of The Shower Niche
- Install Palisade/Dumawall L-Trim On The Outside Corners Of The Shower Niche
- Final Thoughts
| Level Of Difficulty | Time To Complete |
|---|---|
| Medium | 1 hour to install niche 3-4 days to also install backer board, waterproofing, Dumawall tile, and tiling inside of the shower niche |
To Install The Shower Niche Only
| Material List | Tool List |
|---|---|
| Tile Redi Niche Shower Shelf (in whatever shape, size, and quantity you want – linked is the one we chose) | Impact Driver |
| 1-¼” stainless coated #8 screws (to install the shower niche) | Torpedo Level |
| Shims | 4 Foot Level |
| Optional: Plastic Moisture Barrier |
To Tile The Shower Niche With Ceramic Tile
| Material List | Tool List |
|---|---|
| Thinset Mortar (if you want to accent the back of your shower niche with a different pattern of tile as we did – otherwise, you’d install Dumawall inside the shelf) | Small ¼ x ¼ x ¼ trowel |
| Grout (Delorean Gray) | Grout float |
| Ceramic subway tile (in your choice of color and size – subway tile is the most inexpensive tile out there!) | Wet tile saw or score-n-snap tile cutter |
| Grout Boost (to protect the grout from stains) | Sponge |
| Dumawall tile (to cover the sides of the shower niche) | ⅛” tile spacers |
| Dumawall L-Trim (to cover the outside corners of the shower niche) |
To Tile The Shower Niche With Palisade/Dumawall Tile
| Material List | Tool List |
|---|---|
| Dumawall tile (to cover the inside of the shower niche) | 2 Caulk guns |
| L-Trim (to cover the outside corners of the shower niche) | Circular saw or table saw |
| Inside Corner Trim (if you are only using Dumawall tile to cover the inside of the shower niche – otherwise, you’d install ceramic tile inside the shelf and not use this) | |
| Loctite Power Grab Adhesive | |
| 100% silicone caulk (clear) |
Step One: Screw Shower Niche Into Studs
The first step to installing a shower niche while using Palisade/Dumawall is to attach the shelf to studs.
For this step, I’m assuming you’ve already demolished your old shower, and we are starting over from a clean slate. (Otherwise, a shower niche is much harder to install as an after-thought.)
First, determine where you want your shower niche to sit. This will vary greatly based upon the size, shape, and quantity of niches you’re planning to install.
I personally love the look of the horizontal shelves (and I wanted plenty of storage space), so we used this double shower shelf set found at Amazon and turned them horizontal. They actually come as two separate pieces that can be placed as close or as far apart as you desire, which is so nice!
Where To Position Your Shower Shelf
After having installed two of these shelves and used them for over half a year now, I recommend installing them far enough away from the showerhead so that water can’t be directly sprayed into them.
We centered our niches on the back wall of both our shower and tub.
While the niches and tile are waterproofed, and they do have a slight slope to let the water run out, the Palisade/Dumawall L-Trim acts as a tiny trap for water sprayed directly into it.
In our master bathroom, we have a rain showerhead, so water never gets sprayed into the niche in there, and therefore, water has yet to get trapped in there.
However, our guest bathroom has a standard showerhead that occasionally sprays water directly into the niche, thus resulting in a small pool of water sitting in it for a little while.
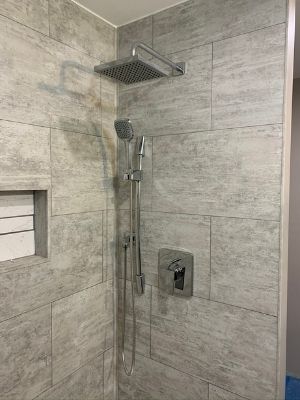
So far, it hasn’t been a problem, especially because we are aware of it, and we try to limit the amount of water that gets sprayed into it.
However, if I were to redo the niche installation, I would either move the niches farther away from the showerhead OR I would just build up a slightly steeper slope within the niche so that water could run out easier.
No need to worry about this too much, I just wanted to warn you of the things I would do differently next time we install this product!
How To Install The Shower Shelf
Alright, now that’s out of the way, all you need to do is set the shower shelf within supporting horizontal studs (add them if they don’t already exist), level the shelf using shims, and screw it into the surrounding studs.
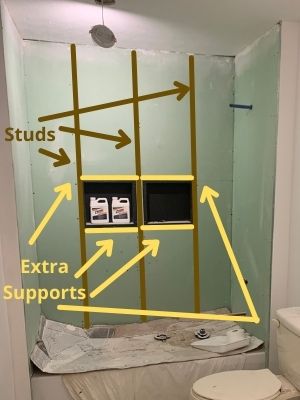
The shower shelf sits within the studs, so make sure it can be screwed into all 4 supporting studs (the left, right, top, and bottom).
Use your torpedo level inside the shelf and your 2 or 4 foot level on top of the two shelves to level them before you screw them into place using 1-¼” stainless coated screws.
If you need to, use shims to further support the bottom and sides of shelves before you screw them into the studs.
This video is a little dated, but it does a good job of showing how to install the niche into studs, caulk it, and add moisture-resistant drywall to the surround.
Installing into wood studs is even easier than what the guy in this video had to do to install into metal studs.

Once you have the shower niches installed, you can move on to the next step!
Step Two: Install Backer Board Around Shower Niche & Waterproof
The next step to installing a shower niche while using Palisade/Dumawall is to install a backer board throughout the shower enclosure.
First though, if your shower or tub is on an exterior wall, I recommend covering the insulation and studs with a plastic moisture barrier before installing whatever backer board you choose.
The moisture barrier will protect your shower from the exterior elements and from condensation forming when your shower gets hot during a cold winter.
(If your enclosure is on an interior wall, however, then you don’t need to worry about this step!)

Check out my other tutorial to decide which type of backer board to use and how to waterproof your shower for Palisade/Dumawall tile, so that you never have to worry about water damage!
Once your backer board is installed and your shower or bathtub enclosure is waterproofed, you can move onto the next step!
Step Three: Install Palisade/Dumawall Tile
The next step to installing a shower niche while using Palisade/Dumawall is to actually install the Palisade/Dumawall tile!
This step is by far the longest in terms of time (much too long for this post), so I wrote a complete guide that will walk you through exactly how you can easily install Palisade/Dumawall tile!
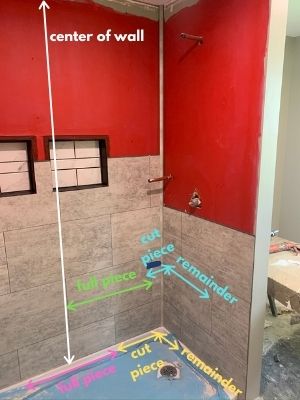
After installing this tile twice, I’ve learned that the most tedious part of the installation process is the actual measuring and planning of the tile layout (not the actual installation).
So I broke down exactly how we measured and calculated the tile design and layout, so that you can save time and easily calculate the cut pieces yourself!
After the tile is installed, we can start focusing on the shower niche again. Next, we get to tile it!
Step Four: Tile The Inside Of The Shower Niche
The next step to installing a shower niche while using Palisade/Dumawall is to tile the inside of the shower niche.
As I mentioned above, there are two ways you can accomplish this step; either through the use of more Palisade/Dumawall tile or the use of traditional ceramic. Both have their pros and cons!
| Tiling With Dumawall | Tiling With Ceramic | |
|---|---|---|
| Pros | No extra tools or materials needed As easy to install as the rest of the shower | Creates a gorgeous accent piece within shower |
| Cons | No accent created | Extra tools and materials needed Little bit more work to install (and messier) |
Either way, it’s time to tile the shower shelves!
How To Tile A Shower Niche Using Palisade/Dumawall Tile
To tile the shower niche using Palisade/Dumawall tile, you would install it the same way you’ve installed the rest of the tile:
- Cut and glue the inside corner trim
- Cut and glue/caulk the Palisade/Dumawall tile to cover the back wall and sides of the shower niche
Yep, it’s that simple! Just glue and caulk exactly as you’ve installed the rest of the vinyl tile.
How To Tile A Shower Niche Using Ceramic Tile
To tile the shower niche using ceramic tile, you need to use mortar and grout.
- Measure and cut the ceramic tile to size
- Mix mortar and apply a thick layer to the back wall of the niche
- Run a ¼ x ¼ trowel through the mortar to create the trowel grooves
- Install tile with ⅛” tile spacers (leave at least ⅛” gap between the niche and tile so that Palisade/Dumawall tiles can slide next to it to finish the sides)
- Once the mortar is dry, break out any excess mortar within the grout lines
- Mix the grout with Grout Boost and use a small grout float to push the grout into the spaces around the tile
- Wipe away the excess grout with a clean, wet sponge
- Cut and glue/caulk the Palisade/Dumawall tile to cover the sides of the shower niche
This is what the shower shelf will look like with ceramic tile installed on the back wall and Palisade/Dumawall tile installed on the sides.
For a more in-depth explanation of installing ceramic tile and applying grout overtop, you can check out this article which does a great job of explaining how to install ceramic tile in a shower niche.
Once the inside of the shower niche is tiled, there’s only one step left to complete!
Step Five: Install Palisade/Dumawall L-Trim On The Outside Corners Of The Shower Niche
The last step to installing a shower niche while using Palisade/Dumawall is to install the L-Trim on the outside corners.
As we planned this project out, we knew we would need some L-Trim to finish out the project, but we couldn’t figure out how to transition from the shower wall into the shower niche easily.
(When we installed this, there were hardly any tutorials out there to help us, so we had to come up with a simple solution ourselves.)
That was when we decided that using Palisade/Dumawall tile for the sides of the shelves would be the easiest because the L-Trim could easily transition that outside corner.
Then, in the back of the niche, we could just install traditional ceramic tile to get that awesome accent piece I really wanted. And where the Palisade/Dumawall tile and ceramic tile met, we could run one last bead of caulk to completely waterproof the area.
So that’s why we decided to use the Palisade/Dumawall tile on the sides instead of continuing the ceramic tile throughout the entire shower box.
Just like the other trims, you can cut L-Trim and caulk/glue it over the outside corners to finish off the edges.
The Trouble With Cutting L-Trim
L-Trim definitely gave us the hardest time while cutting though. Of course, we decided to add one extra layer of customization and mitered the corners of the L-Trim to frame out the shower shelves.
For some reason, the L-Trim kept splintering out as we tried to cut it at a 45 degree angle.
(It took us over 5 hours to figure out how the heck to cut this stuff without breaking it, and we barely had enough left to finish the project. Talk about stressful and frustrating when this stuff costs $45 a piece!)
Finally, after many failed attempts, we figured out that the outside corner needs to be supported as it’s being cut. (Otherwise the force of any power tool just puts too much pressure on it.)
To support it, we took a scrap piece of 2×4 and clamped the L-Trim to the outside corner of the 2×4. That way, when we cut into it, the 2×4 held it in place and kept it from splitting up the middle.
It still isn’t the perfect solution and occasionally, we didn’t clamp it well enough, but it did allow us to finish the project with mitered corners.
I’m sure butt cuts would have been much easier, but I’m stubborn haha!
After all of your L-Trim pieces are cut and dry-fit, use a little bit of glue and caulk along the backside to install them on the outside corners of the shower niches.
Ta-da! Your shower niche installation is complete!
Final Thoughts On Palisade/Dumawall Shower Niche Installation
There you have it! It would have been easier to install Palisade/Dumawall without a shower niche, but our shower now looks more elegant and is more functional because we installed a niche.
So, I would highly recommend adding the small extra expense to your bathroom remodel budget. It might add $200-300 more to the budget, but it will gain you hundreds (if not, thousands) more in the perceived value of your home in the long run.
Plus, how cool would it be to say you installed the custom accent piece all by yourself? Trust me, anyone that sees your newly remodeled bathroom will be impressed.
Catch you in my next post!

By Christine
Christine is a blogger and DIYer who tackles home renovation and decorating projects alongside her husband, Adam, for their personal residence and rental properties. Although she successfully tackles large renovation projects to avoid expensive contractor fees and bring her vision to life now, her path to success was not easy.
Go here to read her story, “From a Clueless First-Time Homebuyer To A Confident DIYer Creating Her Dream Home One Project At A Time“.
Popular Posts


DIY With Christine is a participant in the Amazon Services LLC Associates Program, an affiliate advertising program designed to provide a means for sites to earn advertising fees by advertising and linking to Amazon.com.