*My posts may contain affiliate links, which means I may receive a small commission, at no cost to you, if you make a purchase through a link! Thank you for supporting my website!*
Last updated on September 11th, 2024 at 09:19 am
How To Build A Faux Mantel – An Easy Mantel DIY Project
Are you looking for a budget-friendly way to give your fireplace a makeover, but don’t know where to start? Then this tutorial on a DIY floating mantel is for you!
Part of our 1950s Ranch renovation included replacing the chimney flue, wall stone, hearth, and yes… the mantel.
When we were deciding whether to update the fireplace or not, I researched the cost of mantels. Let me say, my jaw hit the floor when I saw the average price for a PIECE OF WOOD was over $300.
Of course, there were cheaper ones, but they definitely looked cheap. Yeah, not gonna fly when you’re remodeling an old house to make money!
So my DIY brain got to work on a solution. At last, this DIY floating mantel was born! And the best part? It cost us less than $60.00… Plus, now it’s on display in my home for all to admire when they first walk in the door.
And yes, I am very proud of it haha! Follow this detailed tutorial to create your own DIY fireplace mantel and wow the socks off of your own guests!
Let’s dive in!
Quick Navigation: How To Make A DIY Floating Mantel
- Plan Your Dimensions
- Cut & Assemble 2x4s
- Mount 2×4 Support To The Wall
- Cut & Assemble DIY Floating Mantel
- Fill MINIMALLY With Wood Filler & Sand Mantel
- Stain Floating Mantel
- Attach DIY Floating Mantel To 2×4 Support On The Wall
- Final Thoughts
| Level Of Difficulty | Time To Complete |
|---|---|
| Medium | 2 Days |
| Material List | Tool List |
|---|---|
| Stain in your chosen color (I used a custom mixture of Varathane Fast-Dry stain – 50% Early American & 50% Classic Gray mixed in a cup and wiped on) | Miter saw or circular saw |
| Polyurethane in your chosen sheen (I used satin) | Brad Nailer |
| 3 – 2″ x 4″ x 8′ Stud | Tape Measure |
| 2 – 1” x 10” x 8’ Quality Pine | Mechanical Sander |
| 2 – 1” x 6” x 8’ Quality Pine | 2 – Foam Brushes |
| Wood glue | |
| Wood filler | |
| Box of 2-½” screws (drywall or wood screws work) | |
| Box of 1-1/4″ screws (drywall or wood screws) | |
| 1” brad nails |
Step One: Plan Your Dimensions
The first step to creating this DIY fireplace mantel is to plan your dimensions.
The dimensions of your fireplace are subject to your specific home and fireplace, however, there are some industry standards that you can start with to figure out what dimensions are appropriate for your wood mantel.
Industry Standard Dimensions:
- Width of the mantel – the same width as your hearth or a few inches smaller
- Height of mantel – 5-½” – 7-½” tall
- Depth of mantel – 7 – 8” off the wall
- Mounting height above ground – 54” from the floor
- Mounting height above fireplace box – at least 12” above the top of the fireplace box
- TV mounting height above mantel – 7” from the top of the mantel to the bottom of the TV
For a full list of standard dimensions and a tutorial on how to measure for a new fireplace (to ensure you get the perfect fit), check out my tutorial here.
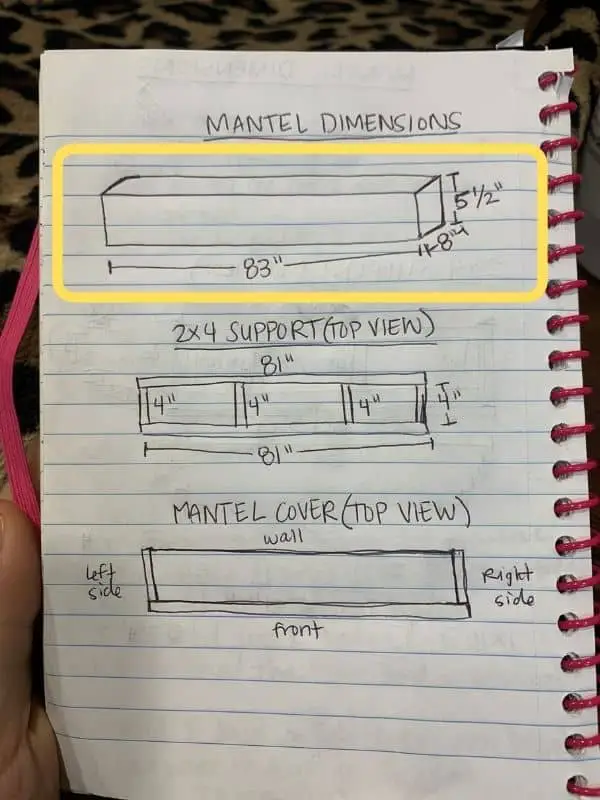
Based on the size of our fireplace hearth, we decided to go with these dimensions:
- Width – 83” (this fit our wall and our hearth the best)
- Height – 5-½” (the width of a 1×6 because I am lazy and didn’t want to cut another board)
- Depth – 8” (a little bit smaller than the width of a 1×10 because I wanted a wider shelf so I could fit decor and a sound bar on it easily)
- Mounting height above ground – 54” from the ground to the bottom of the mantel (we have 8 ft ceilings and we wanted to fit a 55” TV easily above the mantel)
In order to support the mantel on the wall without brackets, you need to build a hidden 2×4 support that the mantel “cover” slides over. That support looks like this.
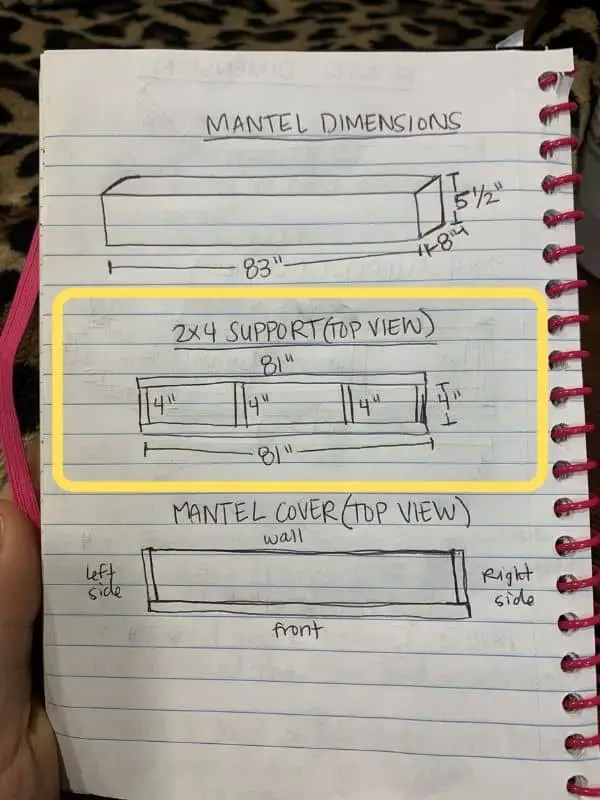
2×4 Support Dimensions
To get the dimensions of the 2×4 support, I had to subtract from the overall dimensions I wanted.
To figure out the width of the 2×4 support, I took the total width (83) minus the thickness of two 1×6 (1-½) minus a ¼” on each side for a little wiggle room (½). The math looks like this: 83 – 1-½ – ½ = 81”
You need two 81” 2x4s for the front and back pieces of the support.
(Optional: I’ve seen a lot of people skip the front support 2×4. That would probably work also. However, I opted to add it because it gave my support more support and was easier to assemble in my opinion. If you want to save a step, then you only need one 81” 2×4 that will get screwed into the wall. Just be sure to adjust all of your other measurements accordingly.)
To figure out the depth of the 2×4 support, I took the total depth (8) minus the thickness of two 2x4s (3) minus the thickness of the 1×6 (¾) minus a ¼” for a little wiggle room. (Trust me, you’ll want the wiggle room in case your wood is bowed which it usually is!) The math looks like this: 8 – 3 – ¾ – ¼ = 4”
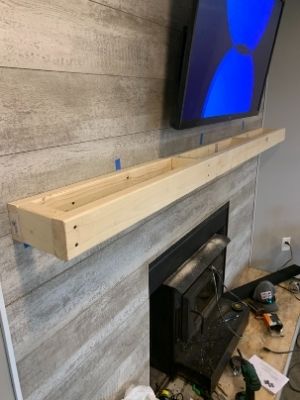
You need four 4” 2x4s for the middle pieces of the support. Here’s my sketch of what I was going for.
DIY Mantel Cover Dimensions
Now, let’s talk about the fireplace mantel “cover” dimensions. You’re going to need 3 pieces from the 1×6 and 2 pieces from the 1x10s.
Note: I’ll give you my dimensions, but I highly recommend you double-check the dimensions with your own project just in case there are some discrepancies. At the end of the day, it won’t matter if the full width and depth of your mantel are an inch or so off from what you wanted.
The only thing that truly matters is that the mantel cover slides over the 2×4 support easily. Otherwise, you’ll have to start over, and nobody’s got time for that! That’s why I recommend ⅛” to ¼” of wiggle room on all sides of the 2×4 support!
- Front board (1×6) – 83” x 5-½”
- Right side/left side boards (1×6) – 7-¼” x 5-½”
- Top/bottom boards (1×10) – 81-½” x 7-¼”
Pro tip: If you have a table saw, you can cut the right and left side pieces from the leftover 1x10s and save money on one 1×6. If you don’t have a table saw, however, then it would be easier to buy another 8 foot 1×6 board.
Later, we will talk about what order these pieces are assembled.
Step Two: Cut & Assemble 2x4s
The next step to creating this DIY floating mantel is to cut and assemble your 2x4s.
Cut your 2x4s using your miter saw or circular saw to the dimensions you calculated in the previous step. The thing that’s most important when cutting these pieces is not necessarily the dimension, but rather that all 4 short pieces are equal lengths and both long pieces are equal lengths.
After you cut each piece, hold it against the first cut piece to make sure they’re the same length.
Yay, now it’s time to assemble! This part will definitely be easier if you have a second set of hands. However, clamps can be helpful too.
First, measure and draw on each long 2×4 where you want your short pieces to go. You’ll want a short piece on each end, but otherwise, the two middle pieces can be spaced out between the rest of the distance.
Measure where you marked each piece on one long 2×4 and mark the same spots on the other long 2×4.
Next, take one short 2×4 and screw it to one long 2×4 making sure they are square to each other. Use your 2-½” screws to screw through the long 2×4 into the top of the short 2×4.
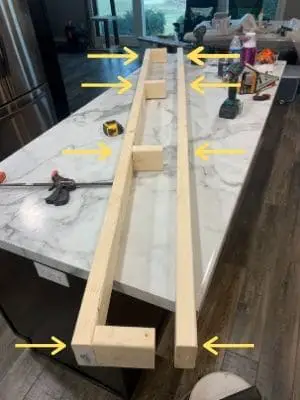
Then, continue to your next mark and screw in the next short piece, and so on.
Once you have all the short pieces screwed into one long 2×4, take the other long 2×4 and screw it into the other side of the short pieces to finish out the support frame.
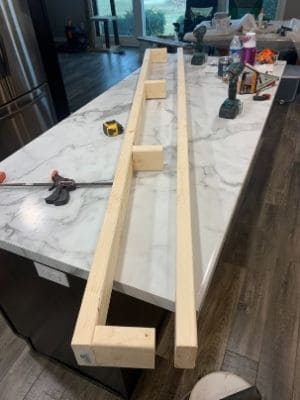
Here’s where you could skip the second 2×4 if you wanted. I chose to add it in there for extra support. You do you!
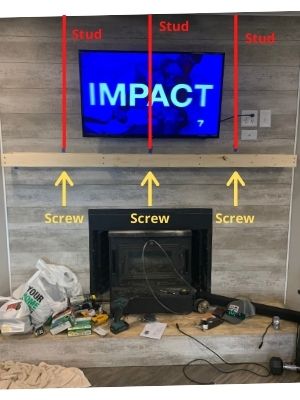
Step Three: Mount 2×4 Support To The Wall
The next step to creating this DIY floating mantel is to mount the 2×4 support to the wall.
How To Install A Fireplace Mantel On Drywall
If you hang your floating mantel on drywall then you have it easy! All you need to do to hang your new fireplace mantel on drywall is to follow these simple steps:
- Use a stud finder to locate at least 2 studs as close to either end as you can get (the longer the mantel, the more preferable it is to find more studs in the middle)
- Mark the height you want the top of the mantel to be on the wall
- Measure ¾” lower than the top mark and make a mark (this is where the top of your 2×4 support will be screwed in
- Mark the center of the wall where you are hanging the mantel
- Mark the center of your 2×4 support
- Hold the 2×4 support up, line up the two center marks, and level it (multiple hands will help here)
- Screw through the 2×4 support into your marked studs using 2-½” drywall screws
Ta-da! Your 2×4 support is now in place.
How To Attach A Floating Mantel To A Stone Fireplace
If you hang your floating mantel on stone, then your work is a little more difficult, but not impossible. All you need to do to is to follow these steps:
- Mark the height you want the top of the mantel to be on the stone
- Measure ¾” lower than the top mark and make a mark (this is where the top of your 2×4 support will be screwed in
- Mark the center of the wall where you are hanging the mantel
- Mark the center of your 2×4 support
- Hold the 2×4 support up, line up the two center marks, and level it (multiple hands will help here)
- Find 3 spots close to either end where the 2×4 support is crossing over a mortar joint and mark them on your 2×4 support.
- Drill holes into the 2×4 support where you marked your 3 spots (using the appropriate size drillbit for a wedge anchor
- Optional: If the stone is making the support sit unevenly, cut out a divot into the back of the 2×4 support to let the stone sit into it a little better
- Hold up your 2×4 support again and drill into the stone through the 3 holes lining up with the mortar joints using a masonry drill bit.
- Tap in your wedge anchor
I get that this is a little more technical, so here is a fantastic video that will walk you through how to attach your floating mantel to a stone fireplace.
Woohoo! Once you have your 2×4 support mounted, we can start assembling the fireplace mantel cover!
Step Four: Cut & Assemble DIY Floating Mantel “Cover”
The next step to creating this DIY fireplace mantel is to cut and assemble the mantel cover.
Double Check Your Dimensions
First off, let’s discuss the order that these pieces will be assembled (which will help you make your calculations better). Here is a drawing of the top view of the mantel cover:
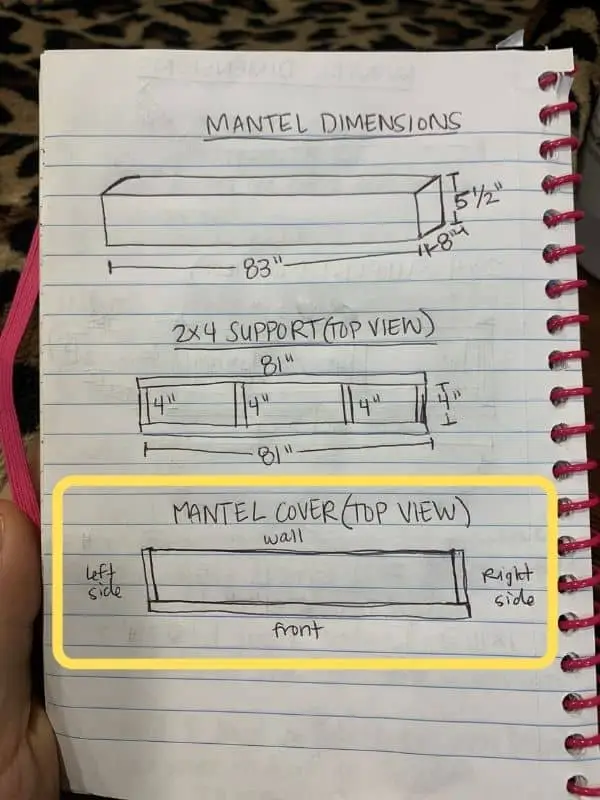
You want to assemble the left, right, top, and bottom pieces first. Then you want to secure the front piece (the showpiece) on last. The whole idea behind assembling it in this order is so the least amount of seams can be seen from the front.
If you look at the picture above, you can see:
- The left and right pieces are fully covering the ends of the top and bottom pieces. (those seams will be hidden on the top and bottom)
- The front piece is fully covering the left, right, top and bottom pieces. (those seams will be hidden on the top and bottom, and slightly visible on the left and right)
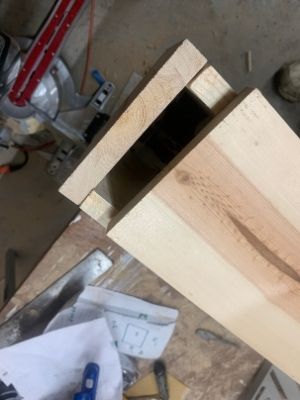
Here’s another visual of how to assemble the mantel cover.
Now that you have the assembly order down, double-check that your dimensions are still accurate. (Unless you are using my dimensions, then you can move on.)
Cut All DIY Mantel Cover Pieces
Second, cut all pieces (top, bottom, left, right, front) dry-fitting them together as you go.
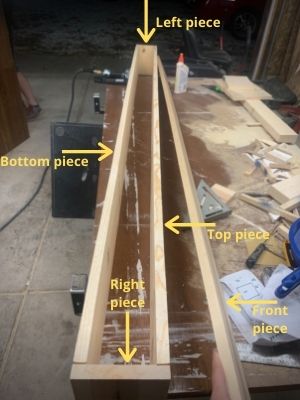
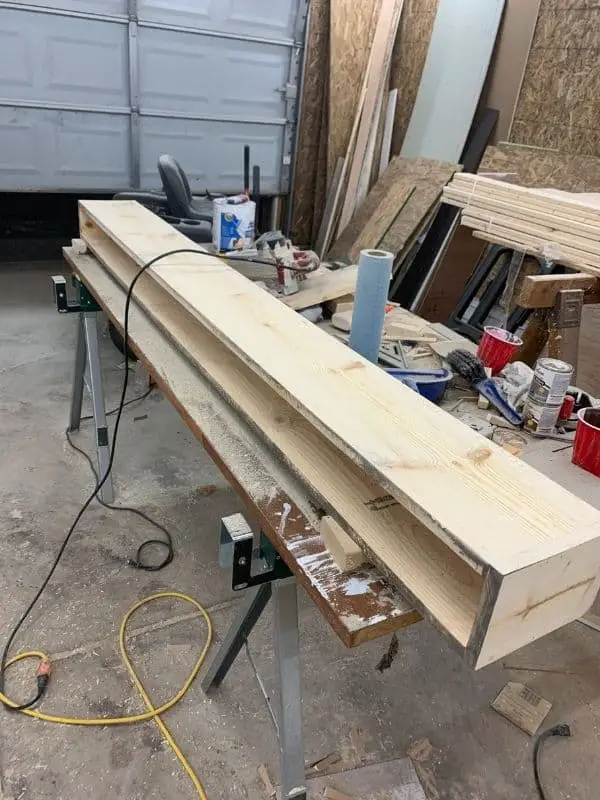
Assemble Floating Mantel Cover Pieces
Third, assemble the pieces together. Using wood glue found at Amazon and your brad nailer (or a hammer and nails), apply a thin layer of wood glue to the end of the top piece and attach one of the side pieces to it.
Note: You might have an issue with your brad nails bending and shooting out into the outside of your mantel cover. If this happens, remove the brad nails and attempt to angle the gun so the nails are more likely to bend into the inside of the cover.
Try to make the edges of the boards as flush with each other as possible to avoid excessive sanding later.
Continue until the top, bottom, left, and right pieces are assembled. Then use wood glue and brad nails to attach the front piece. As I will further explain in the next section, brad nails are hard to cover and the front is your “showpiece”, so use them sparingly here.
Likely, the top and bottom pieces will be bowed slightly, so the edges of the front piece won’t line up perfectly with the edges of the top and bottom pieces. To minimize this, start on one end, attach the front piece, then slide down a bit, pulling the top piece out to line up with the front piece before nailing.
Do the same with the bottom piece before nailing. Then continue sliding down the board and pulling out the top and bottom pieces before nailing. It still probably won’t be perfect, but it will be significantly easier to sand later.
Check That The Mantel Cover Fits Over The 2×4 Support
Lastly, check to see if the cover will easily fit over your 2×4 support!! No sense in going through all the sanding and staining if it won’t fit.
If yours slides over easily, then you’re good to move on! However, if you can’t slide the cover on, you might want to adjust the assembly of your cover or shave off the inside of the cover to make it fit.
Or worst-case scenario, start over with new, bigger dimensions and rebuild. No matter what happens, it’s better to fix those problems before you make the mantel cover beautiful!
Step Five: Fill MINIMALLY With Wood Filler & Sand Mantel
The next step to creating this DIY floating mantel is to wood fill (minimally!) and sand, sand, sand!
Now, I have to stop you here and put this SUPER IMPORTANT WARNING here, so you don’t make the same mistake I did. (And yes, it was a big, time-wasting/almost project ruining mistake I made!)
Wood filler is “stainable” but it does not stain the same as the rest of the wood. So make sure you read my article here to avoid this mistake before you apply wood filler.
Before you sand, make sure to go around and tap in any brad nails that might be sticking out. If you are staining your mantel as dark as mine or darker, then I wouldn’t worry about filling in the brad nails because you are never going to see them.
However, if you are staining a lighter color, then you might want to sink the brad nails slightly below flush then fill using the options listed above.
To get a clean, factory finish, start with 80 grit sandpaper. Sand the entire thing using a mechanical sander and round the edges for a custom look. Then move on to 120 grit sandpaper and start the process all over. Finally, finish with 220 grit sandpaper and really round out the edges to give it a more realistic look.
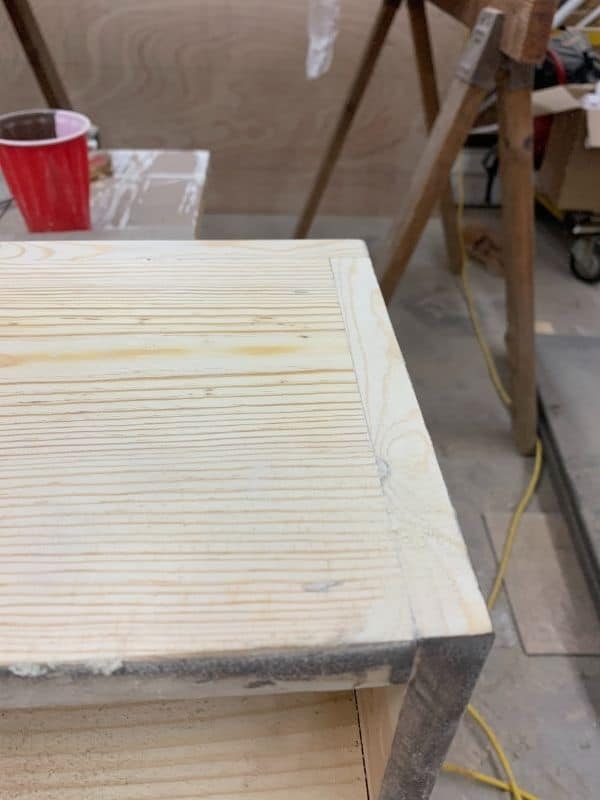
At this point, there’s no such thing as too much sanding. So take the time now to get it as smooth as you want. (If you want a “rustic look” then hit it with the claw on a hammer randomly to create divots and knicks, then barely sand it. I kept mine clean and smooth throughout.)
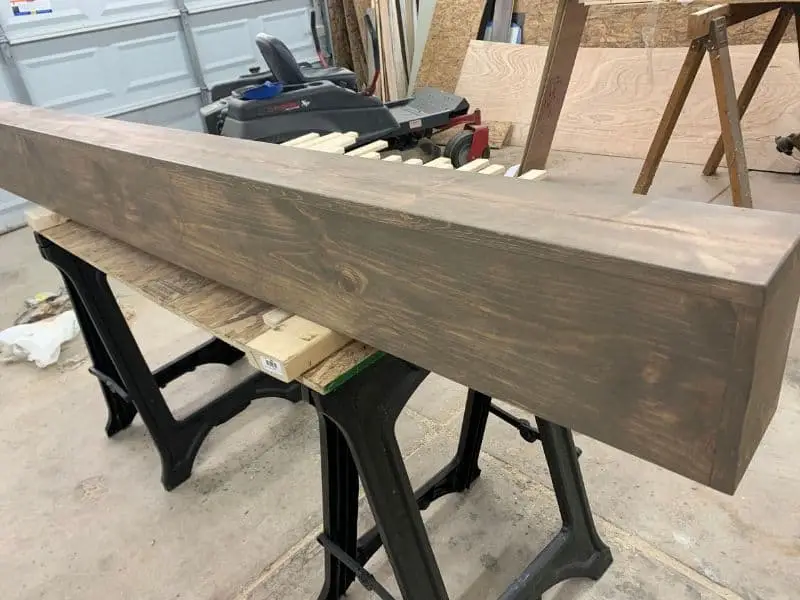
Once your floating mantel cover is sanded to your satisfaction, move on to staining!
Step Six: Stain Your Floating Mantel
The next step to creating this DIY floating mantel is to stain it. This step is super easy if you use any store-bought stain. For some things, there is a store-bought color that I like. For others, I have mixed my own custom color.
Either way, I always test my color on a scrap piece of wood before staining my real project! (Lesson learned the hard way.)
How To Stain The Fireplace Mantel
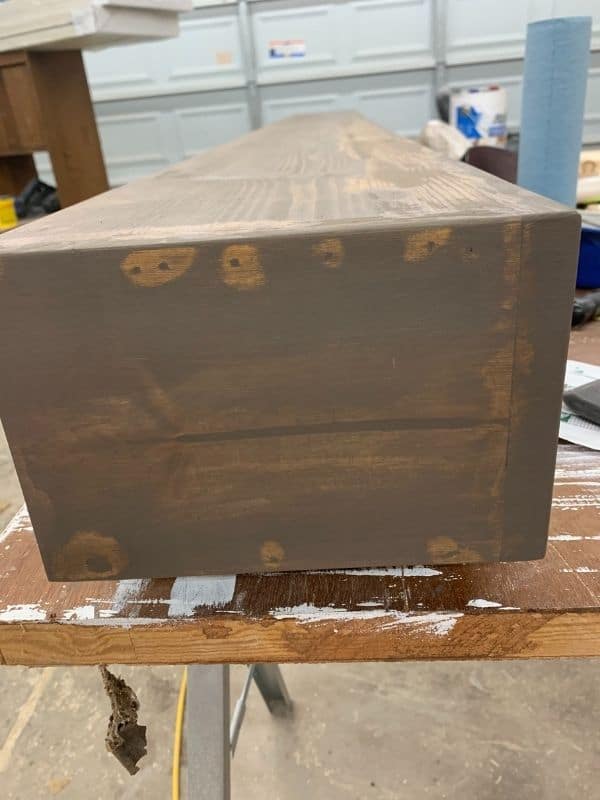
For my custom color, I mixed 50% Early American and 50% Classic Gray Varathane Fast Dry stain. I poured my measurements in a separate cup, stirred them real good, then lightly wiped it on my mantel and immediately wiped it off.
I found if I put too much or let it sit for more than a few seconds, the color was too dark for my liking. (It’s because of how opaque the classic gray is! I wanted to be able to see the wood grain still.)
Do this to your whole mantel cover and let dry per the instructions on the can.
To see some other stain mixing recipes, you can check out my article here! I did a bunch of tests, so you can find the perfect stain color!
How To Apply a Topcoat To The Fireplace Mantel
Once the stain is completely dry, it’s time to put a top coat on to make your mantel extra durable! No sense in going through all this work and skipping out on the part that will make this project last for years.
I used Varathane Oil-Based Polyurethane in Satin because it gave it a polished, but not too shiny, finish!
There are a few nuances about oil-based polyurethane that you need to be aware of before applying your first coat. To see how to get rid of bubbles in your polyurethane and other mistakes to avoid, you can check out my article here.
That way, you’ll know you will achieve the perfect polyurethane finish!

Step Seven: Attach DIY Floating Mantel To 2×4 Support On The Wall
The last step to creating this DIY floating mantel is to attach the mantel cover to the 2×4 support on the wall.
Woohoo! The last step is the easy part! Now you have a secured 2×4 support and a completely finished mantel cover. All that’s left is to slide the cover over the support and secure the cover with screws into the support.
On the top of the cover, screw three or four 1-¼” screws along the back of the wall to secure the cover to the 2×4 support.
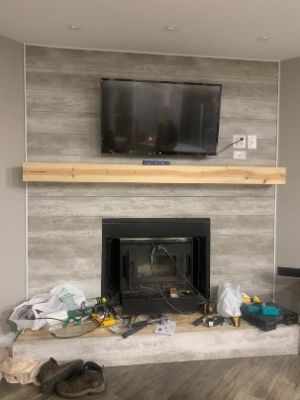
Then step back and admire your work because you just created a beautiful DIY floating mantel for under $60.00!
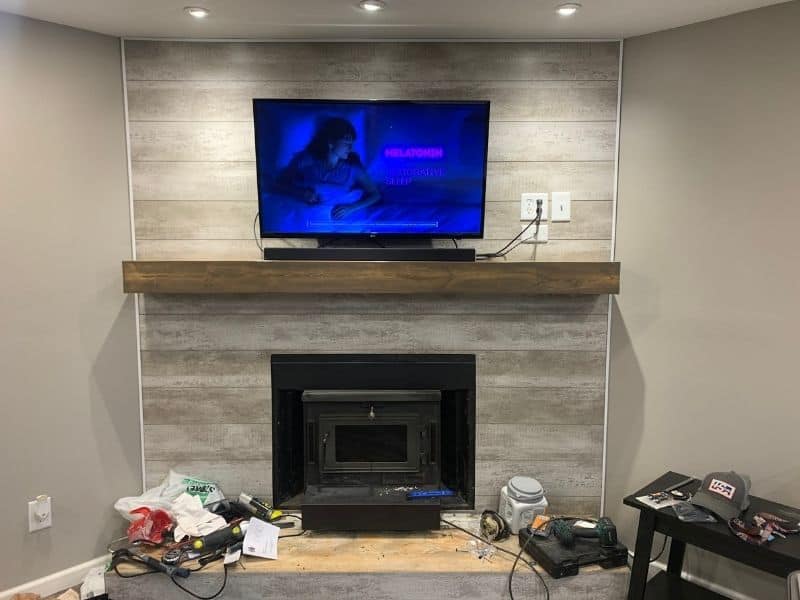
Now that you have a gorgeous mantel above your fireplace, all that’s left is to decorate!
Final Thoughts On How To Make A DIY Floating Mantel
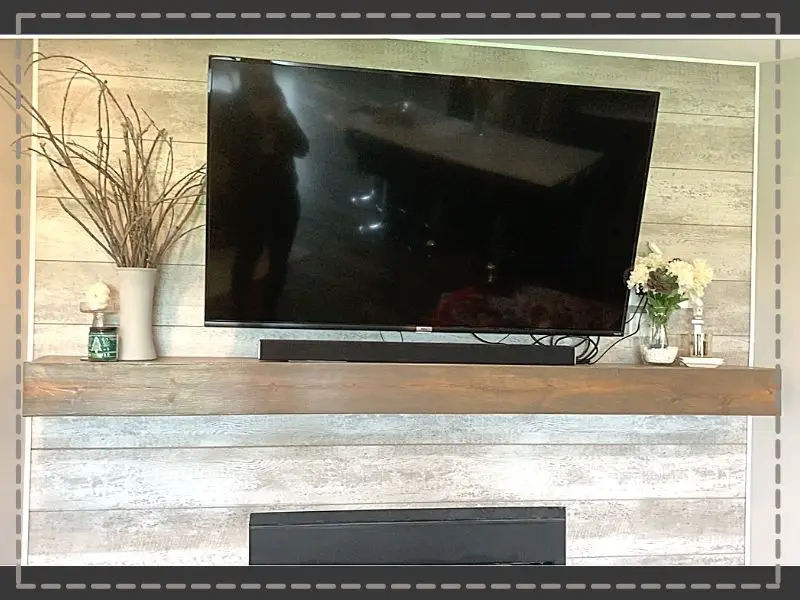
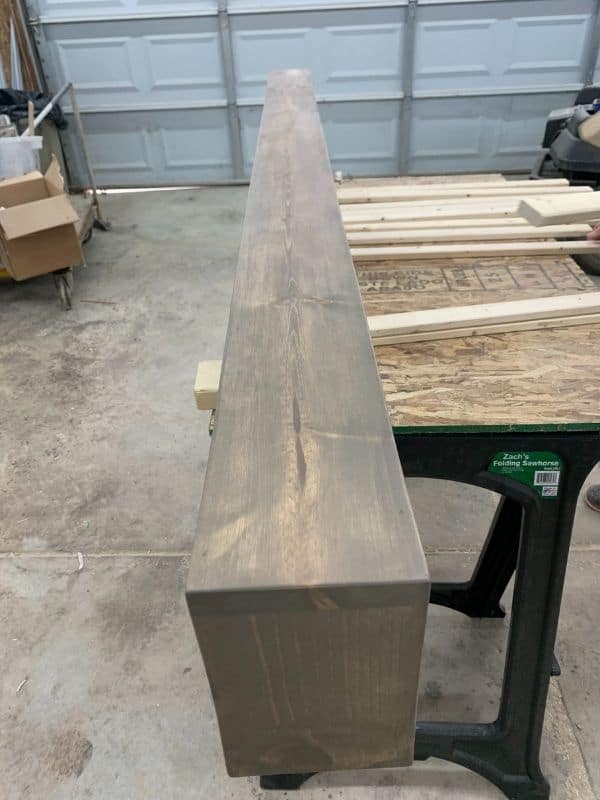
That’s it! You now have a beautiful, custom DIY floating mantel that will surely be the showstopper of the room.
I mean, look at how gorgeous our fireplace mantel turned out! Now, all I have to do is decorate it.
Catch you in my next post!

By Christine
Christine is a blogger and DIYer who tackles home renovation and decorating projects alongside her husband, Adam, for their personal residence and rental properties. Although she successfully tackles large renovation projects to avoid expensive contractor fees and bring her vision to life now, her path to success was not easy.
Go here to read her story, “From a Clueless First-Time Homebuyer To A Confident DIYer Creating Her Dream Home One Project At A Time“.
Popular Posts


DIY With Christine is a participant in the Amazon Services LLC Associates Program, an affiliate advertising program designed to provide a means for sites to earn advertising fees by advertising and linking to Amazon.com.