*My posts may contain affiliate links, which means I may receive a small commission, at no cost to you, if you make a purchase through a link! Thank you for supporting my website!*
Last updated on February 28th, 2024 at 10:54 am
Do you have a stack of wood and don’t know what to do with it? Then this DIY firewood holder tutorial is for you!
This past year, we renovated our 1950s Ranch completely. Part of that renovation included a brand new chimney for our first fireplace!
So that little life upgrade resulted in us needing tons of firewood and a way to store it through the harsh Ohio winters.
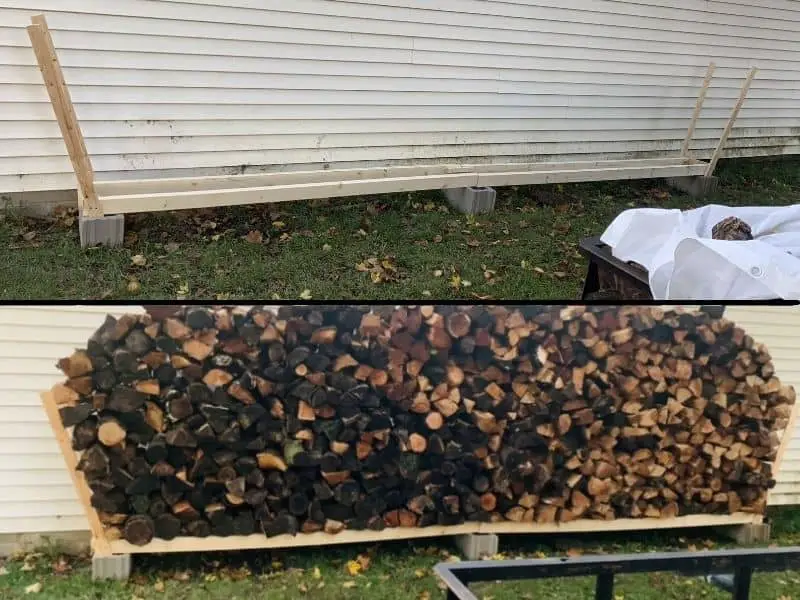
Lo and behold, we built this DIY firewood rack for less than $30, and it took us less than an hour to put together! (The stacking of the wood was a different story though haha!)
This firewood holder is an excellent beginner DIY project to get you used to basic power tools. Use this project as a way to build your skills or as a way to save some major dollar bills!
Let’s dive in!
Quick Navigation: How To Build A DIY Firewood Holder
- Do You Need A Firewood Rack?
- Choose Where To Build Your Firewood Rack
- Level & Place The Cinderblocks
- Cut & Set The 1x3s In Place
- Set The 2x4s In Place
- Secure The Wood Together
- Stack Your Firewood On Your DIY Firewood Holder!
- Final Thoughts
| Level Of Difficulty | Time To Complete |
|---|---|
| Easy | 1 Hour |
| Material List | Tool List | Cut List |
|---|---|---|
| 4 pieces of 2” x 4” x 8’ | Impact Driver | 4 – 8 foot 2x4s |
| 2 pieces of 1” x 3” x 8’ | Miter saw (or circular saw) | 4 – 4 foot 1x3s |
| 1 piece of 1” x 2” x 8’ furring strip (or scrap wood would work here!) | Tape measure | 4 – 8 inch to 12 inch 1x2s (or thin scrap pieces of wood) |
| 2” exterior deck screws | Pencil | |
| 3 cinderblocks |
Do You Need A Firewood Rack?
Before we dive into the tutorial, let’s get something clear. If you plan on storing and burning wood at your house at all (inside or outside), then yes, you do need a firewood rack.
(If you don’t plan on doing that then kudos to you for reading a DIY firewood holder tutorial anyway haha!)
First, a firewood rack helps the seasoning process to occur in wood.
By lifting the cut wood off the ground and stacking it neatly on a rack, you allow air to circulate around and through the wood. This ultimately aids in speeding up the wood seasoning process, so you can have good burning wood faster.
Second, a firewood holder gives you a place to store your wood that’s away from your house. Why would we care about that? Because little critters and pests love to hide away in the wood.
By keeping the wood off the ground and out of your house, you help eliminate many of the pests that would infiltrate your house quicker than you can say “firewood holder”.
Since we’ve determined that a firewood rack is a great thing to have, let’s go over such a simple and cheap way to DIY one yourself!
Step One: Choose Where To Build Your Firewood Rack
The first step to building a simple DIY firewood holder is to choose where to build your firewood holder.
If you’re anything like me, then you’re someone who hates the cold (guilty). And you’re probably thinking about stacking the wood right next to your door, so you can minimize the amount of time you have to stay outside.
Believe me, I remember years of stacking wood REALLY FAR away from the house while I was growing up and always wondering why the heck would anyone want to walk this far to get more wood for the fire?
(Can you tell that I rarely volunteered – and still don’t volunteer – to get wood from the firewood rack? Haha! Luckily, my husband doesn’t mind tending to the fire to keep me toasty during the cold winter months!)
Well, I would like to shy you away from stacking your firewood next to your house for a couple of reasons.
Is It Okay To Stack Firewood Next To A House?
I, and most other people, would recommend not stacking firewood next to a house because firewood attracts all sorts of critters.
Bugs, mice, and any other tiny pest you can imagine will hitch a ride in the firewood and crawl their way out as soon as they make it inside your warm house.
In fact, just yesterday we had a fire and one of my cats found (at different times throughout the night) a stink bug, a spider, and a half hibernated bee… and yes, they all came from the tiny stack of firewood that we just carried in for the night.
So, just based on that, you wouldn’t want the stack to be too close to your door. Then you’d be inviting all of those critters into your warm house every time you open the door.
The other reason is that wood needs plenty of air circulation to properly dry out and season. So stacking the wood a foot or so away from any buildings will help the wood dry out better.
Where To Stack Your Firewood
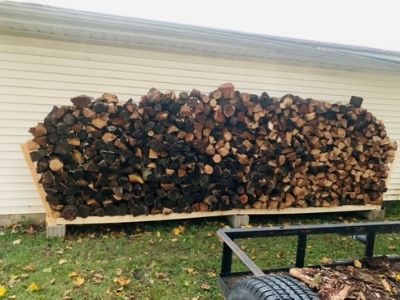
Based on these reasons, we opted to build our DIY firewood holder a foot off the back of the garage. It was away from the house and far enough off the garage to let air flow around it.
Plus, the garage isn’t too far away from the house, so the trek wouldn’t be miserable in the cold (around 30 feet away from our house side door).
Find a place a distance away from your house that is level (ish) and can receive plenty of sunlight and air to help the wood dry faster.
Log Splitters Direct does a great job of explaining the best way to store firewood until you need it.
Once you have your location figured out, you can move on to the next step!
Step Two: Level & Place The Cinderblocks
The next step to building a simple DIY firewood holder is to level and place all three cinderblocks in a row about 7 feet apart.
When we built our DIY firewood holder, we did not level the ground where the cinderblocks were placed. As we’ve gone through winter, the cinderblocks have sunk a little bit. Which caused our entire woodpile to lean.
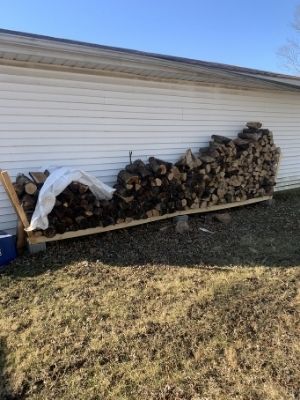
Luckily, we’ve been going through our wood quick enough that (so far) nothing has toppled over. I don’t think it’s going to either because the cinderblocks have finally settled, and we’ve removed a decent amount of the weight as we’ve used the wood.
When you go to build your firewood rack, however, I highly recommend digging up the grass and leveling out the cinderblocks before stacking a ton of weight on it to help it settle more evenly than ours did.
How Deep Should A Firewood Rack Be?
The firewood rack depth should be as wide as the width of a cinderblock. That depth will give plenty of room to stack firewood in a nice and neat row.
That’s why this structure is built off of cinderblocks! They’re sturdy, cheap, and just the depth we need for our DIY firewood holder.
Once you have all three cinderblocks placed in a row and leveled, you can move onto the next step.
Step Three: Cut & Set The 1x3s In Place
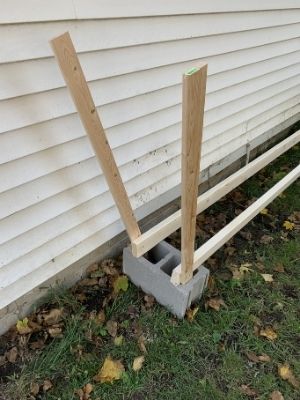
The next step to building a simple DIY firewood holder is to cut both 1x3s in half. The 1x3s will be the supports sticking in the air to hold the sides of the woodpile in place.
Take your tape measure and pencil and make a mark at 4 feet on each 1×3. Then use your miter saw or circular saw to cut the two pieces in half. Now you have four 4 foot pieces of 1x3s!
Take the cut 1x3s and set one in each hole of the cinderblocks on each end (the first block and the last block, but not the middle block).
Don’t worry if they don’t want to stay in place just yet. We will be securing them into place soon!
Once all four 1x3s are set in place, it’s time to move on to the next step!
Step Four: Set The 2x4s In Place
The next step to building a simple DIY firewood holder is to set all four 2x4s in place.
The 2x4s will be the bottom supports of the entire firewood holder. Two of them will make one side of the holder.
No need to cut them or anything. Just place one that bridges across the first and middle cinderblocks and another one that touches the first 2×4 and bridges across the middle and last cinderblocks.
Make sure to move that first row to one side of the cinderblocks and press it against the inside of the 1x3s that are sticking up on that side.
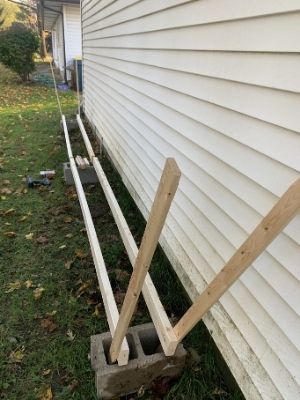
Then do the same thing for the other side of the holder. The entire DIY firewood holder will be 16 feet long by 2 ft wide by 4 feet tall, which holds about one cord of wood!
So far, we’ve found that one cord of wood is a great amount of wood for us to make it through an Ohio winter. We have 3-4 fires a week, mostly starting after work (when my husband gets home bc he’s the fire maker hehe).
Once you have the 2x4s in place, you can move onto the next step.
Step Five: Secure The Wood Together
The next step to building a simple DIY firewood holder is to secure the 1x3s to the 2x4s. Of course, securing the wood together isn’t necessary because the weight of the firewood will hold everything in place.
But until you get the first two rows of firewood stacked, you might be fighting the supports if you don’t secure them together first.
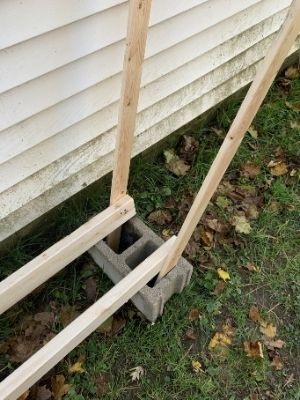
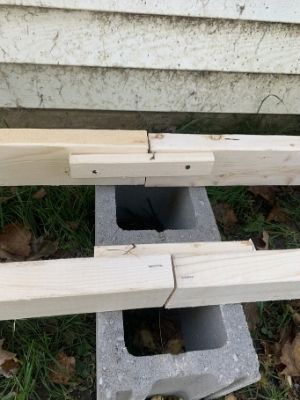
So we opted to tie them together to make our lives a little easier. We just used some 2-inch exterior decking screws to screw the 1x3s into the 2x4s.
We also used some scrap wood we had (1×2 furring strips to be exact), to hold the ends of 2x4s apart. We just screwed that scrap wood into the ends of the 2x4s using the same screws.
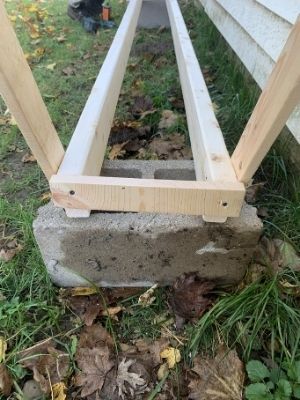
And lastly, we used more scrap wood and the same screws to support the middle of the firewood holder where the two 2x4s meet. This little piece of scrap wood kept the 2x4s from being able to separate in the middle as we stacked wood.
The extra supports might have been overkill, but we had the extra wood lying around anyways, so we thought we might as well make our lives easier haha!
Now that your DIY firewood holder is built, you can move onto the last step!
Step Six: Stack Your Firewood On Your DIY Firewood Holder!
The last step to building a simple DIY firewood holder is to actually stack your wood! The best way to stack the wood is to stack it as evenly across the firewood rack as possible.
That will help it from sinking into the ground unevenly and will make it more stable and strong. Also, don’t stack the wood too tightly. As mentioned before, leaving gaps around the wood lets air flow through and helps the seasoning process.
Should You Cover Firewood With A Tarp?
To protect the firewood from rain, it’s a great idea to cover firewood with a tarp. However, the tarp should only cover the top row of the wood.
That way, the water can drain off of the wood and air can still flow through the pile to continue the drying out process.
If you don’t have a tarp, then firewood can get rained on, however, it makes the seasoning process take longer. And if it rains or snows when you want to use your firewood, you might struggle to start a fire and keep it burning hot and well.
How To Start A Fire In A Fireplace
On top of having seasoned wood, if you’re wondering how to start a fire SUPER EASILY in your fireplace (or in a firepit outside), then I highly recommend Fatwood Firestarters found at Amazon.
Fatwood firestarters are harvested from pine trees that have a high concentration of natural resin, so they are chemical-free and make starting a fire a breeze!
(The only time I start a fire instead of my husband is when I can use Fatwood to make my life easier. He has more patience to start a fire whether he uses Fatwood or not, and I just don’t haha!)
If you don’t have any Fatwood firestarters, then this video does a fantastic job of showing you how to easily start a fire in a fireplace.

Final Thoughts On How To Build A Simple DIY Firewood Holder
There you have it! Now you have a simple and cheap DIY firewood holder to hold all of your firewood for the year!
Just a heads up, if you don’t use seasoned wood to build your firewood holder (as we did not), then your rack might only last 2-3 years due to the elements weakening it. But that’s okay because we spent less than $30 to build it!
And you built this bad boy all by yourself in less than an hour! That’s pretty awesome. Use this firewood holder to continue building your DIY skills!
I’ve found that every DIY project I complete gives me more confidence to tackle something even harder and more awesome. You’ll feel the same way as well!
Catch you in my next post!

By Christine
Christine is a blogger and DIYer who tackles home renovation and decorating projects alongside her husband, Adam, for their personal residence and rental properties. Although she successfully tackles large renovation projects to avoid expensive contractor fees and bring her vision to life now, her path to success was not easy.
Go here to read her story, “From a Clueless First-Time Homebuyer To A Confident DIYer Creating Her Dream Home One Project At A Time“.
Popular Posts


DIY With Christine is a participant in the Amazon Services LLC Associates Program, an affiliate advertising program designed to provide a means for sites to earn advertising fees by advertising and linking to Amazon.com.