*My posts may contain affiliate links, which means I may receive a small commission, at no cost to you, if you make a purchase through a link! Thank you for supporting my website!*
Last updated on September 11th, 2024 at 09:15 am
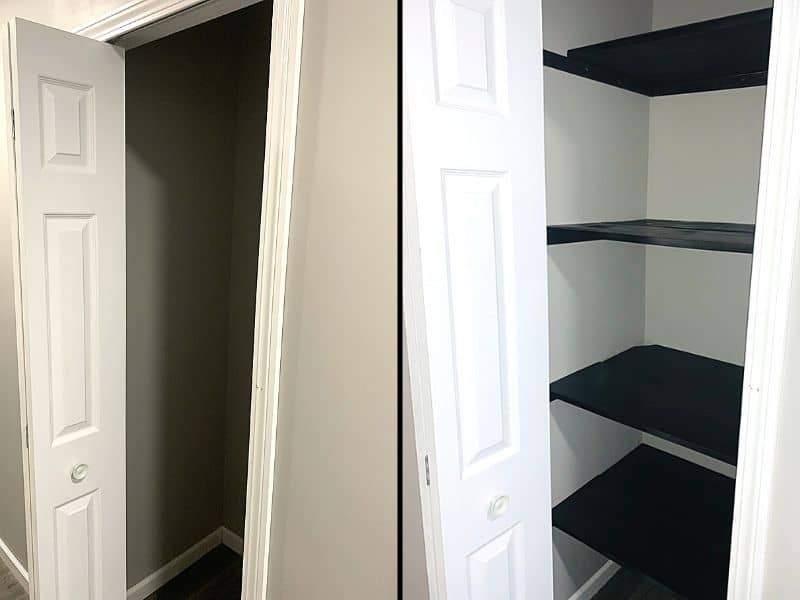
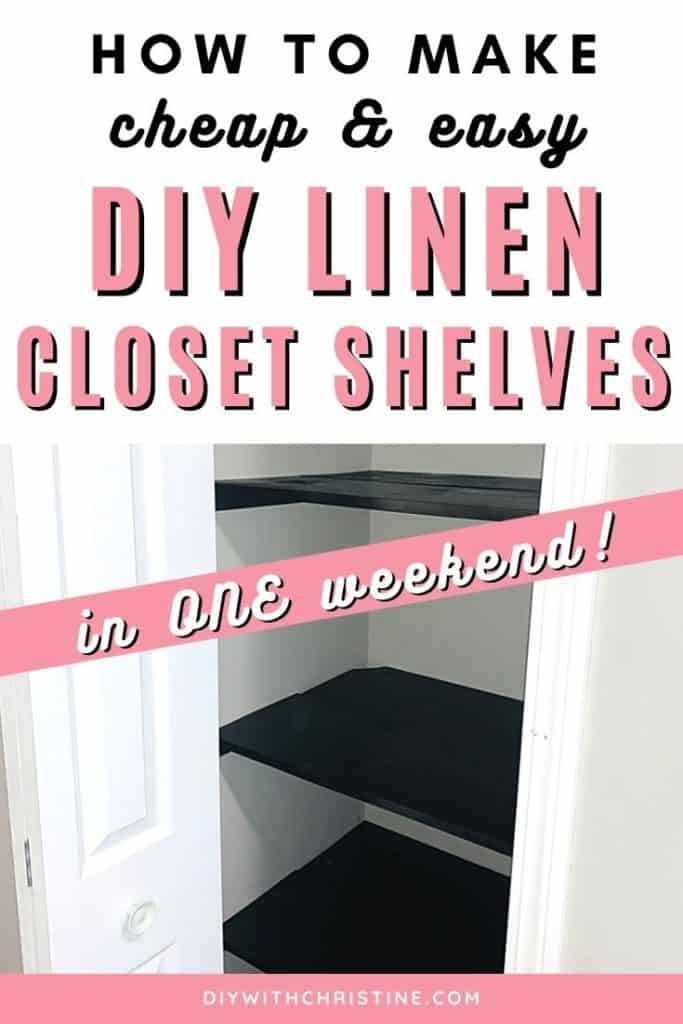
How To Build A Custom DIY Linen Closet For Less Than $60.00!
Are you ready to add some extra storage space to your home? I know I was when I planned to complete these DIY linen closet shelves!
Now, if you’ve ever looked, I’m sure you’ve seen how expensive prefinished shelving can be. Plus, they never seem to have the exact color or sizing you might want for your closet projects.
That’s where this tutorial comes into play! For less than $60.00, you can install all-new, custom closet shelving in your linen closet!
And even better, you can complete the whole project in a single weekend! Heck yes, we love game-changing DIYs that are cheap and easy.
So without further ado, let me show you how you can makeover your linen closet as well!
Let’s dive in!
Quick Navigation: How To Build DIY Linen Closet Shelves
- Measure Your Closet Height, Width, & Depth
- Cut Your DIY Linen Closet Shelves & Supports
- Stain or Paint Your DIY Linen Closet Shelves & Supports
- Apply A Topcoat To Your DIY Linen Closet Shelves
- Install Your Closet Supports (Furring Strips)
- Install Your Closet Shelves
- Organize Your Belongings!
- Other Frequently Asked Questions About DIY Linen Closet Shelves
- Final Thoughts
| Level Of Difficulty | Time To Complete |
|---|---|
| Easy | 3 days – mostly stain & polyurethane dry-time |
| Material List | Tool List |
|---|---|
| 3 pieces of 1” x 12” x 8’ Standard Pine Boards | Impact Driver |
| 4 pieces of 1” x 2” x 8’ Furring Strips | Drill (with various drill bits) |
| 1 quart of stain or paint (I chose Ebony from Varathane) | Miter saw (or circular saw) |
| 1 quart of polyurethane (I chose satin from Varathane) | Mechanical sander (with 80-100 grit sandpaper) |
| 2 foam brushes (for stain & polyurethane) | Tape measure |
| 2-½” drywall screws | Contractor pencil |
| 1-¼” drywall screws | Torpedo level |
| Optional: drywall anchors (if you can’t hit two studs per furring strip shelf support) | 4-foot level |
| Stud finder |
Step One: Measure Your Closet Height, Width, & Depth
The first step to building DIY linen closet shelves is to determine what you are going to store in your linen closet and measure your closet.
To start, think about what you plan on storing in your linen closet. Do you need shelves for towels, sheets, and other cleaning products?
What about shelves for bulky storage containers to help you stay organized? Or is your linen closet big enough to also include a rod to hang clothes up?
After you determine what’s going to go in the closet, it’s time to discuss some standard closet shelf dimensions, so you can build a linen closet that will fit all of those items!
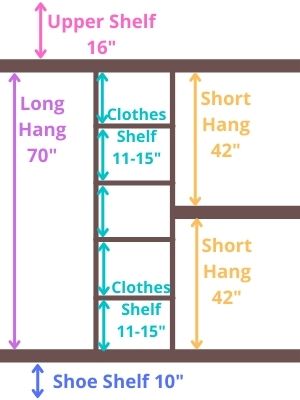
Standard Closet Shelf Dimensions
There are some standard dimensions you’ll want to refer to before making any plans for your linen closet.
Some of those dimensions include:
- Long hang (dresses, long skirts, long coats, pants) – 70 inches tall
- Short hang (shirts, coats, short skirts( – 42 inches tall
- Upper shelf (above top rod) – 16 inches tall
- Shoe shelf – 10 inches tall
- Shelves for clothes/shoes – 11-15 inches deep
- Shelves for bulky storage – 24 inches deep, 20 inches tall
Since my linen closet is small, I only wanted shelves that could hold sheets, towels, organization bins, and any other cleaning products I choose to stuff in there. So that means I need as many shelves as I can fit that are at least 20 inches tall and 24 inches deep.
Keep these standard dimensions in mind as you whip out your tape measure to take some measurements!
Note: If you want to install a closet rod as well, check out my post on how I completed my entryway closet makeover.
It’s a full tutorial on how to install closet shelves with a closet rod to maximize your space! In this tutorial, I’m solely going to focus on DIY closet shelves (no closet rods)!
How To Measure Your Closet For DIY Closet Shelves
Now that you have some standard dimensions in mind, you need to take some measurements. Take your tape measure and measure the height of your closet (from floor to ceiling).
To fit as many shelves that are at least 20 inches tall as possible, take that height measurement and divide by 20 (or whatever height you want your shelves to be).
For my 96-inch closet height measurement, that means I could fit 4.8 rows of shelves (96 inches / 20 inches = 4.8 rows). Since I want all shelves to be at least 20 inches, that means I can only fit 4 rows of shelves in my closet.
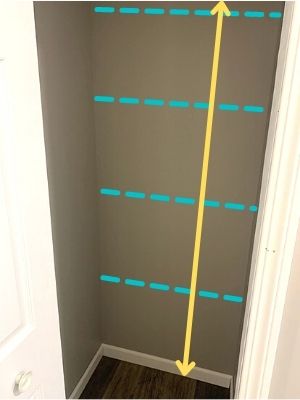
To get the exact distance I need between each shelf to make them equal, just take the height measurement divided by the number of rows we just calculated. (96 inches / 4 rows = 24 inches between each of my 4 rows)
Next, measure the depth of your closet (front to back – on the side walls). A good shelf depth for a linen closet is 24 inches. If your closet is more shallow than 24 inches, just use that dimension to measure and cut the width of your shelves later.
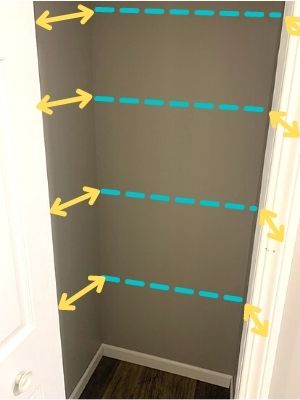
However, if your closet is deeper than 24 inches, then I still recommend running your support strips the entire length so that they definitely hit two studs.
Also, this measurement will be the same measurement you use for the length of your sidewall support strips.
Last, measure the width of your closet (left to right – on the back wall). Take this measurement minus ⅝ inch (the thickness of a furring strip) times 2 (because there will be a furring strip support on each side wall).
For example, if your back wall measurement is 28 inches then subtract 1-¼ inches to get the total length of your back shelf support. (28 inches – (⅝ inches x 2) = 26-¾ inches)
Also, keep the original back wall measurement in mind because that will be the length of your shelves.
DIY Closet Shelf Measurement Recap
Whew! I know that was a lot, so let’s recap the measurements you should have:
- Spacing between each shelf to make them even (from height measurement) – In my example, it is 24 inches
- Furring strip support lengths on sidewalls (from closet depth measurement) – In my example, it is the depth of your closet (so we can screw into two studs).
- Qty to cut: # of rows times 2
- Shelf width (from closet depth measurement) – In my example, it is the depth of your closet (If your closet depth is greater than 12 inches, we will be using 2 1×12 pine boards.)
- Qty to cut: # of rows times 2
- Furring strip support length on the back wall (from closet width measurement) – In my example, it is 26-¾ inches
- Qty to cut: # of rows
- Shelf length (from closet width measurement) – In my example, it is 28 inches
Pro Tip: As you measure, you might find that there is a variation in dimensions as you work your way down the wall. It might be helpful to take the width and depth measurements every 24 inches (or the spacing between shelves measurement), so you get more accurate measurements as your wall changes in size.
If all else fails, just measure and cut one piece at a time, so you can check the fit as you go!
Planning the closet dimensions and calculating the measurements is the most time-consuming step. Once you make it past this, you will be flying through your DIY linen closet shelf build!
Once you have all your measurements, you can move onto the next step.
Step Two: Cut Your DIY Linen Closet Shelves & Supports
The next step to building DIY closet shelves is to cut the shelves and support strips to your measurements.
This step is as simple as it sounds. Take all of your measurements from the previous step and cut your closet shelf supports from the furring strips and the closet shelves from the 1×12 pine boards!
Again, if you’re worried about miscutting, then take it one measurement and one cut at a time. Then test to see how they fit in your closet. I used my miter saw to make all of the cuts for this closet (except the top shelf).
For the top shelf, I made the front shelf half the width of the back shelf, so I could easily put baskets up there and pull them down. To cut this shelf, I used my table saw to cut it in half. A circular saw would work here as well!
Once you get the hang of how the build will go, you’ll get much faster and more confident!

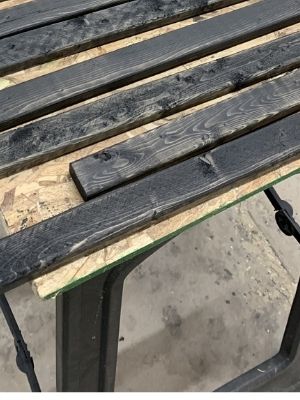
After all of your shelves and support strips are cut, take a mechanical sander with 80-100 grit sandpaper and run over all sides (especially the cut edges) to smooth out the wood and prepare them for stain.
Since closet shelves take a beating over the years, your sanding doesn’t have to be perfect. We are mostly going for smooth edges so no one can get a splinter as they use the new shelves!
After all of the pieces are sanded, you can move onto the next step.
Step Three: Stain or Paint Your DIY Linen Closet Shelves & Supports
The next step to building DIY linen closet shelves is to stain or paint the cut closet shelves and supports.
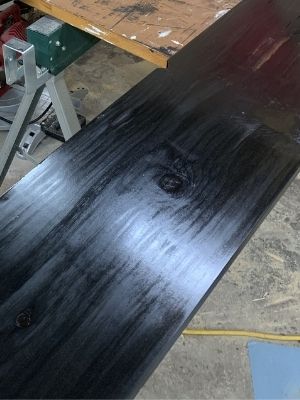
I recommend laying out all of the pieces on a table or some sawhorses so you can mass stain or paint. I chose to stain my closet shelves in Ebony by Varathane Fast-Dry because I love the harsh black on the wood grain next to my gray walls and white trim.
(Also, I had extra from my kitchen island trim makeover, so it only made sense to use that color throughout the rest of my home!)
Use a foam brush and wipe the stain on all sides of the closet shelves and the furring strip supports. If you want a lighter shade, only wipe a small amount on the wood and wipe it off with a clean rag immediately.
However, if you want a deeper color on the wood, wipe a lot of stain on it and let it sit for a few minutes before wiping the excess stain off with a clean rag. For my closet shelves, I let the stain sit for a few minutes before wiping to get that rich black color.
Unlike paint, the stain won’t get messed up if you lay it on the table to stain the other side. So this means you can get a lot of staining done all at once!
Once all of your closet shelves and furring strip supports are stained or painted, you can move onto the next step!
Step Four: Apply A Topcoat To Your DIY Linen Closet Shelves
The next step to building DIY closet shelves is to apply polyurethane to the stained closet shelves.
(If you painted, it’s up to you on whether you want a topcoat or not. Just be sure to choose a topcoat that goes with the type of paint you used. For example, water-based top coats do not like the smooth, glossy surface of oil-based paints.)
For my shelves, I wanted to give them a layer of durability from the everyday wear-and-tear of life. So I used the Varathane oil-based polyurethane in a satin finish.
I used one of my foam brushes to apply three coats of polyurethane to my shelves. I didn’t bother adding a topcoat to the furring strip supports because honestly, they’ll never be seen and they’ll rarely be touched.
By only focusing on the shelves (which were time consuming enough), I saved a ton of time! And no, you cannot tell that I skipped the topcoat on the supports. That’s a win-win in my book haha!
To avoid some pretty common polyurethane mistakes (such as the dreaded bubbles in your finish), check out my post on how to fix and prevent bubbles in polyurethane. I promise it will save you so much time, and you’ll get an awesome finish on your top coat!
Follow the directions on the can, and give your topcoat the proper dry-time so your finish stays nice and neat.
After all of your shelves have a dried topcoat, it’s time to move onto the next step!
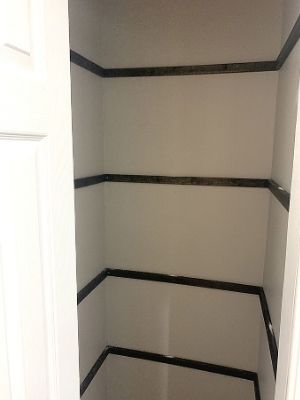
Step Five: Install Your Closet Supports (Furring Strips)
The next step to building DIY linen closet shelves is to install the closet support strips on the wall.
At this point, we’ve done most of the hard work. All that’s left is to install the cut pieces!
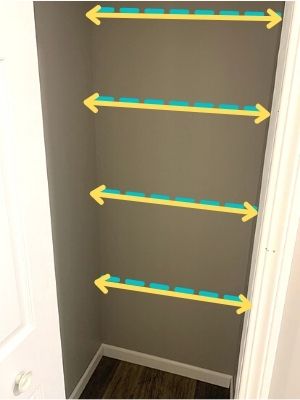
First, take your tape measure and starting from the floor, mark every spot where a shelf is going to go. For our example, we planned on having 4 shelves spaced out 24 inches.
So every 24 inches, make a mark. That is roughly where you want the center of your shelf to sit. Also take a stud finder and mark off all the studs on all three walls.
Now, take your first shelf support strip for the left wall, hold it against the wall about ⅜” below the first mark on the wall (so a ¾” shelf will sit in the middle of the mark), and level the strip with a torpedo level.
Once the strip is leveled, drill a hole into the support strip where a stud is. Make sure to stop short of the drywall so the screw has enough things to grip onto when it is installed next. Then switch to your impact driver and screw a 2-½ inch screw into the stud.
How To Attach Shelves To A Closet Wall
These furring strips are going to be the supports that the actual shelves sit on. So they need to be able to hold some weight.
Because of this, I recommend screwing into every stud that the support strip bridges across. Then you can be sure your shelves will hold some weight! As a minimum, you want to screw into at least two studs (or if that’s not possible, then 1 stud and 1 set of heavy-duty drywall anchors).
Furring strips are pretty flimsy, so if you don’t pre-drill your holes, you run the risk of them cracking right up the middle and becoming useless.
That’s why I recommend using a drill and an impact driver. Then you can just leave the drill bit on the drill and a bit for the screws on the impact driver to work quickly and efficiently!
After the left side shelf support strip is installed, move onto the back wall support strip. It is installed the same way as above, except you want to use a 4-foot level to level the back strip with the side strip.
Then again, pre-drill, and screw into the studs to hold the support strip. And lastly, install the right side support strip the same way. There! You have one row of support strips done!
Continue to install all of the support strips the same way for the other rows. Once all furring strip supports are installed into studs in the closet, you can move onto the next step.
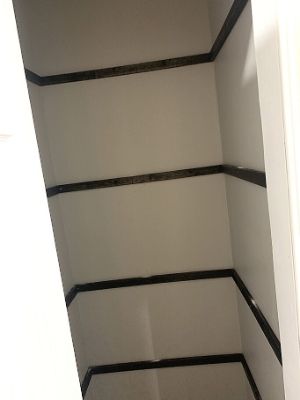
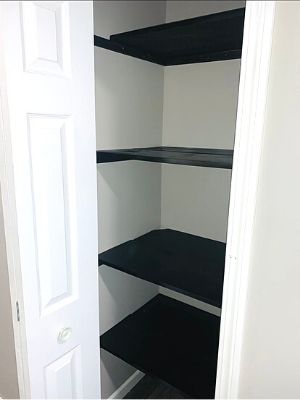
Step Six: Install Your DIY Closet Shelves
The next step to building DIY closet shelves is to install the closet shelves on the support strips. We are in the homestretch! Take two of your finished shelves and place them on the first row of supports.
Using your drill, again predrill holes into the four corners of each shelf and screw 1-¼” drywall screws into them to secure them to the shelf support strips.
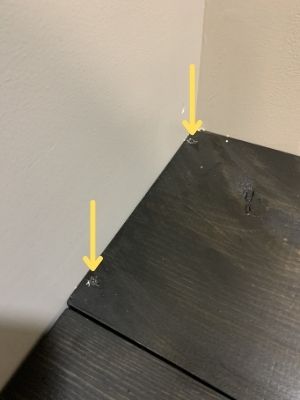
Continue to do this for each shelf. This step secures the shelf down and takes out any wobble or unevenness in the boards!
Note: Don’t forget that you cut one of the shelves shorter for the top shelf to make it easier to store things up top. Make sure that the shorter shelf gets placed in the back on the top row to hide that it’s a different size!
Once all of your shelves are installed, you can move onto the final step of building DIY linen closet shelves!
Step Seven: Organize Your Belongings!
The last step to building DIY linen closet shelves is to organize your belongings in your new closet!
You worked so hard to build this beautiful linen closet with awesome storage shelves, so make sure your items find their home in a neat and organized way!
This video does a fantastic job of showing some creative ways to easily organize your linen closet!

Also, the book The Life-Changing Magic Of Tidying Up by Marie Kondo changed the way I look at the items I own and store forever. No longer do I keep stuff “just because” and feel overwhelmed by the clutter. If you haven’t read it yet, then I highly recommend you check it out!
If you spend the time to purge and organize your stuff now, you’ll save yourself so much time in the future. Plus, you’ll get excited every time you open the door to your new linen closet because YOU built it yourself.
Right on, my friend!
Other Frequently Asked Questions About DIY Linen Closet Shelves
What is the cheapest wood for shelves?
Standard pine boards are the cheapest wood for shelves. 12 inch wide boards are perfect for shelves. Just cut them to length, paint or stain, and install them in your closet!
Is it cheaper to build your own shelves?
Yes, it is cheaper to build your own shelves. At $12-$15 per 8-foot standard pine board, you can get several shelves out of one board.
And you can customize the size and color to fit your closet dimensions and style exactly.
Also, stain goes a long way, so a small quart of stain can cover several 8 foot standard pine boards for $5-$8.
Polyurethane also goes a long way for similar pricing as stain.
What screws to use for closet shelves?
To install the support strips for closet shelves, use 2-½ inch screws to screw into the studs. To install the closet shelves, use 1-¼ inch screws to screw into the support strips.
Do shelves need to go into studs?
Shelves should go into studs whenever possible to ensure they can hold the weight of the items being placed on them. It is recommended to screw each shelf support strip into at least two studs.
However, if that is not possible, then each shelf support strip should be screwed into at least one stud and the other side should be supported with the appropriately weighted drywall anchors.
Can I put shelves on drywall?
Yes, shelves can be put on drywall. Just screw into a stud or use the appropriately weighted drywall anchors to support the weight of the items that are going to be placed on the shelf.
This article does an excellent job of explaining what type of anchors to use to hang heavy items and how to install them!
Final Thoughts On How To Build DIY Linen Closet Shelves
There you have it! It’s really simple to add new shelves to a closet. In fact, if you have other closets that need more shelving on the sides, you can use this tutorial to add storage room there as well!
(That’s what we did in our master bedroom closet. We have a pretty standard 8-foot closet. No walk-in, unfortunately. So these shelves are a great help to maximize our limited space!
Catch you in my next post!

By Christine
Christine is a blogger and DIYer who tackles home renovation and decorating projects alongside her husband, Adam, for their personal residence and rental properties. Although she successfully tackles large renovation projects to avoid expensive contractor fees and bring her vision to life now, her path to success was not easy.
Go here to read her story, “From a Clueless First-Time Homebuyer To A Confident DIYer Creating Her Dream Home One Project At A Time“.
Popular Posts


DIY With Christine is a participant in the Amazon Services LLC Associates Program, an affiliate advertising program designed to provide a means for sites to earn advertising fees by advertising and linking to Amazon.com.