*My posts may contain affiliate links, which means I may receive a small commission, at no cost to you, if you make a purchase through a link! Thank you for supporting my website!*
Last updated on September 11th, 2024 at 09:26 am
Wondering if you can move an existing kitchen island? Well, look no further because I have your answer!
Kitchen islands can be moved by disassembling them and then reassembling them in the new location. There will be missing/damaged flooring under the original location and electrical and plumbing might need to be rerouted.
Now that we’ve got the basics out of the way, let’s break into the details further so you can easily disassemble and reassemble your kitchen island.
Let’s dive in!
Quick Navigation: How To Move A Kitchen Island Without Damaging It
- Remove All Appliances
- Remove The Countertop
- Remove The Back Panel, Toekick Cover, And Any Trim
- Unscrew The Cabinets From Each Other
- Unscrew The Cabinets From The Floor Anchor
- Remove The Floor Anchor
- Move Any Electrical, Gas, Or Plumbing Lines
- Repair The Damaged Or Missing Floor
- Reassemble The Kitchen Island In The New Location
- Other FAQs About Moving A Kitchen Island
| Level Of Difficulty | Time To Complete |
|---|---|
| Hard | 1 day to several days depending on the electrical, plumbing, and flooring work that needs to be done |
| Material List | Tool List |
|---|---|
| Flooring to patch the damaged flooring under the old island location | Drill or Impact Driver with various bits (typically need star bit, square bit, and Philips head bit) |
| Prybar | |
| Trim prybar | |
| Hammer | |
| Other tools dependent upon electrical, plumbing, and flooring work |
Step One: Remove All Appliances
The first step to moving a kitchen island is removing all of the appliances.
If there is a sink, outlets, or any other appliances such as a stove, dishwasher, or microwave on the island, then the water, gas, and electricity need to be turned off and the fixtures detached and removed from the island.
Sink:
- Turn off the water
- Disconnect the water supply lines and drain line
- Remove the faucet
- Remove the sink
Dishwasher:
- Turn off the water
- Unplug the dishwasher
- Disconnect the water supply lines and drain line
- Remove the dishwasher
Microwave:
- Unplug the microwave
- Remove the microwave
Stove:
- Turn off the gas supply line (if applicable)
- Disconnect any gas lines (if applicable)
- Unplug the stove
- Remove the stove
Outlet(s):
- Turn off the electricity
- Remove the outlet covers
- Disconnect the outlets from the electrical wire
For some islands that have several of these items, it might take you a while to disconnect everything. But if your island is simple like ours and only has outlets, then this task will be a breeze.

Step Two: Remove The Countertop
The next step to moving a kitchen island is to remove the countertop.
The way you remove the countertop is dependent on the type of countertop you have.
Laminate or Butcherblock countertops:
- Unscrew the countertop from underneath it (inside the cabinets)
- Carefully lift the countertop off the cabinets and set it on the side
Quarts/Granite/Marble or other stone countertops:
- Lift the countertop off of the cabinets and set it on the side (these are only held in place by silicone, so lifting up hard should separate the silicone)
If this step is done carefully and with several people, then the countertop should be able to be reused after you move the island.
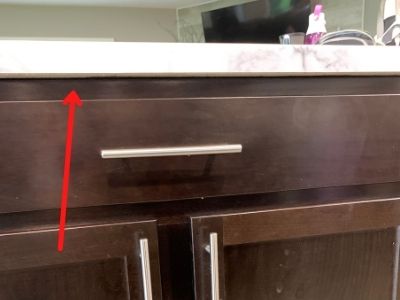
Step Three: Remove The Back Panel, Toekick Cover, And Any Trim
The next step to moving a kitchen island is to remove the back panel and trim.
The back panel, toekick cover, and trim are usually nailed in place with brad nails or pin nails or they might be glued in place (or potentially both). If you use this trim puller prybar found at Amazon and gently pull each of these items off, then you have a chance at salvaging them.
Unfortunately, all of these panels are pretty thin, so they might break while trying to remove them (especially if they’ve been glued down).
Luckily, this is one of the cheapest parts of a kitchen island. So if you do accidentally damage them, they most likely can be easily replaced. You might want to consider replacing them anyway if they are filled with too many nail holes and you don’t want to paint your kitchen island once it’s been removed.


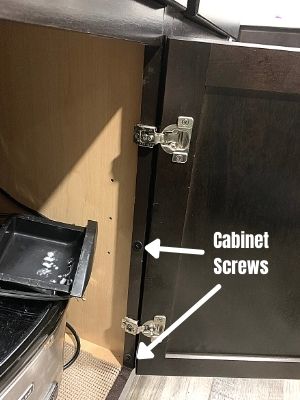
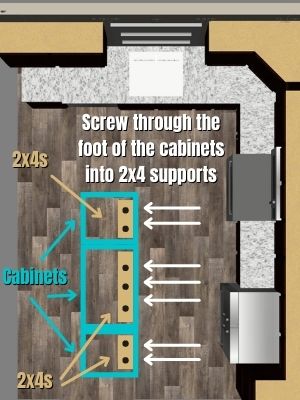
Step Four: Unscrew The Cabinets From Each Other
The next step to moving a kitchen island is to unscrew the cabinets from each other.
The cabinets are screwed together next to the hinges to keep the cabinet faces flush with each other and to help prevent the entire island from moving. To separate the cabinets, look for the screws by the hinges and unscrew them.
Cabinet screws usually need star bits. Using a drill or impact driver will make quick work of this task.
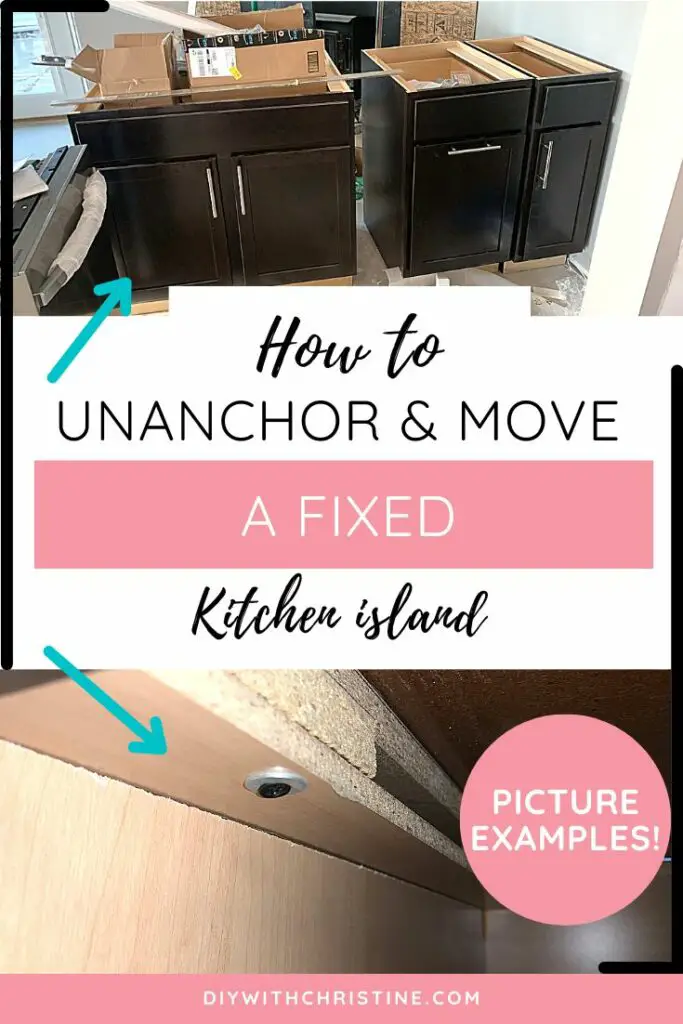
Step Five: Unscrew The Cabinets From The Floor Anchor
The next step to moving a kitchen island is to unscrew the cabinets from the floor anchor.
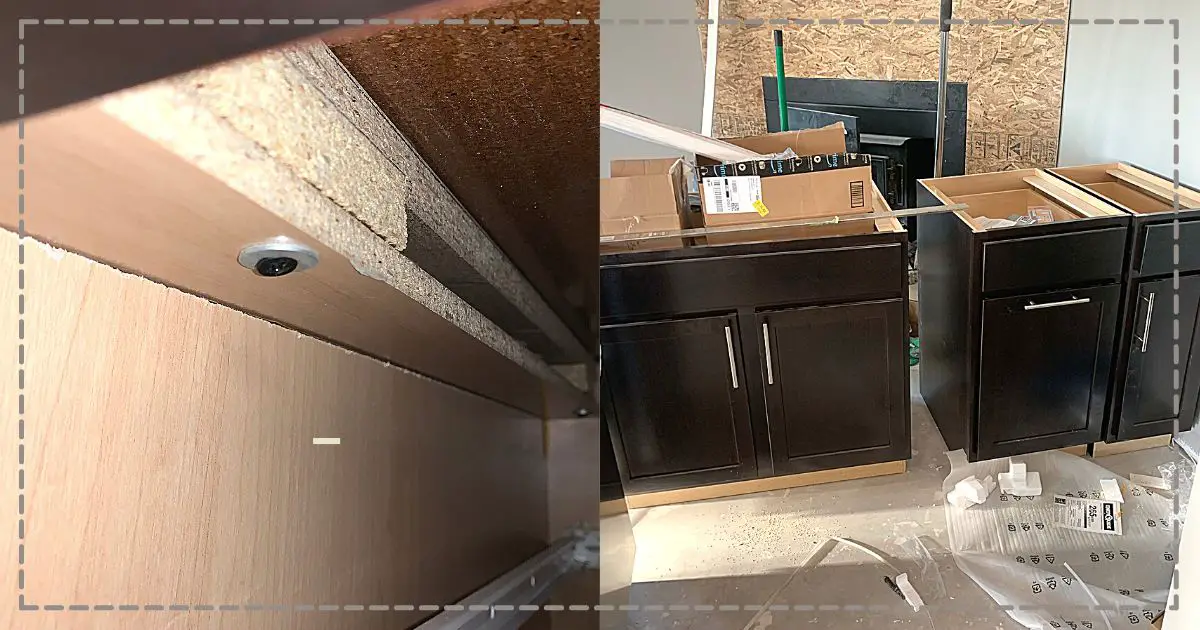
Kitchen islands also are attached to the floor by an anchor. When you removed the toekick cover, you probably found some screws in the footer of the cabinets. These screws are what are securing the island to the floor so it doesn’t shift around while in use.
To detach the cabinets from the ground, remove these screws and lift the cabinets out of the way.
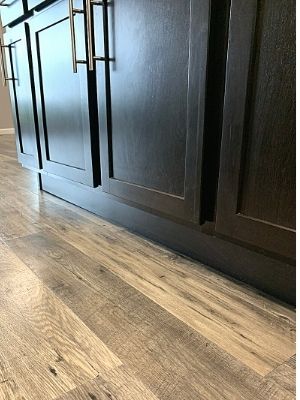
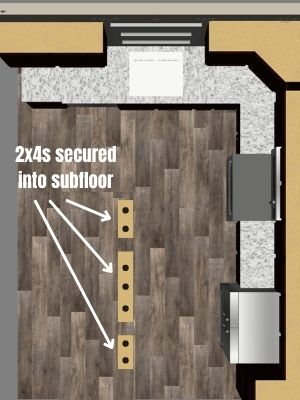
Step Six: Remove The Floor Anchor
The next step to moving a kitchen island is to remove the floor anchor from the subfloor.
The floor anchor is attached to the subfloor and needs to be removed. If your subfloor is wood, then simply unscrew the anchor from the floor.
However, if your subfloor is concrete, then this anchor is likely nailed down with concrete nails. Use a prybar and hammer to pry off the anchor and pull out the concrete nails from the subfloor.
Don’t worry about saving the floor anchor(s). If you can reuse them then great! But you can easily replace them with a 2×4 cut to the size of each cabinet if they accidentally get destroyed while removing them.
Step Seven: Move Any Electrical, Gas, Or Plumbing Lines
The next step to moving a kitchen island is to reroute any electrical or plumbing that’s needed.
This is the only part that can make moving a kitchen island somewhat difficult.
If your island is only moving a short distance, then this might be simple. Otherwise, you’ll have a decent amount of work ahead of you to move these items before reassembling the island in a new location.
The instructions for moving these supply lines are out of the scope of this article. Just know, this step is not suited for a beginner DIYer. Hiring a professional or watching several YouTube videos to learn how to move each of these items is going to be your best bet for success.
Step Eight: Repair The Damaged Or Missing Floor
The next step to moving the kitchen island is to repair the damaged or missing flooring under the old location.
Moving a kitchen island will likely leave behind damaged or missing flooring. This is because either:
- The island was installed before the flooring and now there’s a gap where the island used to be or
- The island was installed on top of the flooring and the floor anchor being nailed or screwed through the flooring damaged it
You’ll need to replace this damaged or missing section of flooring before reassembling the kitchen island in the new location.
Step Nine: Reassemble The Kitchen Island In The New Location
The final step to moving a kitchen island is to reassemble the island in the new location.
To reassemble your kitchen island, follow the teardown instructions in this article backward to reassemble. Or check out my article that shows you how to make a simple kitchen island out of base cabinets for the island assembly steps to be in order.

That’s it! Your island will be in a new location!
Other FAQs About Moving A Kitchen Island
Here are some other frequently asked questions about kitchen islands to help you move yours more easily!
Does A Kitchen Island Have To Be Attached To The Floor?
Kitchen islands are attached to the floor so that they do not move around while in use and cannot be knocked over.
How Much Does It Cost To Move A Kitchen Island?
The cost to move a kitchen island can range from $50-$100 for an island that needs shifting to the side a few inches and only has electrical lines to $2,000-$3,000 or more for an island that needs fully relocated with electricity, gas, and plumbing lines rerouted.
Can I Change The Top Of My Kitchen Island?
The top of kitchen islands can easily be changed. For laminate or butcherblock countertops, simply unscrew them from underneath and lift them off. For granite, marble, quartz, or other stone countertops, simply lift them from the cabinets as they are only held in place by silicone.
How Do You Remove A Kitchen Island Without Damaging It?
Kitchen islands can be removed without damaging them by gently disassembling each piece. To do this, remove the appliances, supply lines, countertop, back panel, and trim, and unscrew the cabinets from each other and the floor anchor.
Final Thoughts On Moving A Kitchen Island
There you have it!
Moving an island can be rather costly depending on the appliances and utility supply lines run to it, but it should be cheaper than installing a brand new kitchen island because you already have the cabinets and countertop that can be reused.
Hopefully, this article helps you know what to expect if you plan to move your kitchen island.
Catch you in my next post!
The Best Kitchen Tools & Products I’ve Used
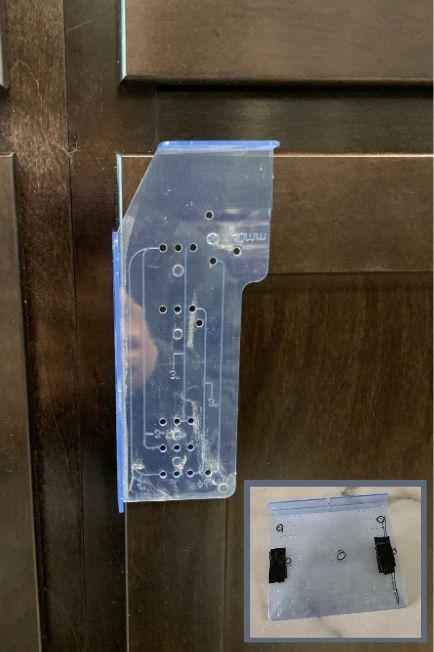
Ravinte Cabinet Handle Installation Template (For Doors & Drawers)
This is my all-time favorite handle installation template because it has two templates (one for drawers and one for doors) with multiple pull sizes & knob placements! These templates make installing cabinet handles a breeze because you always know your handles will be installed in the same spot on all of your drawers and doors. The kit also comes with a drill bit so you can guarantee you’re using the correct size. I used this template on my entire kitchen and both bathrooms to cut the installation time in half. You can find this hardware template here on Amazon.
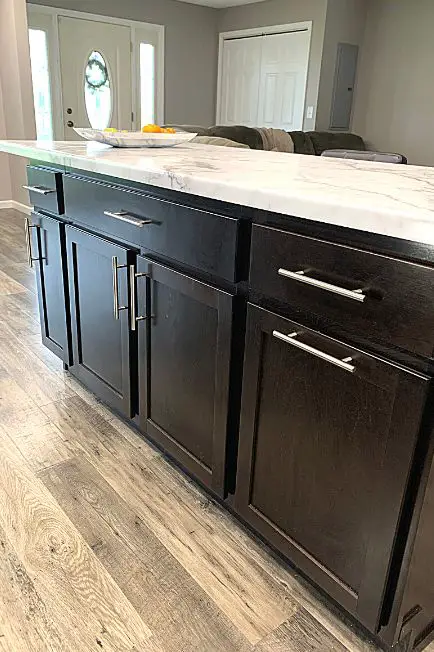
Franklin Brass 5-1/16 Inch (128mm) Center Bar Pull (Stainless Steel)
If you want to immediately modernize your kitchen island, then these cabinet pulls are a must. They are heavy-duty feeling, durable, easy to install, and are a large size for a great price. We put these pulls on all of our kitchen and island doors and drawers along with our bathroom doors and drawers. You can find these gorgeous cabinet pulls here on Amazon.
P.S. Use the hardware installation template I mentioned above to install these new pulls in record time!
If you’ve been curious about how we are decorating our 1950s Ranch, you should check out our “Shop Our Home” page. You can find products that we’ve personally bought to decorate our home.

By Christine
Christine is a blogger and DIYer who tackles home renovation and decorating projects alongside her husband, Adam, for their personal residence and rental properties. Although she successfully tackles large renovation projects to avoid expensive contractor fees and bring her vision to life now, her path to success was not easy.
Go here to read her story, “From a Clueless First-Time Homebuyer To A Confident DIYer Creating Her Dream Home One Project At A Time“.
Popular Posts


DIY With Christine is a participant in the Amazon Services LLC Associates Program, an affiliate advertising program designed to provide a means for sites to earn advertising fees by advertising and linking to Amazon.com.