
*My posts may contain affiliate links, which means I may receive a small commission, at no cost to you, if you make a purchase through a link! Thank you for supporting my website!*
Last updated on September 11th, 2024 at 09:17 am
Pattern For Laying Laminate Flooring Guide
About to install laminate flooring and wondering if there is a pattern for laying laminate flooring? There is! But it’s not a typical pattern like you might think.
Here is a short description of the pattern for laying laminate flooring.
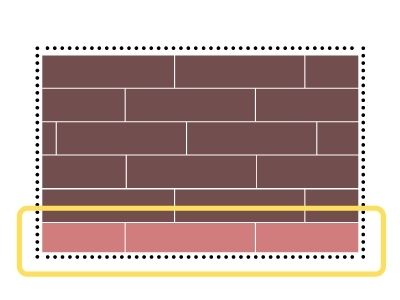
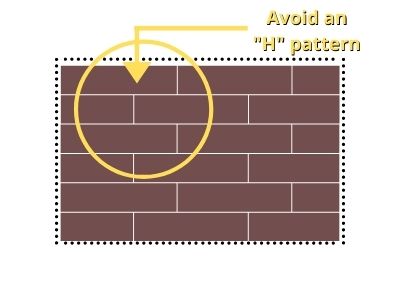
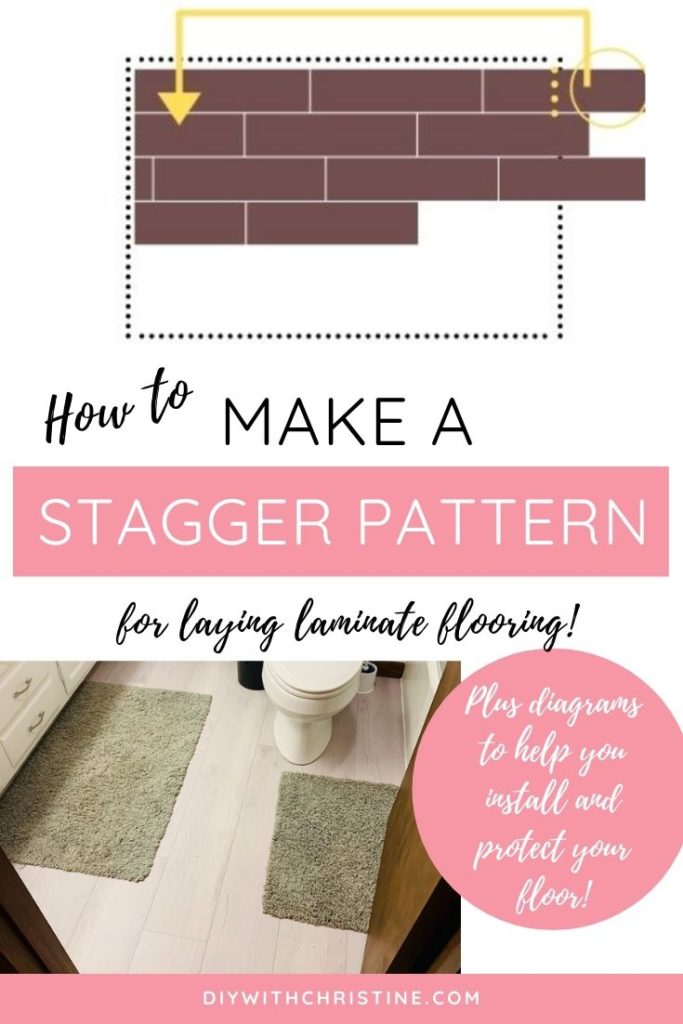
Laminate flooring should be laid in a “random” stagger pattern. The remaining piece of one row should start the next row. Each piece must be 6 inches or greater. If the remaining piece is less than 6 inches, start the row with a full piece. Two seams between rows should be farther than 6 inches apart.
Pictures and diagrams are much easier to follow, though, so let me break down this “random” pattern further for you.
Let’s dive in!
Quick Navigation: How To Stagger Laminate Flooring
- Measure The Room
- Calculate The Starting Row Dimensions
- Use The Leftover Of The Last Piece To Start The Next Row
- Final Thoughts
Step One: Measure The Room
The first step to making a staggered pattern for laying laminate flooring is to measure the room.
Break out your tape measure and write down these 4 measurements on a piece of paper or the back of one of the laminate boards (that’s what we usually do haha).
Measure the:
- Length of your room
- Find the longest point between the two walls
- Width of your room
- Find the longest point between the two walls
- Length of your laminate flooring boards
- It probably says on the packaging. Only measure the face of the board, don’t include the tongues sticking off it.
- Width of your laminate flooring board
- It probably says on the packaging. Only measure the face of the board, don’t include the tongues sticking off it.
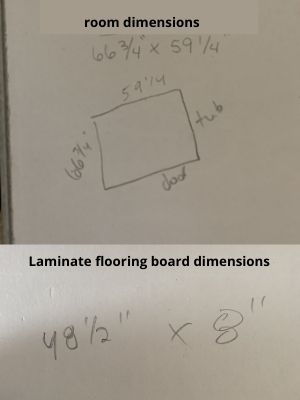
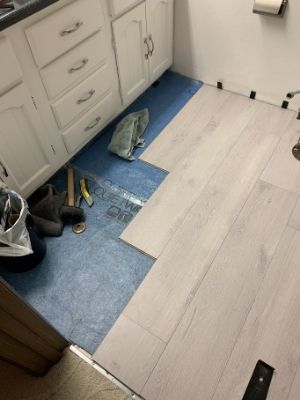
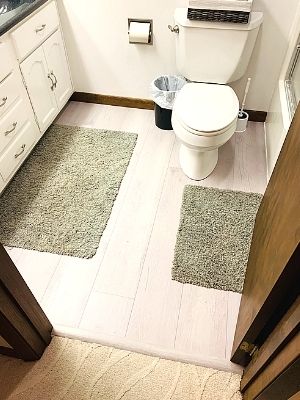
For our small guest bathroom, we used these dimensions:
- Length of the room – 66-¾”
- Width of the room – 59-¼”
- Length of the board – 48-½”
- Width of board – 8”
How To Measure A Room For Laminate Flooring That Is Large Or Oddly Shaped
If you are measuring a large, open room that is technically multiple rooms (like an open concept living room, kitchen, dining room situation), then you will want to build a “faux wall” throughout the center of the room and measure the length and width of one section at a time.
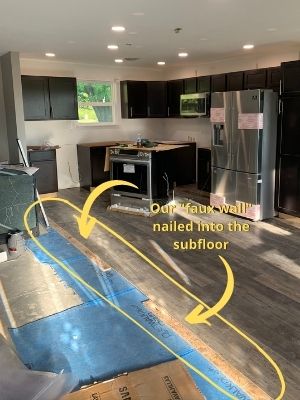
To do this, find the center of your room and attach 2x4s to the subfloor to temporarily separate the room and create a “faux wall”. This will give you something to support the first row as you install new pieces into place.
Once one half of the room is installed, then you can remove the faux wall and install the other half of the room.
Once you have your measurements, it’s time to move on to the next step.
Step Two: Calculate The Starting Row Dimensions
The next step to making a staggered pattern for laying laminate flooring is to calculate the starting row dimensions.
Grab your calculator because it’s time to do some math!
We want to see if we can start with a full piece on the first row or if we have to cut it widthwise or lengthwise. The idea is to make sure the last piece we lay isn’t too small.
When A Laminate Flooring Board Is Considered Too Small
A laminate flooring board is considered too small when the:
- Length is less than 6” long and/or
- Width is less than 40% of the total width of the board
(For this example, I didn’t want any of my pieces to be smaller than 3-3/16” wide or 6” long.)
Smaller pieces won’t stay snapped in, and you will constantly be fighting them. So it’s better, in the long run, to just avoid them completely.
Alright, now let me help you figure out the calculations for your own starting row.
Find The Width Of The Last Row
You need to find the width of the last row (if we start with a full-width piece) to determine whether it will be big enough or whether we need to cut the width of the first row.
- Take the width of your room and divide it by the width of the finished face of your full laminate floor board.
For example, the width of our room was 59.25” and the width of our board was 8”.
Ex. 59.25 / 8 = 7.40625 boards.
This measurement tells us how many boards it will take to cover the width of the room.
- Take the remainder (0.40625 in this example) and multiply it by the width of a full board (8).
Ex. 8 x 0.40625 = 3.25 inches.
This measurement tells us how wide the last row will be if I start with a full-width piece in the first row.
- Take the width of a full board (8) and multiply it by 40%.
Ex. 8 x 0.4 = 3.2 inches
This measurement tells us the minimum width the last row can be before it is considered too small.
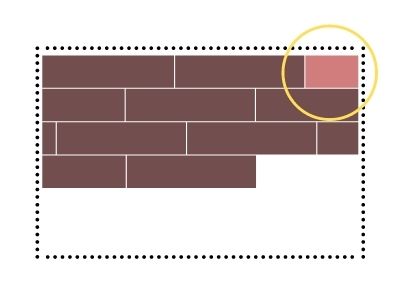
What These Numbers Tell You (Width)
These numbers will tell you a story. If I start with a full-width piece in the first row, then my last piece will be 3.25 inches.
That number works out perfectly because 3.25 inches is greater than 3.2 inches (which was the 40% minimum width we calculated above).
The remainder we found (0.40625) actually is a percentage of the width of the board, so as long as that is greater than 0.4 (or 40%), then we don’t really care what the actual dimension of the last row is.
Now, if that remainder had equaled less than 0.4 then that means our last row is going to be less than 40% wide.
To prevent that, we need to cut the width of the first row to make the last row larger. If the row width is short of the minimum width by an inch, then cut an inch off the width of the first row. Or if it’s short 2 inches, then cut 2 inches off the first row, etc.
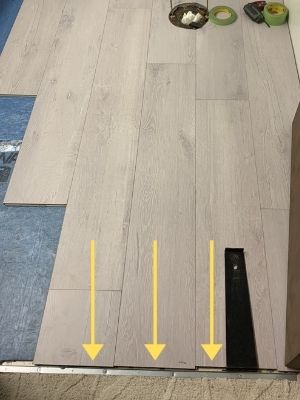
Find The Length Of The Last Piece Of The First Row
To find the length of the last piece, you do the same math, only using length measurements instead of width measurements.
Just like above, you need to find the length of the last piece in the first row (if we start with a full-length piece) to determine whether it will be big enough or whether we need to cut the length of the first piece in the first row shorter.
- Take the length of your room and divide it by the length of your laminate flooring board.
For example, our room was 66.75” long and our board was 48.5” long.
Ex. 66.75 / 48.5 = 1.376 boards
This measurement tells us how many boards it will take to cover the length of the room in the first row.
(In this example, it’s going to take one full piece and 0.376 (or 37.6%) of a second piece to complete the first row.)
- Take the remainder (0.376) and multiply it by the length of a board (48.5) to get the length of the last piece in the row.
Ex. 48.5 x 0.376 = 18.25 inches.
This measurement tells us how long the last piece in the first row will be if I start with a full-width piece in the first row.
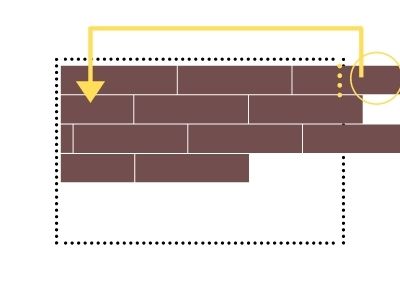
What These Numbers Tell You (Length)
Just like before, you can see how the last piece is going to turn out before you even start. The length of the last piece in the first row is going to be 18.25 inches for me.
This number is fantastic because it’s greater than 6 inches.
Just a reminder, if your last piece in the first row calculates out to be less than 6 inches, you need to cut the first piece to be smaller (whatever amount you are short by on the last piece is how much you need to cut off the first piece).
For example, if the last piece calculated out to be 4 inches long, then you need to cut 2-3 inches off of the first piece to make the last piece equal 6-7 inches long.
Also, if there’s ever a time in any of your rows where the last piece measures less than 6 inches (not just the first row), then start the row with the length of the very first starting piece.
The beauty behind laying laminate flooring is that you can always unclick the rows and re-cut if you need to. Yes, it’s extra work, but you aren’t throwing away thousands of dollars from a mistake in the beginning.
Once you have your calculations worked out, it’s time to move onto the final step.
Step Three: Use The Leftover Of The Last Piece To Start The Next Row
The last step to making a staggered pattern for laying laminate flooring is to use the leftover from the previous row to start the next row.
Two things happen when you use the leftover from the previous row to start the next row. You naturally:
- Minimize waste
- Make a random, staggered pattern
Minimize Waste While Laying Laminate Flooring
First off, you significantly minimize waste when you just use the leftover from the previous row. Now the only time a piece is considered “scrap” is if it equals less than 6 inches.
Otherwise, the tongue on the cut-off “leftover” piece ends up being the correct tongue for the starting piece on the next row.
The only time you’ll have to worry about the size of the leftover piece (other than if it’s less than 6 inches), is if it causes the seams within three adjacent rows to be parallel (or within 6 inches of each other).
If that happens, then you’ll have to cut the starting piece smaller or start over with a new piece that matches the size of the first piece in your first row.
Otherwise, you’re really getting the full value out of each pack of laminate, which is awesome!
Make A Stagger Pattern For Laminate Flooring
Second, using the leftover piece naturally creates the stagger pattern because each row will have a different sized “leftover” piece.
Of course, in a rare case, your room and laminate board dimensions might work out perfectly so your leftover piece is equal each time. (If this happens, please send me a picture because I’ve never seen it, and I’m curious!)
In that case, then you’ll need to cut a few of your starting pieces to manually stagger the seams by at least 6 inches within 3 adjacent rows as we talked about above.
How Much Do You Stagger Laminate Flooring?
Laminate flooring should be staggered by 6 inches or more. If the seams are too close together, then the floor cannot “breathe” properly, and the seams can break down. To prevent this, cut the first board in a row to a length that staggers the seams by 6 inches or more.
I went into great detail in this article solely about the pattern for laying the laminate flooring. But if you want to see the complete installation process all in one place, you should check out my full guide on how to install laminate flooring.
It will help you double-check that you’re not missing any steps during the full laminate flooring installation process!
Also, if you’re struggling to get the laminate floorboards to snap together during installation, then check out my picture tutorial here to help you learn how to snap the boards together with ease!
Nice, you’ve got the stagger pattern down for laying laminate flooring!
Final Thoughts On Stagger Patterns For Laying Laminate Flooring
There you have it! The “random” pattern is actually easier than following a real pattern because it doesn’t have to be perfect. (It’s truly meant to be imperfect.)
After the initial calculations, you can focus less on the pattern and focus more on ensuring that each piece of laminate is locked together fully.
I promise your flooring will turn out better and last longer if you take just a little bit of time upfront to work out the stagger pattern!
Catch you in my next post!

By Christine
Christine is a blogger and DIYer who tackles home renovation and decorating projects alongside her husband, Adam, for their personal residence and rental properties. Although she successfully tackles large renovation projects to avoid expensive contractor fees and bring her vision to life now, her path to success was not easy.
Go here to read her story, “From a Clueless First-Time Homebuyer To A Confident DIYer Creating Her Dream Home One Project At A Time“.
Popular Posts


DIY With Christine is a participant in the Amazon Services LLC Associates Program, an affiliate advertising program designed to provide a means for sites to earn advertising fees by advertising and linking to Amazon.com.