*My posts may contain affiliate links, which means I may receive a small commission, at no cost to you, if you make a purchase through a link! Thank you for supporting my website!*
Last updated on September 11th, 2024 at 09:27 am
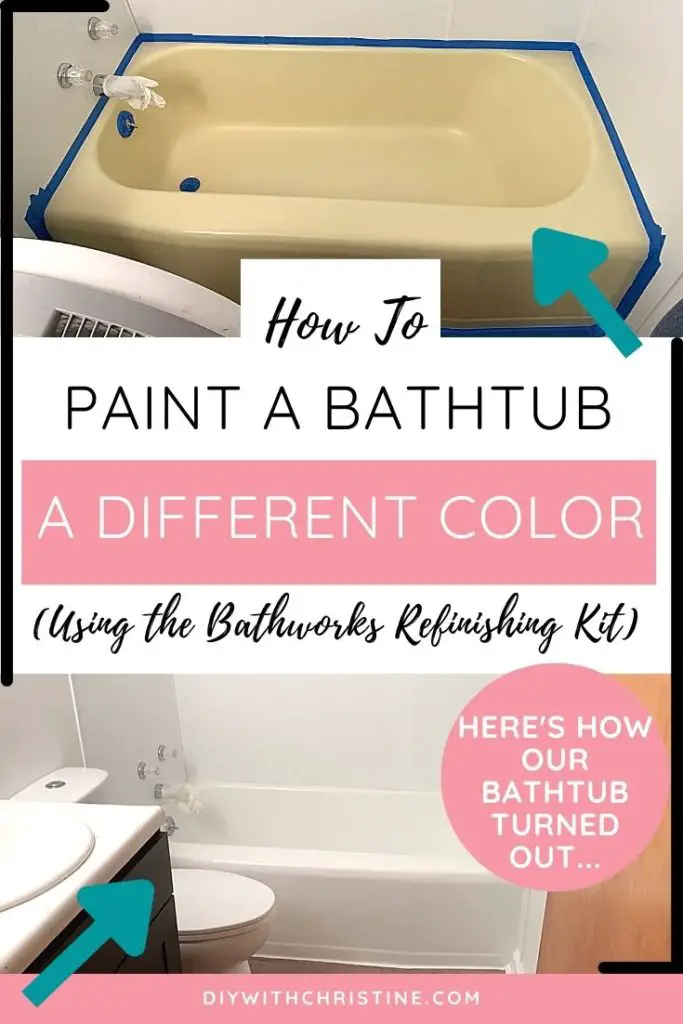
Can You Paint A Bathtub A Different Color? Find Out Here!
Wondering if you can change the color of an ugly pink/green/blue/yellow bathtub? Well, look no further because I have your answer!
Bathtubs can be painted a different color using a 2-part resin paint mixture rolled onto the tub to create a porcelain-like, hard, glossy surface that won’t easily chip, peel, crack, or yellow. This will refresh the color of the bathtub and provide a protective coat that will help the tub last longer.
Now that we’ve got the basics out of the way, let’s break into the details a little further so you can easily paint your bathtub a new color as well.
Let’s dive in!
Quick Navigation: How To Change The Color Of A Bathtub
- Can You Paint A Bathtub A Different Color?
- What Type Of Paint Should You Use To Paint A Bathtub?
- How To Change The Color Of A Bathtub
- Scrub The Bathtub With CLR Cleaner & Scrub Pad
- Wipe Down The Bathtub With The Etching Cleaner From The Kit
- Sand The Bathtub With 120 Grit Sandpaper
- Cover All Faucets & Showerheads With A Rubber Glove Or Equivalent & Dry The Tub Thoroughly
- Wipe Down The Tub With A Tack Cloth & Tape The Edges With Painter’s Tape
- Wipe Down The Tub With The Liquid Primer From The Kit & Mix The Paint
- Mix The Non-Skid Additive & Roll Onto The Bathtub Base
- Paint The First Coat Of Paint On The Bathtub
- Paint The Second Coat Of Paint On The Bathtub
- Other FAQs About Changing The Color Of A Bathtub
- Final Thoughts
Can You Paint A Bathtub A Different Color?
Porcelain, fiberglass, and plastic bathtub, bathtub surrounds, shower pans, and shower surrounds can be painted to update the color and hide any repairs done to the tub.
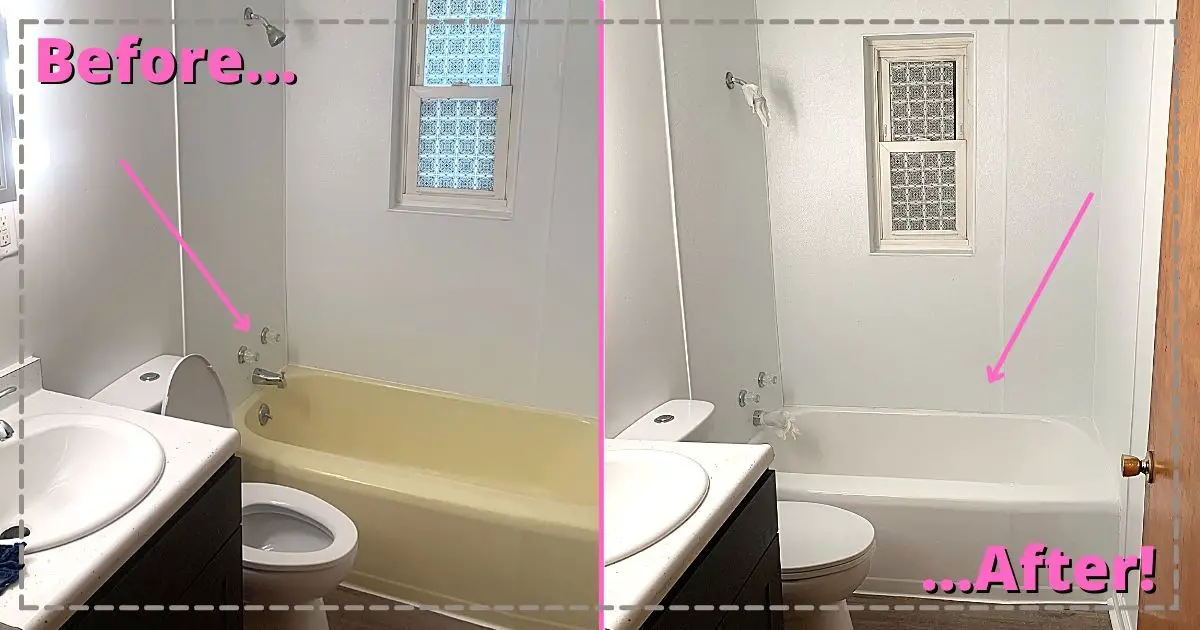
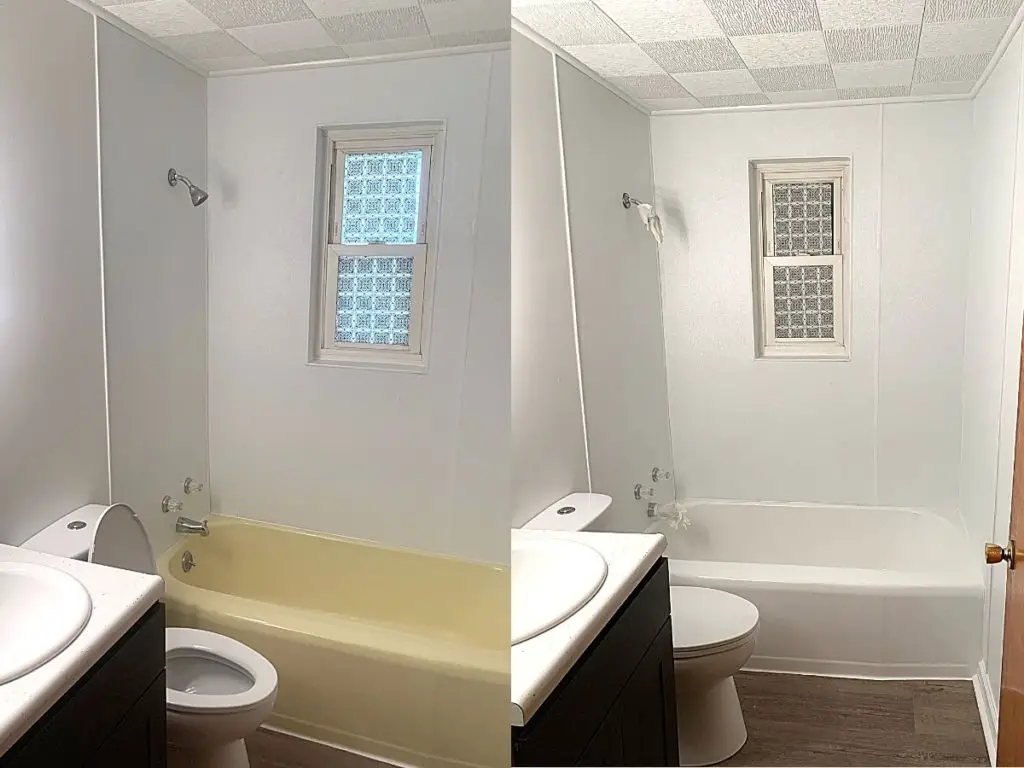
Refinishing (also known as reglazing) a bathtub is an inexpensive way to change the color of an outdated bathtub (think pink, blue, green, yellow, etc) to a fresh, modern white and an easy way to extend the life of a tub by providing a protective layer overtop.
For help deciding if reglazing/painting a bathtub is right for you, check out my article here.
Not just any paint can be used to paint a bathtub, however. Regular latex and oil-based paints are not strong enough to withstand the constant amount of water that bathtubs and showers see.
In addition, many bathtub refinishing kits use epoxy paint that might seem durable at first application, but over time, will discolor and peel.
Instead, bathtubs and showers should be painted/refinished using a commercial-grade 2-part resin paint mixture that won’t easily, chip, peel, crack, or yellow.
To refinish your bathtub and change the color of it, you can either hire a professional company to reglaze the bathtub, or you can DIY the painted bathtub using this Bathworks Bathtub Refinishing Kit found at Amazon. (Yes, it’s a 2-part resin paint mixture!)
What Type Of Paint Should You Use To Paint A Bathtub?
The best type of paint you should use to paint a bathtub is a commercial-grade 2-part resin paint mixture found in this Bathworks Bathtub Refinishing Kit found at Amazon.
This kit is the star of the show, and the following tutorial will be based on using this product.
The refinishing kit includes almost everything you need to fully clean, sand, and paint a standard 60-inch bathtub base. (If you also want to do the bathtub walls, then you will need this second kit – it’s a standard kit that doesn’t have all of the tools, just the paint and cleaning materials, so it’s a little cheaper.)
We used this kit on the hideous yellow bathtub in one of our rentals to refresh it. You can see my full experience on how easy this product is to use and whether I’d use it again or not here.
How To Paint A Bathtub A Different Color
Let’s go over how to use the Bathworks Refinishing Kit so you can paint your bathtub a different color as well.
| Level Of Difficulty | Time To Complete |
|---|---|
| Medium | 4-6 Hours |
| Material List | Tool List |
|---|---|
| Bathworks Refinishing Kit (Full Kit With Tools For Bathtub Base) | Plastic Non-Scratching Scrubbing Pads |
| Additional Bathworks Refinishing Kit (Standard Kit Without The Tools For The Bathtub Walls) | Large Box Fan (Optional) |
| CLR Cleaning Spray | Large Sponge |
| Painter’s Tape | Sharp Razor Blade |
| Drop Cloth | Face mask |
| Paper towels | |
| Trash bag |
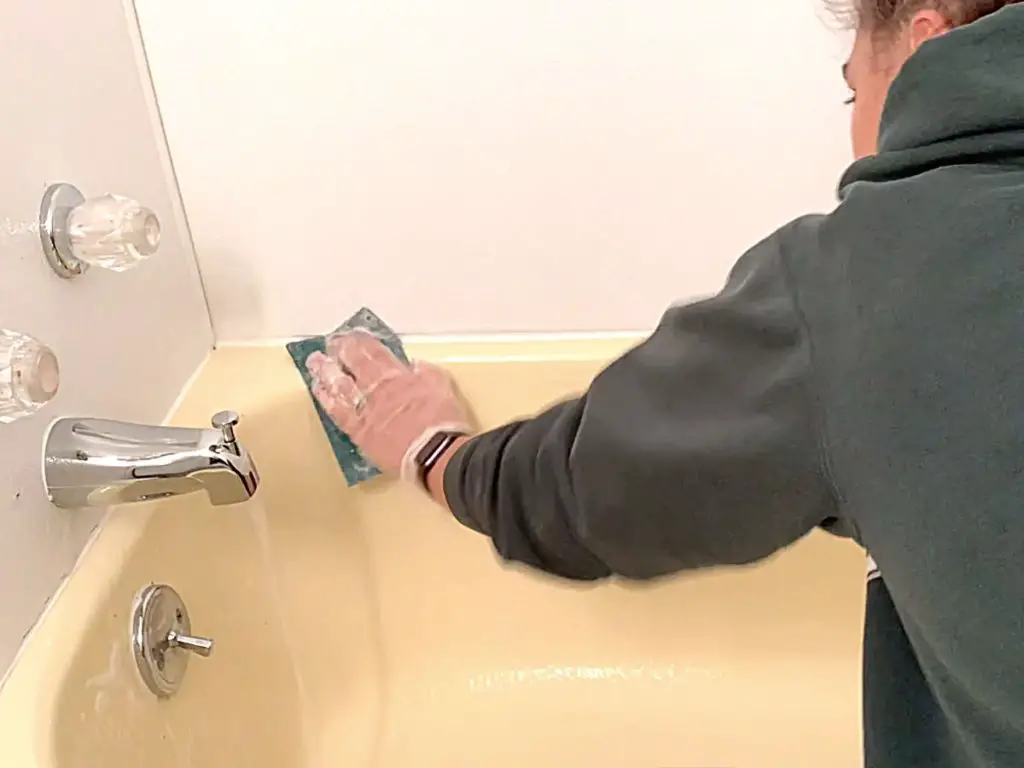
Step One: Scrub The Bathtub With CLR Cleaner & Scrubbing Pad
The first step to painting a bathtub a different color is to scrub the bathtub to remove any soap residue and buildup.
Arguably, the most important step in painting a bathtub is this first cleaning step. You must remove all soap and hard water build-up so that the paint mixture can stick to the tub properly.
If any residue is left behind, then the paint will slowly peel off over time as you use the tub.
To get the tub and surrounding walls sparkling clean, I used this CLR cleaner found at Amazon and a scrubbing pad.
(I used a generic rough texture scrubbing sponge and it worked okay. But I’ve read other people’s experiences and they say that these plastic non-scratching scrubbing pads found at Amazon paired with the CLR do wonders to remove the buildup from an old tub. To redo it, I would give those a try so I wouldn’t have to scrub so hard!)
First, put on some rubber gloves. The cleaning products and the refinishing kit products are hard on your skin. (Also, the resin paint mixture is impossible to get off… my watch band, T-shirt, and leggings lost the battle. So I highly recommend wearing old clothes as well!)
Second, spray the CLR cleaning spray over the entire tub and walls, let it sit for a minute or two, then take your scrubbing pads and really scrub into the tub to get as much crud off as you can.
The cleaning of the tub was honestly one of the most-time consuming parts because I knew I had to get the tub spotless.
If your tub still has some residue, don’t worry quite yet. The next few steps will help remove the worst of the buildup.
Third, once the tub and walls are thoroughly scrubbed, rinse off the cleaning spray with warm water. (I also used a large sponge to help me get the suds from the back of the tub washed away.)
Once the tub is cleaned, it’s time to move on to the next step.
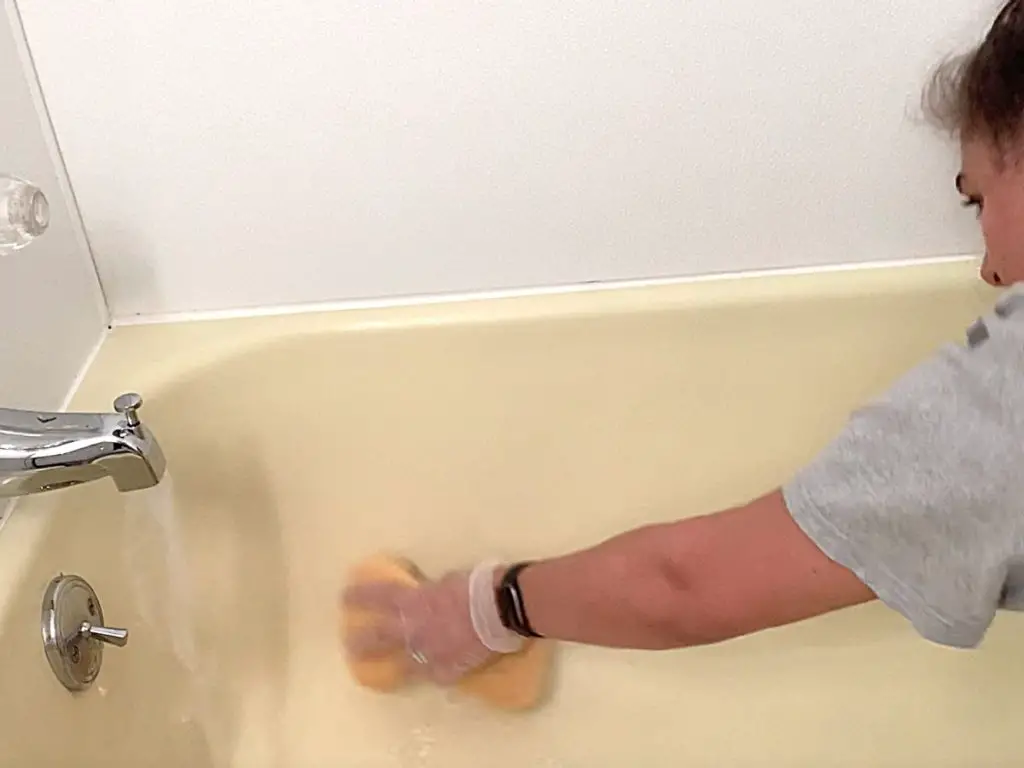
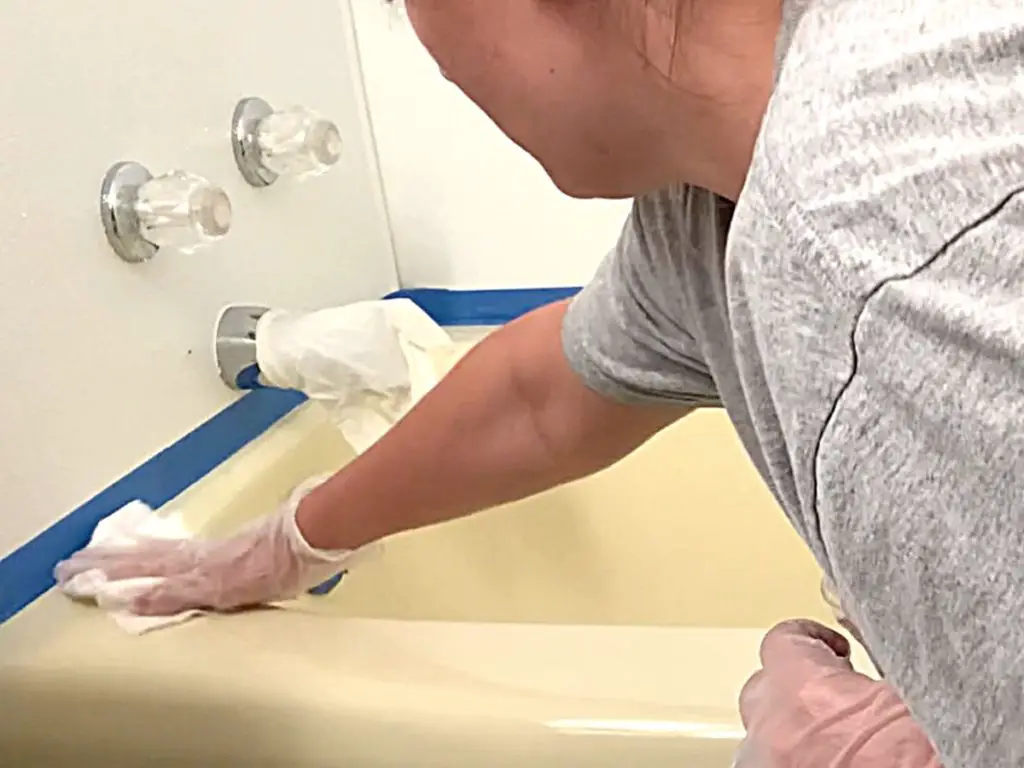
Step Two: Wipe Down The Bathtub With The Etching Cleaner From The Kit
The next step to painting a bathtub a different color is to wipe the etching cleaner over the tub and walls.
While the tub is still damp, pull out the bottle of etching cleaner from the kit and pour a little bit onto a paper towel.
Wipe the etching cleaner over the tub and the walls then take your scrubbing pad and scrub everything again (especially focusing on those high soap residue areas).
If there are areas with a ton of soap residue even after scrubbing with the CLR cleaner and the etching cleaner, then take a sharp razor blade and scrape the majority of the remaining residue off before moving on to the next step.
Remove any large chunks that you scrape off from the tub and put them in a trash bag so that they do not clog up your drain when you rinse off the tub with warm water.
Once you’ve scrubbed the bathtub and walls thoroughly with the etching cleaner and removed the remaining residue with a razor blade, rinse down the tub with warm water.
Leave the tub a little damp and move on to the next step.
Step Three: Sand The Bathtub With 120 Grit Sandpaper
The next step to painting a bathtub a different color is to lightly sand the entire bathtub base and walls.
The kit comes with some 120 grit sandpaper. It’s time to pull out a sheet.
While the tub is still wet, take the sandpaper and rub it over the entire bathtub (especially around heavy soap residue areas) and the walls.
Sand enough so that the top layer of the tubs and walls have been slightly roughed up.
After you are done sanding, rinse the tub thoroughly with warm water then move on to the next step.
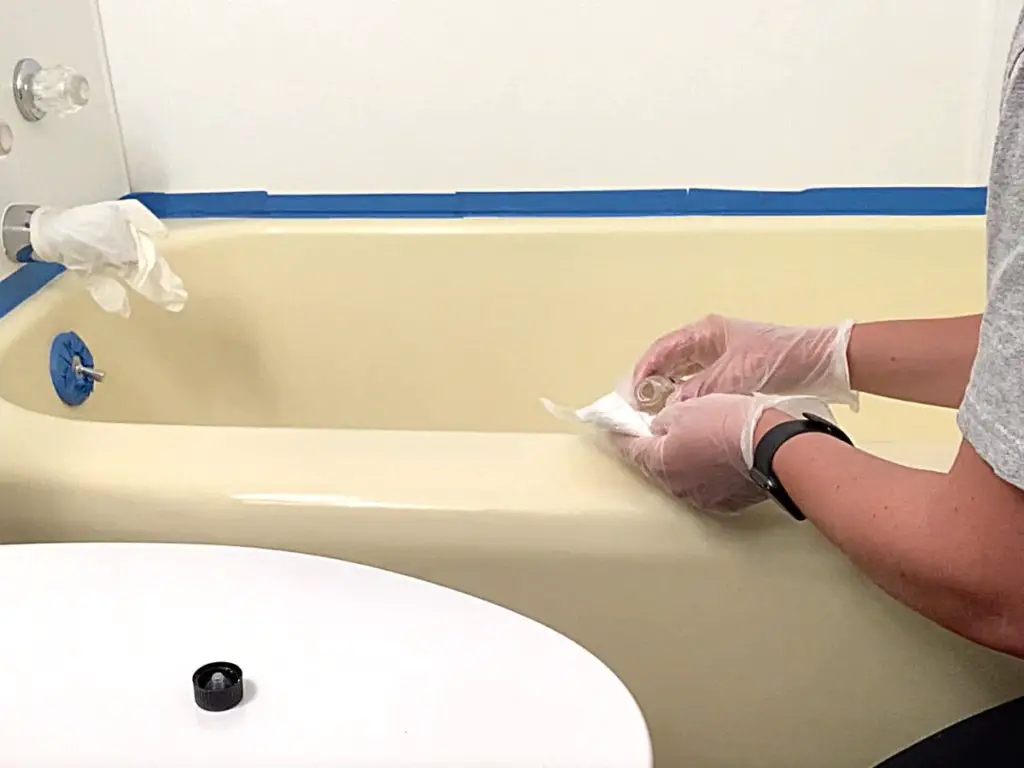
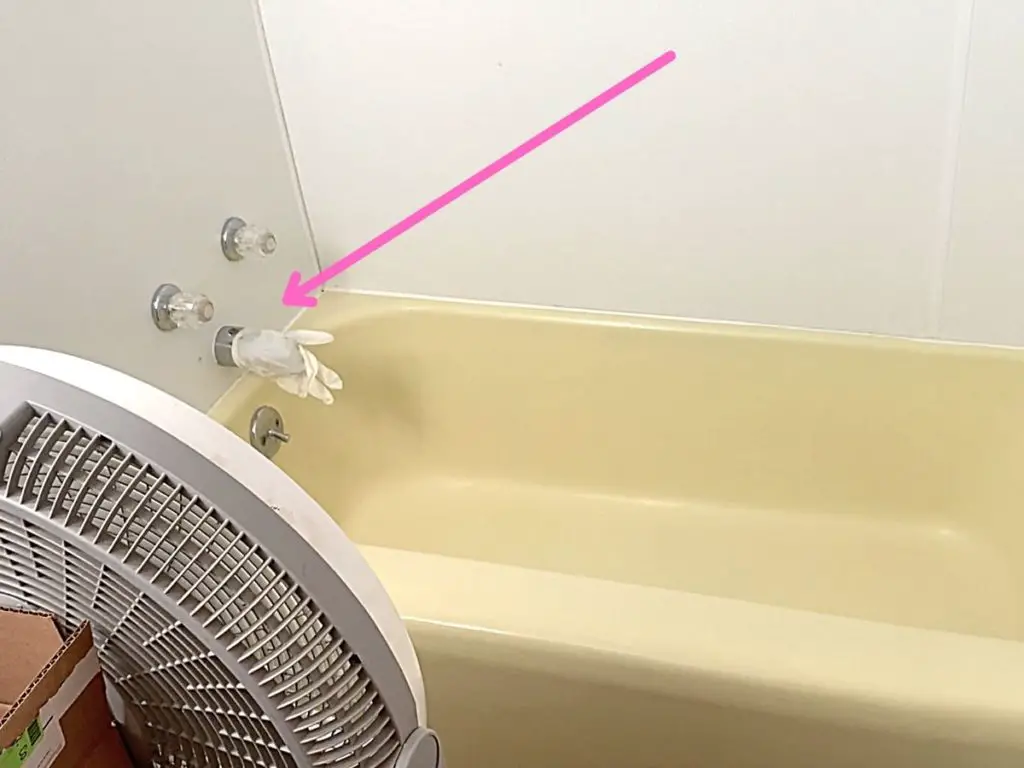
Step Four: Cover All Faucets & Showerheads With A Rubber Glove Or Equivalent And Dry The Tub Thoroughly
The next step to painting a bathtub a different color is to cover the showerhead and bathtub faucet with rubber gloves and dry the tub thoroughly.
The tub and walls must be 100% dry before the paint mixture from the Bathworks Refinishing Kit is rolled on, otherwise, it won’t adhere to the tub properly.
To avoid any problems due to moisture, take a couple of extra rubber gloves and put them over the showerhead and the bathtub faucet so that no more water can drip out of them.
Then, use paper towels or a dry towel to remove the majority of the water on the tub and walls and set up your box fan pointing at the tub to help it dry faster.
Once the tub and walls are completely dry to the touch, it’s time to move on to the next step.
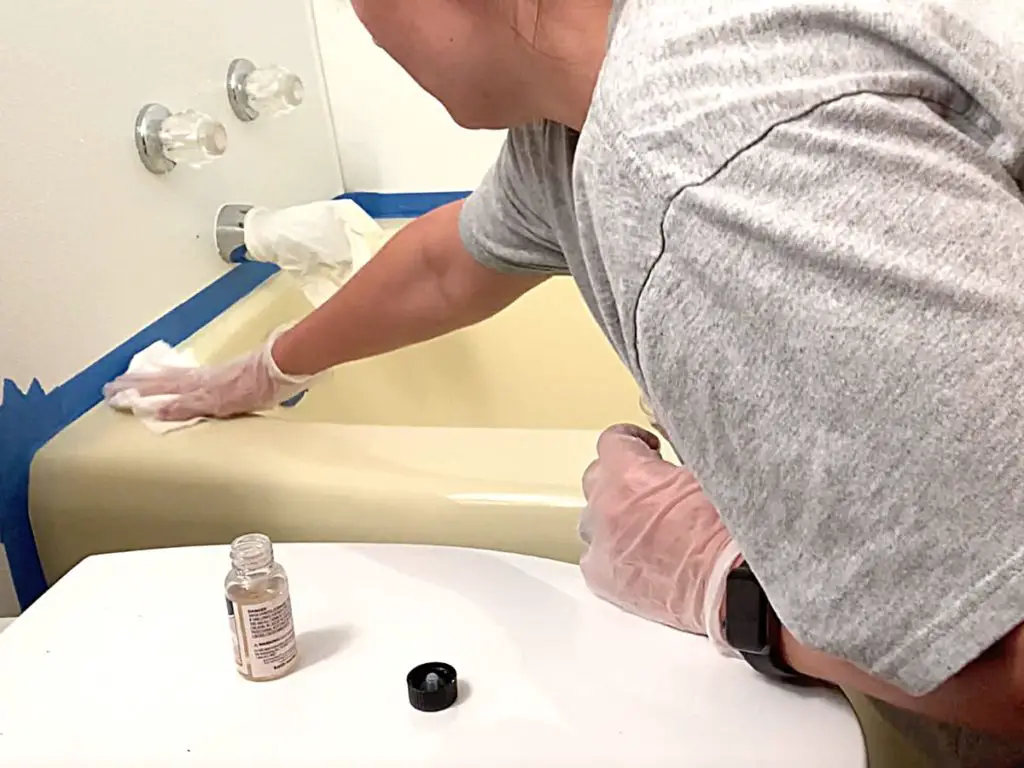
Step Five: Wipe Down The Tub With A Tack Cloth & Tape The Edges With Painter’s Tape
The next step to painting a bathtub a different color is to remove the remaining dust with a tack cloth.
The Bathworks refinishing kit also comes with a tack cloth. Pull out one of these cloths and wipe down the entire wall and tub to remove any lingering, invisible dust.
Then use some painter’s tape to tape off the areas that you do not want the paint to get on.
As I mentioned before, the resin/paint mixture is permanent! Whatever it touches, it is not coming off. So I recommend using plenty of painter’s tape to cover the areas you want to protect. (You can even put a drop cloth down to protect your floor while you’re painting.)
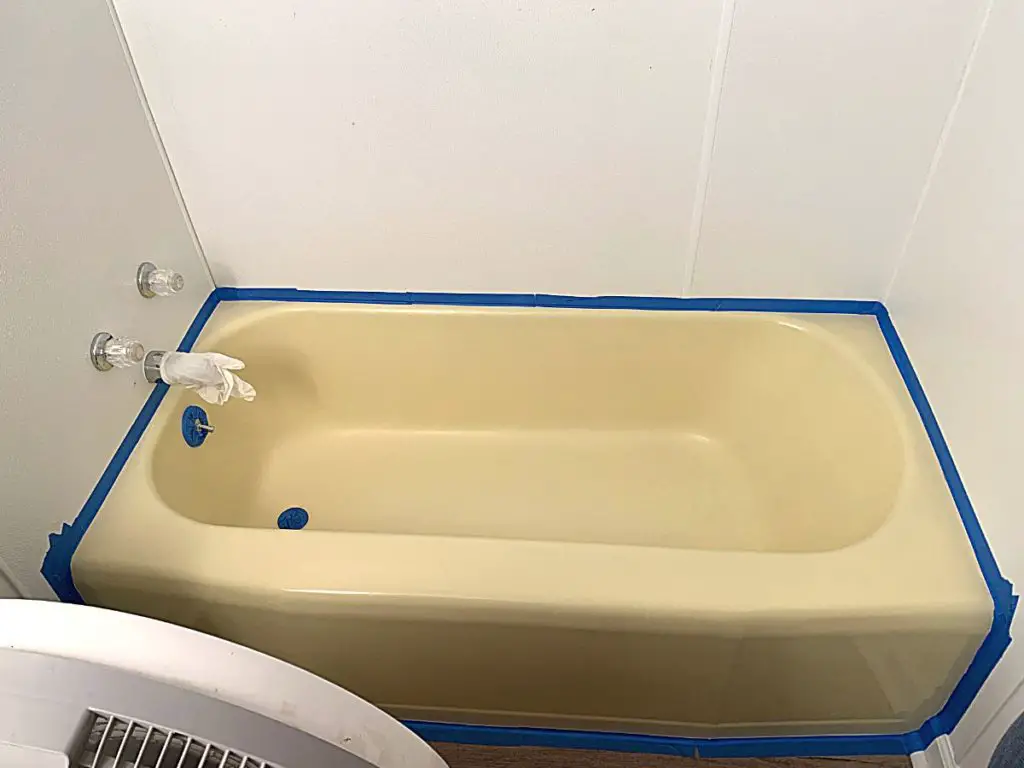
Since we only painted our bathtub base (not the walls), we taped off:
- Where the bathtub base met the walls (on the walls)
- Where the bathtub base met the floor (on the floor)
- The drain
- The overflow faceplate (the lever that lets you plug the tub drain or release the water)
If you are also painting the bathtub surround, then you will also want to tape off the:
- Bathtub faucet
- Showerhead
- Handles
- Where the surround meets the drywall
- Any other areas you do not want to get paint on
If your kit also comes with an additional chip/dent repair kit, then now is the time to make any repairs.
We didn’t have any repairs to make on our tub, so I recommend you follow the instructions that come with the kit to complete that step before moving on to the next step!
Step Six: Wipe Down The Tub With The Liquid Primer From The Kit & Mix The Paint
The next step to painting a bathtub a different color is to wipe the liquid primer from the Bathworks Refinishing Kit on the bathtub and walls.
First, I highly recommend putting a mask on and opening up all windows, doors, and fans that you can because the rest of the products from the kit have a potent smell to them.
You’ll start to feel lightheaded if you stay in them without a mask for too long, and we really don’t want that!
Now, pour some of the liquid primer from the kit onto a paper towel, wipe it over the bathtub base and walls, and let it sit for 5 minutes.
While you are waiting for the primer to dry, it’s time to mix the paint (because it has to sit for 5 minutes before it’s used as well, might as well multitask!)
Take the Part A Color (Refinishing Paint) and the Part B Hardener and pour them both into the empty container provided. Use the stir stick from the kit to thoroughly mix the two parts together, and let the mixed paint sit for 5 minutes.
Once the 5 minutes are up, it’s time to move on to the next step.
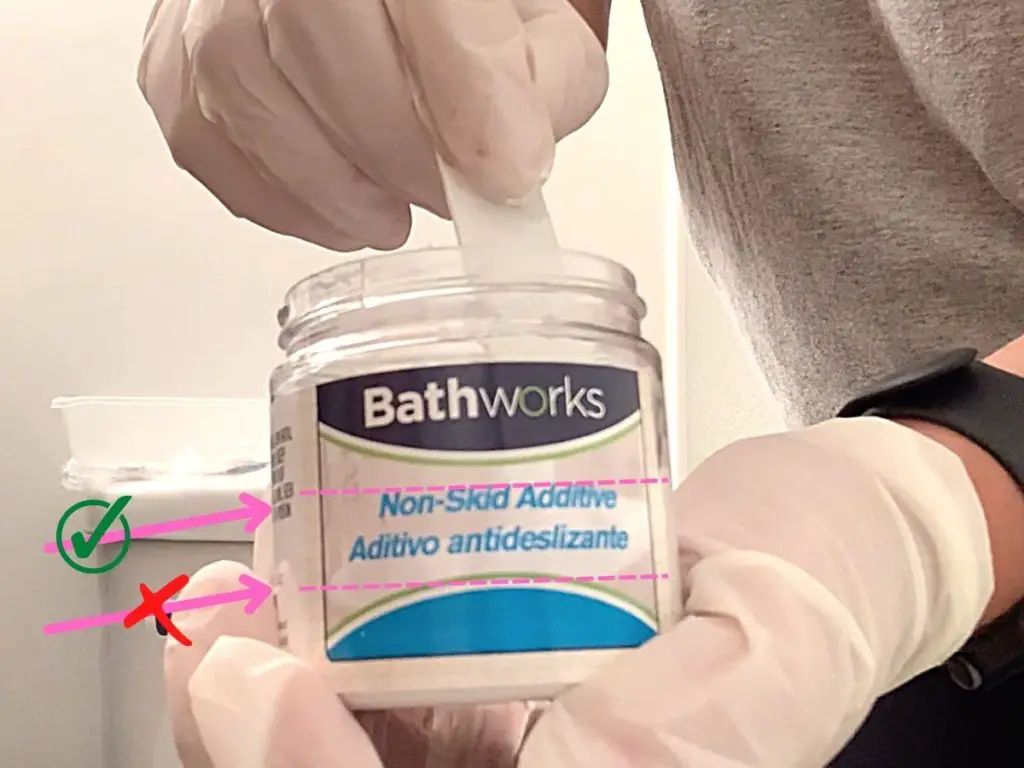
Step Seven: Mix The Non-Skid Additive & Roll Onto The Bathtub Base
The next step to painting a bathtub a different color is to mix the anti-slip texture and roll it onto the tub base.
If your kit comes with the non-skid additive, then it’s time to roll that onto the tub.
Pull out the additive container, open it up, and pour around 1 oz of the paint mixture into the container. Then take your stir stick and thoroughly mix the two together.
The only part that I think I made a slight mistake on was this part. I poured enough of the paint mixture to fill about 1/3 of the additive can, and it just wasn’t enough to roll evenly on the entire tub floor.
Next time, I will probably pour until that container is about half full to make rolling the non-skid textured paint out easier.
Now, take your non-skid mixture and pour it into the center of the bathtub.
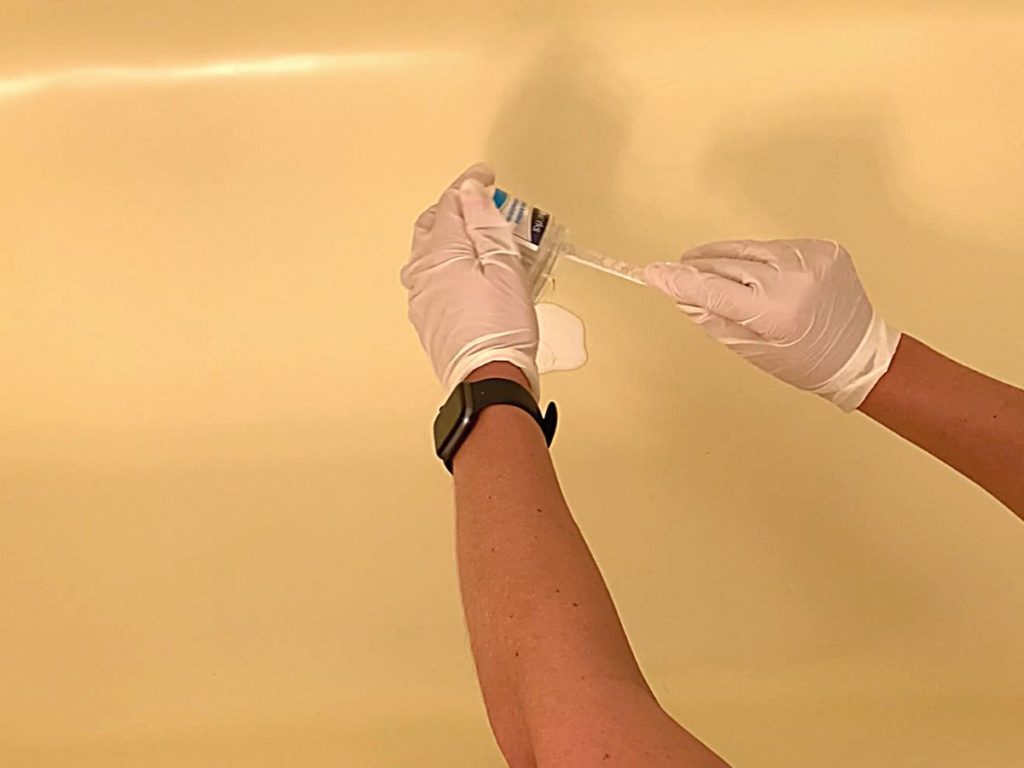
Use the 3″ roller that came in the kit and roll the mixture out into a rectangle or oval shape covering the majority of the base.
This is what will help give your feet a little bit of grip while you are showering so you do not slip.
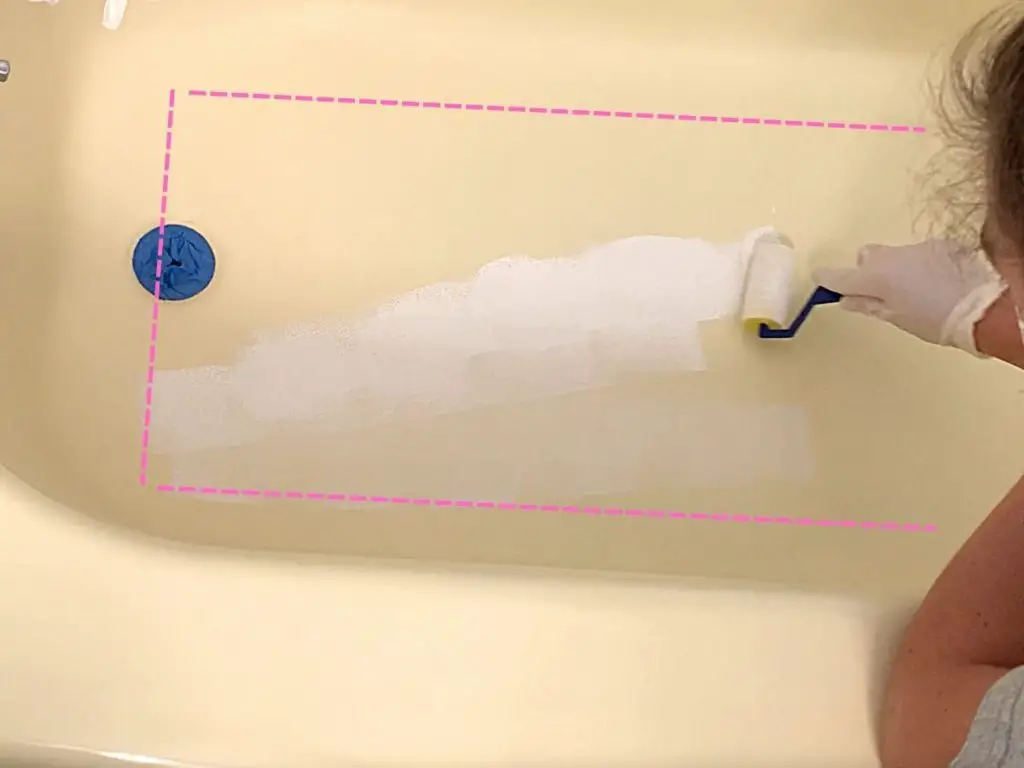
As you can see, I didn’t have enough non-skid mixed paint to evenly spread it across the bottom. I had to pour more paint on top to finish it, and it wasn’t mixed evenly. It still turned out okay for us, but hopefully, you will now avoid that mistake!
Let that small painted section sit for 10 minutes before moving on to the next step!
Step Eight: Paint The First Coat Of Paint On The Bathtub
The next step to painting a bathtub a different color is to apply the first coat of paint on the bathtub.
Finally! It’s time to paint!
Pour the rest of the paint mixture into the paint tray and grab one of the foam brushes to start painting the tub.
There are a few tips for painting that you will want to follow to get the best paint finish:
- Use plenty of paint (don’t be afraid to go too thick, just make sure to roll out the paint evenly as you go)
- Use the foam brush first to get the edges, around the taped off areas, and any areas the roller can’t easily reach, then use the roller on the rest of the tub
- Start on the farthest away part of the tub
- Work your way into the tub bowl and paint from the bottom up
- Save the top of the tub and the outside for last
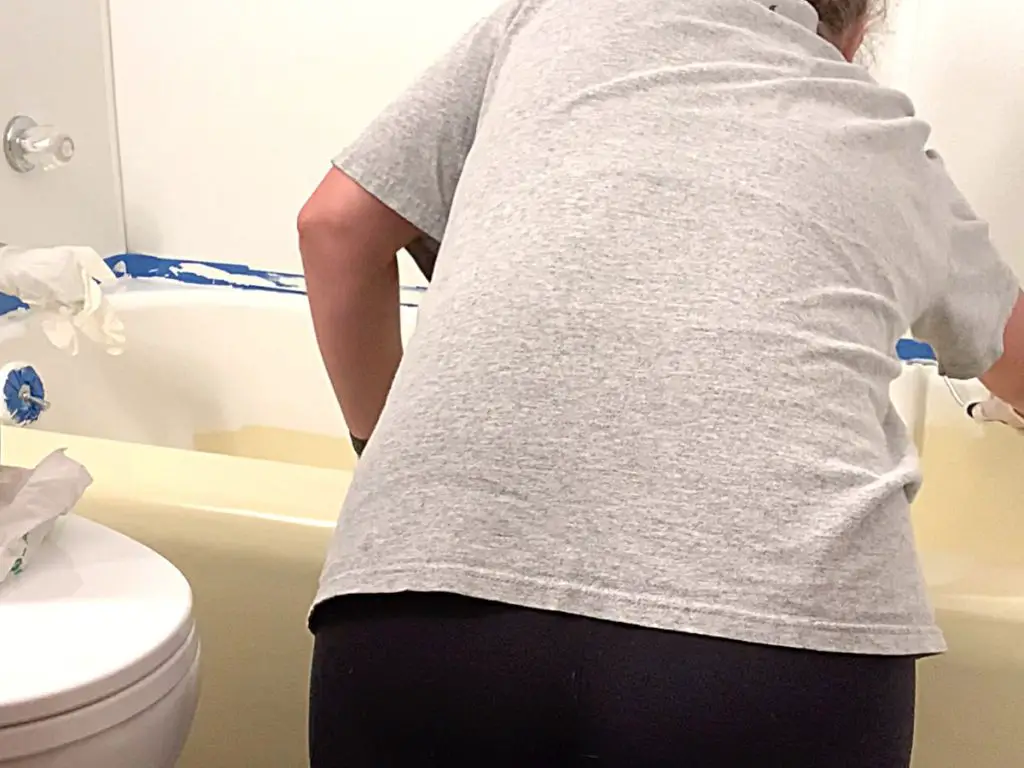
The main thing you want to avoid is leaning into the paint mixture while you are trying to roll another area. I didn’t realize my t-shirt was hanging into the paint some of the time, and needless to say, I ruined my shirt and had to fix the paint where the shirt touched it. Lesson learned.
Take your time while painting. You have a full 3 hours to use the paint mixture, and you can paint the second coat immediately following the same pattern, so you have plenty of time to work.
Once you have the first coat fully painted, it’s time to move on to the final step!
Step Nine: Paint The Second Coat Of Paint On The Bathtub
The final step to painting a bathtub a different color is to apply the second coat of paint to the tub.
As I mentioned in the last step, you can apply the second coat of paint immediately. Just start in the first area you painted and work in the same pattern that you painted the first coat.
This is the time when you are most likely to lean into the paint, so be careful where you are touching as you paint the second coat.
Once you are done painting the second coat, throw away the remaining paint and materials and let the paint dry for 45 minutes.
After 45 minutes, carefully remove all painter’s tape and let the paint fully dry for over 24 hours before using the bathtub.
If you removed any caulk, then recaulk the areas that need it before using the tub.
That’s it!! Admire your hard work and the beautiful transformation of your bathtub because you earned it!

Other FAQs About Changing The Color Of A Bathtub
Here are some other frequently asked questions about changing the color of a bathtub to help you refinish your bathtub with ease!
How Much Does It Cost To Change The Color Of A Bathtub?
Changing the color of a bathtub costs between $60-$100 if you use a DIY refinishing kit or $300-$400 if you have the bathtub professionally reglazed. DIY bathtub refinishing kits are budget-friendly and easy to use to update the color of an old bathtub.
How Long Does It Take To Paint A Bathtub?
It takes 4 hours to clean, sand, rinse, and paint a bathtub using a bathtub refinishing kit. A refinishing kit like the Bathworks Refinishing Kit comes with all of the tools needed to paint a bathtub a new color in a single day.
How Long Do You Have To Wait For A Painted Bathtub To Dry?
It takes 24 hours for a painted bathtub to fully dry before use. If a painted bathtub is used prior to the full cure time, the paint can peel, chip, or crack, and the paint finish will be ruined.
How Long Will A Painted Bathtub Last?
A painted bathtub can last 6-10 years without chipping, peeling, cracking, or yellowing, if the paint is a 2-part resin mixture and the tub does not see excessive wear-and-tear. If the paint is epoxy paint or other, then it can fail and yellow much quicker (within a couple of years).
Final Thoughts On Changing The Color Of A Bathtub
There you have it!
This was my first time painting a bathtub, and I could not believe the transformation! It took that old, ugly yellow bathtub in our rental property and completely brought it back to life!
The paint is so thick and hard that it feels like a normal bathtub. You can’t tell at all that we refinished it.
Since the bathtub was still in good shape (just an outdated color), the Bathworks Refinishing Kit was the perfect solution to help us makeover this bathroom on a budget!
Hopefully, you found this tutorial helpful and now you can tackle changing the color of your own bathtub.
Catch you in my next post!

By Christine
Christine is a blogger and DIYer who tackles home renovation and decorating projects alongside her husband, Adam, for their personal residence and rental properties. Although she successfully tackles large renovation projects to avoid expensive contractor fees and bring her vision to life now, her path to success was not easy.
Go here to read her story, “From a Clueless First-Time Homebuyer To A Confident DIYer Creating Her Dream Home One Project At A Time“.
Popular Posts


DIY With Christine is a participant in the Amazon Services LLC Associates Program, an affiliate advertising program designed to provide a means for sites to earn advertising fees by advertising and linking to Amazon.com.