*My posts may contain affiliate links, which means I may receive a small commission, at no cost to you, if you make a purchase through a link! Thank you for supporting my website!*
Last updated on September 11th, 2024 at 09:30 am
How To finish laminate flooring on a door
Wondering if you have to cut the door jamb to finish installing your laminate flooring properly? Well, look no further because I’ve got your answer!
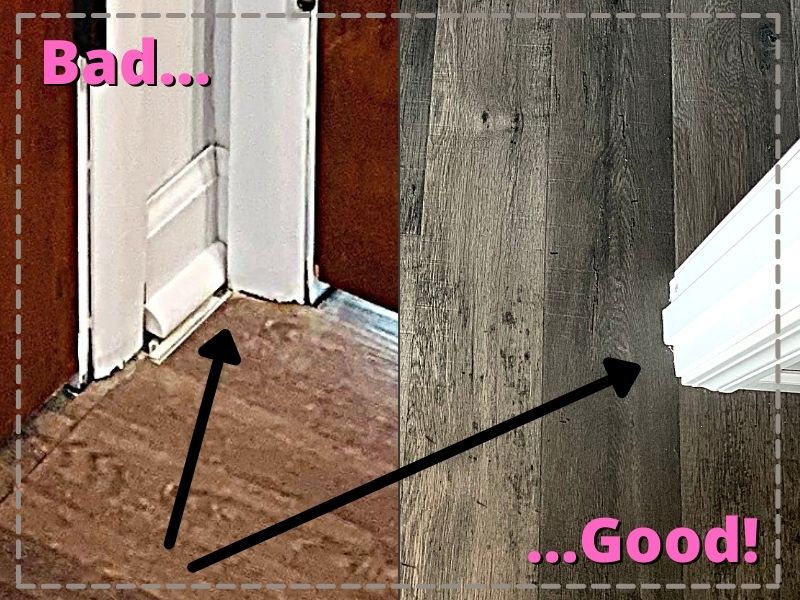
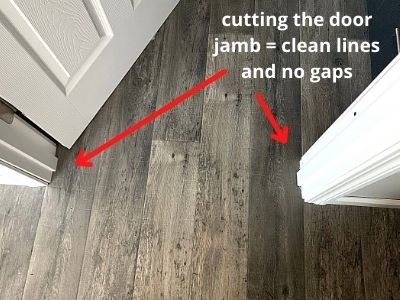
To install laminate flooring around doorways, use an oscillating multi-tool to undercut the door jamb by the thickness of the flooring. By cutting the door jamb, the laminate flooring can then slide underneath the door trim to make installation easier and hide any cut edges from sight.
Now that we’ve got that covered, let’s go over the details further so you can easily execute this task.
Let’s dive in!
Quick Navigation: Cutting Door Trim To Install Laminate Flooring
- Can You Install Laminate Flooring Without Cutting The Door Jamb?
- How To Cut A Door Jamb To Install Flooring
- How To Install Laminate Flooring Under A Door Jamb
- How To Install Laminate Flooring
- Final Thoughts
Can You Install Laminate Flooring Without Cutting The Door Jamb?
Proper laminate flooring installation has two goals:
- Hide the cut edges
- Make the least amount of cuts possible
To achieve both of these goals around a doorway, we need to cut the door jamb.
If you install laminate flooring without cutting the door jamb, installation time and efforts will increase because you will either have to make complicated, precise cuts to perfect frame out the door, or you will have unsightly gaps visible around the doorframe.
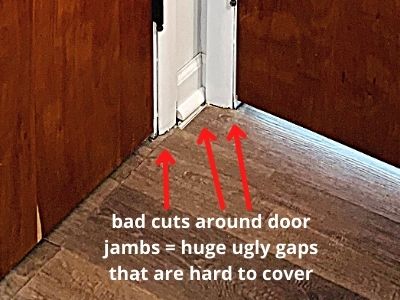
In addition, the laminate flooring will be significantly harder to snap into the rest of the flooring if the “complicated cut” is too precise because there will be no wiggle room to slide the cut piece into place with the remaining pieces.
Instead, save yourself time and effort, and simply undercut the door jamb and trim so that the laminate flooring can slide easily underneath without any complicated cuts.
Why You Can Undercut A Door Jamb Easier Than Cutting The Laminate Around The Doorframe
Doorframes don’t actually sit on the ground. Instead, they are screwed into the studs that surround the door on the sides and the top, which actually holds the weight of the door.
Because of this, you can completely cut out the bottom part of the doorframe and have no worries about gravity taking over.
And with this oscillating multi-tool found at Amazon, this cut is super easy. This tool lets you make straight plunge cuts, so you can easily remove a piece as thick as your flooring to make the installation process easier.
This extra space created by undercutting the door jamb also gives the laminate flooring the gap it needs to expand and contract underneath the door jamb, so it’s out of sight.
It’s the same concept as installing the laminate flooring with a gap then installing some baseboard overtop the gap to hide the edges.
Only in this scenario, we don’t have to remove the door or door trim, we can just cut the tiny piece out that we need and slide the flooring underneath.
Alright, now let’s go over exactly how to undercut the door jamb so you can get to installing your new flooring.
How To Cut A Door Jamb To Install Flooring
To avoid hideous gaps in the flooring around the door frame, you need to cut the door jamb and door trim.
| Level Of Difficulty | Time To Complete |
|---|---|
| Easy | 5 minutes |
| Material List | Tool List |
|---|---|
| Painter’s Tape | Oscillating Multi-Tool |
The easiest way to do this is to:
- Take a piece of your laminate flooring (preferably a scrap piece)
- Cover the top of the laminate flooring with painter’s tape (if it’s not a scrap piece)
- Cover the door trim and door jamb with painter’s tape
- Use the taped piece of laminate flooring to hold your oscillating multi-tool at the correct height as you cut through the door trim and frame
- Cut through the door trim and frame with the oscillating multi-tool
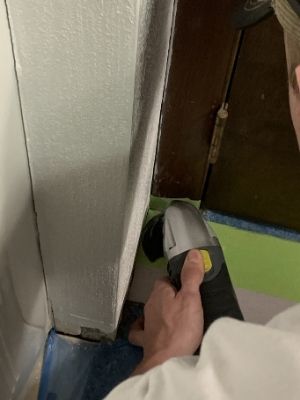
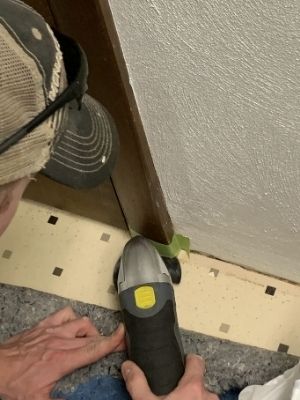
The door frame is secured into the wall studs surrounding it, so it does not need to “sit” on top of your new flooring.
The cut just needs to be close enough to the flooring so that you don’t see a gap after you’ve slid the new floor underneath.
Ta-da! An oscillating multi-tool makes this job so easy.
How To Install Laminate Flooring Under A Door Jamb
After the door jamb is cut to the correct height, all you have to do is slide a new piece of laminate flooring underneath and snap it into place with the rest of the pieces.
And voila! All the edges are hidden!
Locking the pieces together this way is a little complicated because you can’t lift the piece underneath the door jamb up to help you snap it into the other pieces.
To lock this piece into place, you need to take your rubber mallet and softly tap this piece toward the rest of the pieces until it locks in place.
Using painter’s tape on the laminate board as you tap can help prevent any damage or chipping from occurring as well.
That’s it! Continue on with your installation until you get to the other side of the door and repeat the process.
How To Install Laminate Flooring
If you’re new to installing laminate flooring and want the full guide, check out my article here.
I’ll walk you through every step to help you avoid some major mistakes and get the best finish possible.
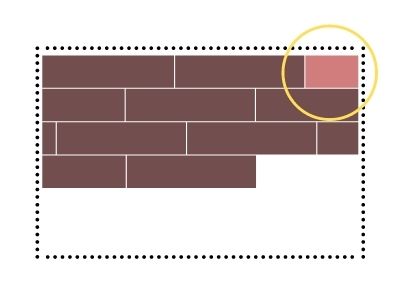
Or if you just need some help calculating the pattern, then you need to check out my laminate flooring stagger pattern tutorial here.
That tutorial will help you calculate all the dimensions you need to cut the perfect pattern for your room (and I used our room as an example to help you do the calculations more easily!)
Final Thoughts On Cutting Door Jamb While Installing Laminate Flooring
There you have it!
Cutting the door jamb to install laminate flooring is easy when you have the right tools.
Luckily, this job only takes two and can be done within minutes. Good luck with the rest of your laminate flooring installation.
Catch you in my next post!

By Christine
Christine is a blogger and DIYer who tackles home renovation and decorating projects alongside her husband, Adam, for their personal residence and rental properties. Although she successfully tackles large renovation projects to avoid expensive contractor fees and bring her vision to life now, her path to success was not easy.
Go here to read her story, “From a Clueless First-Time Homebuyer To A Confident DIYer Creating Her Dream Home One Project At A Time“.
Popular Posts
DIY With Christine is a participant in the Amazon Services LLC Associates Program, an affiliate advertising program designed to provide a means for sites to earn advertising fees by advertising and linking to Amazon.com.

