*My posts may contain affiliate links, which means I may receive a small commission, at no cost to you, if you make a purchase through a link! Thank you for supporting my website!*
Last updated on September 11th, 2024 at 09:25 am
How To Update An Outdated Bathroom On A Budget
Are you tired of looking at the same, old bathroom decorations (or lack thereof) day after day and wanting some easy bathroom remodel ideas on a budget?
That is exactly how my mom felt about her guest bathroom.
She wanted to create a modern and clean-looking bathroom when her guests stayed. In its current state, her bathroom made you feel more like you were at your grandma’s house.
NOT the vibe she was desiring at all. Lucky for her, I have been dying to give that bathroom a total makeover!
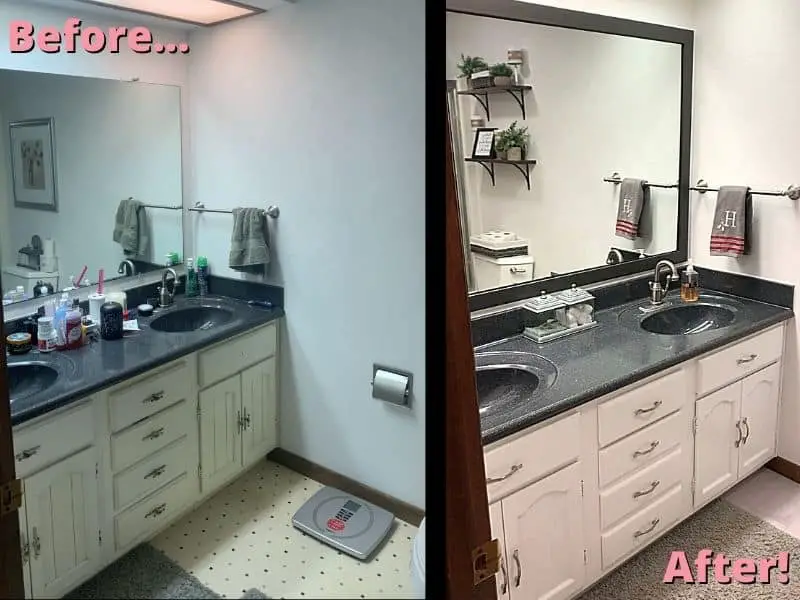
In this post, I will walk you through the steps I took to refresh her outdated bathroom and bring it from “plain & boring” to “modern & fabulous”, so you can refresh your outdated bathroom!
I will also show you how I did it all while staying on a budget because nobody’s got time to pay expensive contractors for things we can do by ourselves.
Let’s dive on in!
Bathroom Remodel Ideas On A Budget
- Get down low & dirty and deep clean like you mean it!
- Pick your color and paint those walls.
- Refresh your outdated bathroom vanity with a new paint job.
- Replace those old, outdated knobs!
- For a bold, new look, replace the floor and/or repaint the trim.
- Ditch the old wall decor & add shelving with beautiful (fake) plants!
- Frame out or replace that old mirror with something modern.
- Clean and paint your existing light fixtures, outlets, and switches (or swap them out for new ones).
- Replace your shower hardware and recaulk everything
- Get O-R-G-A-N-I-Z-E-D: Add shower, cabinet, and closet organization
One: Get Down Low & Dirty And Deep Clean Like You Mean It!
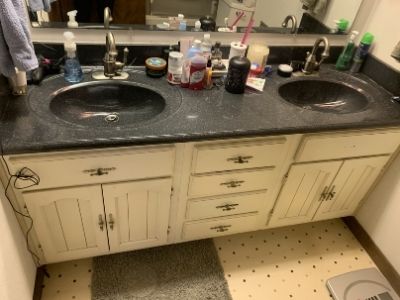
The first idea for the bathroom remodel ideas on a budget is to CLEAN OUT.
I am sure you’ve been there – you can’t fully visualize a room’s capabilities until you clean out the crap & clean up all the little nooks and crannies. So that’s where I started.
I took out everything from the vanity and shower & either threw it away or organized it with other similar items into plastic grocery bags.
Nothing feels better to me than throwing away old junk that I’m not sure why I keep around for so long!
In addition, I took off all the fixtures on the walls (including the towel bars, old pictures, toilet paper holder, outlet covers, trash can, and so on).
After everything was cleared out and thrown away or organized, I wiped everything down with a kitchen degreaser (I used Easy-Off found at Amazon, and it cut right through the dirt on my cabinets!) to prep my surfaces for the next step.
Even clean in those drawers, on the walls around the sinks, and all the wall fixtures you’re going to keep.
Be prepared to be grossed out by how dirty your room is. It’s okay, it happens to the best of us! Now we’re ready for the next step.
Two: Pick Your Color & Paint Those Walls.

The second idea for the bathroom remodel ideas on a budget is to paint the walls.
If you are on a tight budget and dying to refresh your bathroom, paint is the best way to go.
Pick your favorite neutral (my favorite color is Agreeable Gray from Sherwin Williams) or be bold and pick a color that pops for an accent wall!
Wall Color
My mom wanted a fresh and clean look, so we went with the warm white (undertones of brown) called Snowbound from Sherwin Williams.
Other Colors
In addition, we knew the countertop was black and all the wood trim was dark walnut. (We knew this because we didn’t change either thing and wanted to incorporate them into the design better).
So we decided a stark, bright white on the cabinets would help brighten the room as well.
Lastly, we chose to accent the room with silvers, blacks, green from plants, and more dark walnut wood. With all that in mind, we chose white & I got to work painting!
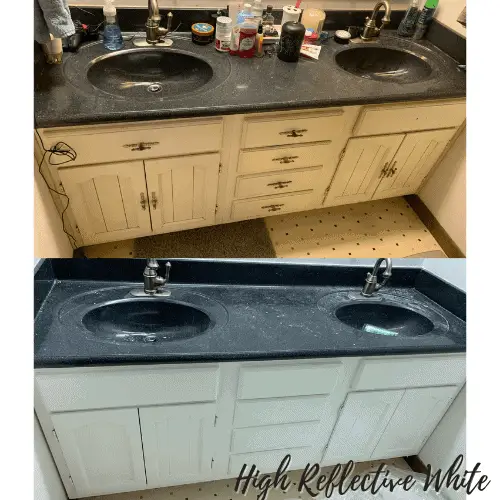
Three: Refresh Your Outdated Bathroom Vanity With A New Paint Job.
The third idea for a bathroom remodel on a budget is to paint your bathroom cabinets.
Similarly, save yourself some MONEY by refinishing your current vanity. We easily could have ripped out the old vanity and countertops and dropped $600 to have all new stuff.
But why would we do that when there was already a well-made vanity & beautiful countertops in there?
With $65 worth of tools, paint, and a little bit of sweaty labor, I made that old vanity look BRAND NEW.
Seriously, everyone that’s seen it thought I installed a new vanity. That made my heart happy!
Bear with me though, this project was one of the things that took the most time and effort. And it had the most steps to complete correctly and professionally.
How To Paint The Bathroom Cabinets
I had to:
- Take off all the cabinet doors and drawers
- Take off the old cabinet hardware
- Wipe the doors, drawers, and vanity down with a kitchen degreaser
- Fill the dings and old cabinet hardware holes with wood filler (only fill the old cabinet hardware holes if you’re changing the style of hardware – I went from a single hole knob to a two-hole pull because I think they look more elegant)
- Sand the doors, drawers, and vanity down with 120 grit sandpaper
- Wipe everything down again
- Paint everything with primer (the cabinets were already white so I only had to do this once)
- Sand with 220 grit sandpaper and wipe down again
- Paint everything with Cabinet, Trim, & Door paint. (I went with Pure White from Sherwin Williams)
- Sand once again with 220 grit sandpaper and wipe down
- Paint everything with the Cabinet, Trim, & Door paint a second time (if your cabinets were previously a dark or wood color, you might need a third coat)
- Reattach all the doors and drawers to the vanity
- Drill the new holes for the new cabinet hardware and attach
And voila! It seems like a long list to tackle, but it’s not once you start working through it.
It only took me a few days of working an hour here and there to complete it all by myself. You could easily tackle it in a day or two if you wanted to commit more time than I did.
Full Bathroom Cabinet Painting Tutorial
Painting the bathroom cabinets was definitely worth the time and effort though because it refreshed that outdated bathroom almost immediately!
For a more in-depth tutorial on how to paint your bathroom cabinets like a pro see my tutorial here.
Four: Replace Those Old, Outdated Knobs!
The fourth idea for a bathroom remodel on a budget is to replace the cabinet knobs.
Maybe your vanity still looks fresh out of the box, but the handles just aren’t vibing with your style anymore. You’ve got it made then!
Search online to find the style you love and will fit the current hole count you have. That way, no repair or painting is necessary.
(Or even better, if you like your current knobs, but want a different color, just spray paint them with Rustoleum primer and spray paint!)

I chose this whimsical, satin nickel style that complimented my mom’s cabinets perfectly.
The curved handle looked like it was meant to go with these cabinets. It matched the curved design in the doors perfectly!
This is an easy step that immediately made the cabinets look decades newer.
Also, don’t just stop at the vanity knobs. Also, change out those outdated doorknobs and hinges.
All you need is a screwdriver and some time to take the door down and replace the knob and hinges.
New doorknobs and hinges are so cheap too – I chose this black knob found at Amazon and hinges to compliment the dark walnut door.
Five: For A Bold, New Look, Replace The Floor And/Or Repaint The Trim
The fifth idea for a bathroom remodel on a budget is to replace the floor and repaint the trim.
For this room renovation, the flooring was the most expensive part, but it was one of the biggest transformations. So it needed to be done.
Also, now is the time to paint your trim if you are thinking about it. This is because the trim will most likely need to be pulled off the wall to lay the flooring. (I took it off because it made my life so much easier!)
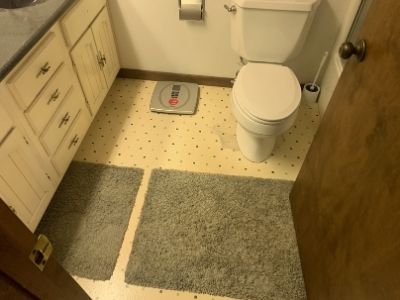
As I mentioned previously, my mom wanted a nice, bright, and clean feel in the bathroom, so we opted for this white/light gray laminate flooring from Home Depot.
The white/gray color went beautifully with the white walls, white vanity, and walnut door and trim. It just gave that fresh feel my mom was going for!
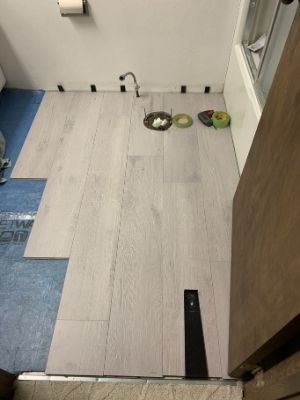
How To Install Laminate Flooring
Laminate flooring is so easy to install and is a super DIY-friendly project.
I chose a 3-row pattern, divided the room out to make sure I didn’t end up with any baby pieces next to the tub or the vanity, and got to work.
First, I removed all the trim from the room (I just wiped them down because we used the same pieces).
Then I turned off the water, drained the toilet, and removed it, and the wax ring from the bathroom. (FYI, you’re going to need to replace the wax ring before you put the toilet back in place.)
I used my measurements to start cutting and laying out the first row. One of these laminate floor tool kits, a hammer, and a rubber mallet are lifesavers for this job.
To see exactly how to layout and install laminate flooring, check out my complete guide! I cover the exact steps in detail that you need to plan, measure, and layout laminate flooring. You’ll save thousands of dollars if you do this easy DIY project yourself!
Once I finished laying all the pieces, I caulked along the side of the bathtub and vanity. Caulking around these areas is important to keep water out from under your new flooring.
In addition, I had my husband help me put the wax ring back on and the toilet back in place. This is a great place to recruit help because toilets are heavy and hard to align over the hole by yourself.
Lastly, I reinstalled the trim.
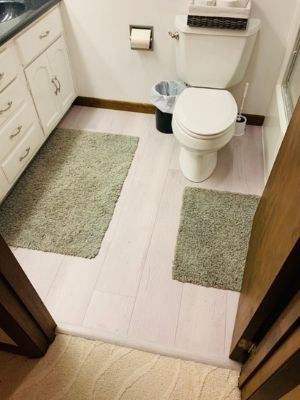
The look of the new flooring in the bathroom outweighed the cost of the laminate flooring!
Six: Ditch The Old Wall Decor & Add Shelving With Beautiful (Fake) Plants!
The sixth idea for a bathroom remodel on a budget is to add shelves.
If you’re looking for a simple and super cheap way to refresh your outdated bathroom, then this step is for you.
When my parents bought their house 13 years ago, the previous owners were older and downsizing. Because of their limited space in their new house, they left a lot of their decor pieces.
What a score for a new house owner who doesn’t want to fork out a ton of cash for decor!
Well…. That was fine and dandy for a while, but it’s been 13 years and it’s TIME for some updates. (My momma agrees! lol).
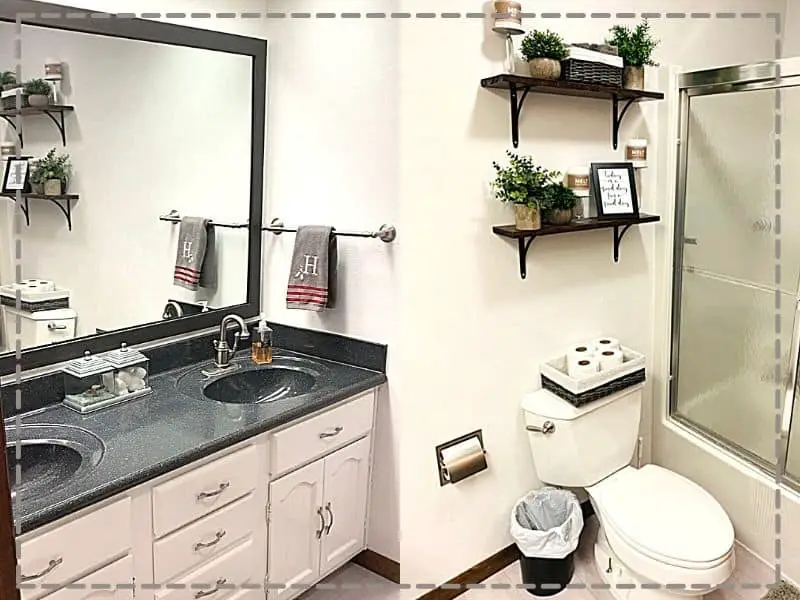
So we took out the old picture on the wall and the back-of-the-toilet decor and replaced it with beautiful DIY shelves, woven baskets, elegant candle holders, and the CUTEST little fake plants I’ve ever seen.

Don’t these shelves just look stunning?! Believe me, they made a WORLD of difference in this bathroom. They brought the natural colors and different textures out into the room.
When you walk in, you can’t stop staring at it!
Decorative Items
Here’s the list of items we bought to decorate the shelves (all from Amazon because who doesn’t love getting packages on your doorstep):
- Gray wicker baskets
- Silver candle holders and simple, white decorative candles
- Black picture frame
- Mini-potted (fake) plants
The wood, stain, and shelf brackets came from Home Depot, and I worked some of my DIY magic to make these bad boys on a budget.

And lastly, this article from The Spruce has a fantastic list of styling tips for open shelving, so you’re sure to have beautiful shelves!
Seven: Frame Out Or Replace That Old Mirror With Something Modern.
The seventh idea for a bathroom remodel on a budget is to frame or replace the mirror.
Do you have an old builder-grade mirror that is fabulous and huge, but looks plain and boring without a frame?
Boy, how I envy you! You’ve got a stunning mirror in your hands, and you might not realize it yet!
My mom has one of those in her guest bathroom, and it was the easiest DIY ever to accomplish.
I made my own frame and hung it on the wall overtop the existing mirror – talk about a total transformation.
All you need to do is:
- Pick out whatever style trim you want
- Measure your mirror and cut the trim to length
- Glue together the ends
- Paint or spray paint (the front and back)
- Hang the frame using command strips, glue, or mounting tape.
Just remember, the best way to refresh your outdated bathroom is all in the details!
After I added a simple frame to her mirror, I couldn’t believe the different vibe I got from the room.
Plus this DIY was very friendly to my budget! (It cost less than $10!) Check out this tutorial for a more detailed explanation of how I made this custom DIY bathroom mirror frame!
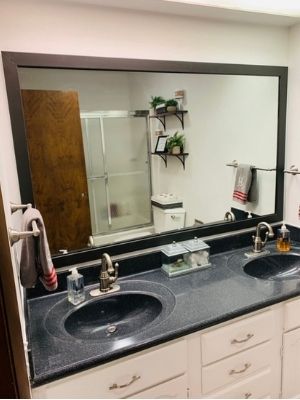
Also, I framed out the old light fixture with new, white trim similarly to how I installed the frame on the mirror. That made a huge difference as well!
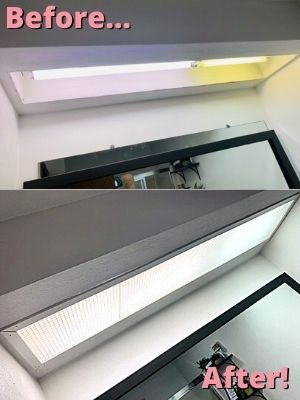
Eight: Clean and Paint Your Existing Light Fixtures, Outlets, And Switches (Or Swap Them Out For New Ones).
The eighth idea of the bathroom remodel ideas on a budget is to clean and paint your existing light fixtures, outlets, and switches!
While you’re taking the time to update your bathroom, replace the lightbulbs with daylight bulbs to immediately brighten up your bathroom.
(Daylight bulbs are excellent for kitchens and bathrooms because they’re task-oriented rooms where you want to see clearly.)
Also, take down the old light fixtures and give them a good, deep cleaning.
If they are no longer matching the vibe of your room, replace them for a different feel, or for a budget-friendly option, spray paint them to match the new color scheme of your room.
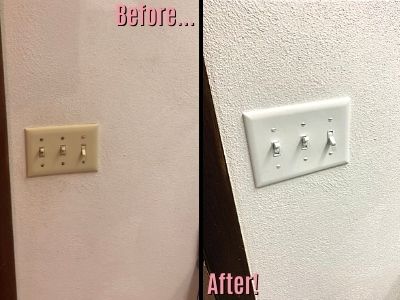
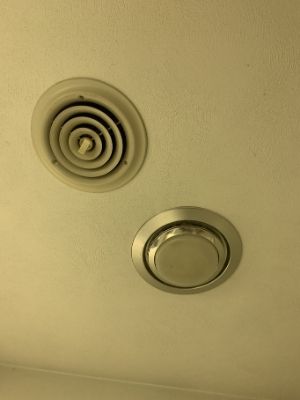
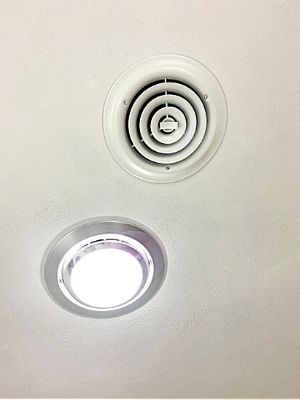
Once you clean, paint, or replace the old light fixtures, outlets, and switches, your room will really start to gel together.
Nine: Replace Your Shower Hardware And Recaulk Everything
The ninth idea for a bathroom remodel on a budget is to replace the shower hardware.
If you really want to refresh your outdated bathroom and give your guests the spa treatment, then it’s time to take a look at your shower hardware.
If you buy the same brand shower head as what’s already installed in your bathroom, you’ll most likely be able to spin off the old head and replace it with a sparkly, new one.
On the other hand, if you like the one you have, but want it to sparkle again, just twist it off (you might have to cut the caulk around it) and fully submerge it in white vinegar for a couple of hours.
That will help knock the crud and oxidation off for a very cheap price.
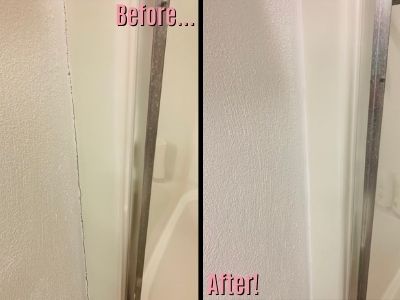
After you have it looking all shiny and new, it’s time to recaulk EVERYTHING! Caulk is a beautiful product for two reasons; it waterproofs/protects your home, and it hides all the flaws/makes everything look finished.
Make sure you get 100% silicone waterproof caulk like this.
How To Choose Your Caulk
Use clear caulk for:
- Shower doors
- Shower hardware (showerheads, handles, faucets)
- Anywhere that you don’t want to see the white color
Use white caulk around the:
- Shower base (between the tub and the floor)
- Shower walls (where the shower walls and actual walls meet)
- Vanity backsplash (clear can be used here as well)
- Toilet base (only if it does not sit flush with your floor)
Fresh, clean caulk will give your bathroom an immediate clean and new feel for as little as the cost of a tube or two.
Side note: If you are just getting started in the world of DIY and are looking for a list of basic tools you need to make your other rooms look nice, I’ve got you covered over here!
Ten: Get O-R-G-A-N-I-Z-E-D: Add Shower, Cabinet, And Closet Organization
The last idea of the bathroom remodel ideas on a budget is to get organized! Don’t let all your hard work go to waste by filling your bathroom with a cluttered mess again.
We already #cleanedout our stuff, and hopefully, you organized the items into groups as you went through them already.
Make sure to check the dimensions so you know how many to get and if they’ll fit. Or just use old Amazon boxes covered in pretty wrapping paper for a cheaper alternative.
Put your items in their new bins, and store them nice and neat in your clean vanity. (Or better yet, add them to your birthday or Christmas wish list and make it super easy for your loved ones to get you the items you really want!)
I don’t know about you, but an organized space takes a HUGE weight off my shoulders and lets me clear my mind. Hopefully, your new space will do the same for you!
Final Thoughts On Easy Bathroom Remodel Ideas On A Budget
There you have it! 10 quick and easy steps to refresh your outdated bathroom.
Follow these simple steps, and you’ll be well on your way to creating a bathroom you love!
P.S. If you’re ready to update your shower and are looking for a budget-friendly, easy-to-DIY, custom-looking alternative to a traditional ceramic tile shower, then you’ve got to check out our detailed tutorial on Palisade/DumaWall shower tile.
It’s one of the only truly waterproof shower tiles on the market!
Catch you in my next post!

By Christine
Christine is a blogger and DIYer who tackles home renovation and decorating projects alongside her husband, Adam, for their personal residence and rental properties. Although she successfully tackles large renovation projects to avoid expensive contractor fees and bring her vision to life now, her path to success was not easy.
Go here to read her story, “From a Clueless First-Time Homebuyer To A Confident DIYer Creating Her Dream Home One Project At A Time“.
Popular Posts


DIY With Christine is a participant in the Amazon Services LLC Associates Program, an affiliate advertising program designed to provide a means for sites to earn advertising fees by advertising and linking to Amazon.com.