*My posts may contain affiliate links, which means I may receive a small commission, at no cost to you, if you make a purchase through a link! Thank you for supporting my website!*
Last updated on September 11th, 2024 at 09:22 am
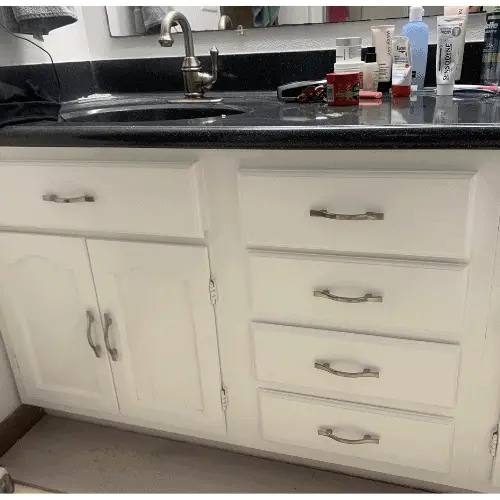
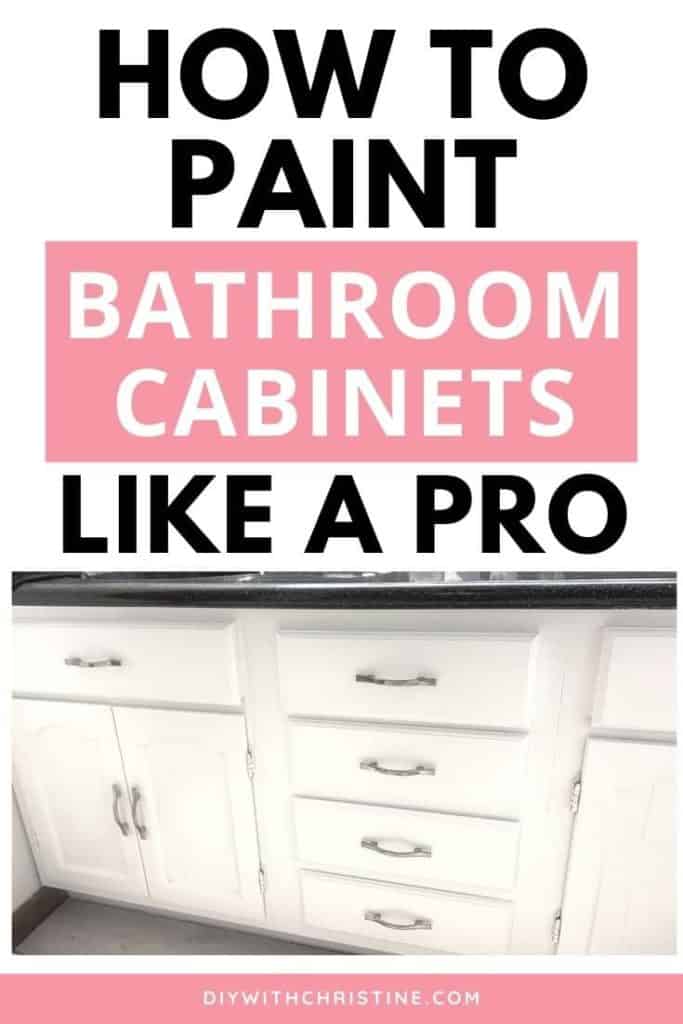
How To Paint Bathroom Cabinets White
Want to paint your bathroom cabinets like a pro, but don’t want to spend thousands of dollars on an actual pro?
Look no further! You can easily give your bathroom a huge makeover without any major demo work or spending thousands (or even hundreds) of dollars. And you can do it all by yourself, you go girl!
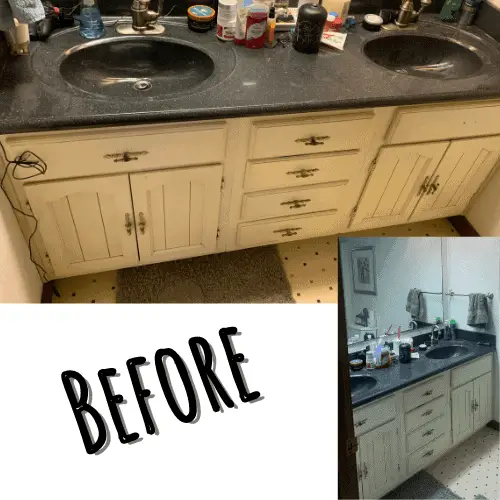
As you’ve probably noticed, your cabinet is a huge focal point in your bathroom. If the cabinet colors don’t complement the rest of the room, you’ll never truly be able to create a cohesive, gorgeous, modern bathroom.
Well, you’re in luck because it’s a simple process to strip down and paint your bathroom cabinets. All it takes is some time, a little elbow grease, and this detailed guide. Follow along and you’ll learn exactly how to paint bathroom cabinets like a pro while saving yourself tons of money. I promise you’ll be in love with your bathroom cabinets for years to come!
Let’s dive on in!
Level Of Difficulty
Easy
Time To Complete
2 days
Materials To Paint Bathroom Cabinets
- Kitchen Degreaser
- Wood Filler
- Sandpaper (80 grit, 120 grit, 220 grit)
- Zinsser Primer
- Water-based Cabinet, Trim, & Door Paint in your chosen color
- Painter’s Tape
- New cabinet pulls (optional)
Tools To Paint Bathroom Cabinets
- Screwdriver
- Drill
- Tape Measure
- Small Putty Knife
- Mechanical Sander (Optional)
- Paint tray
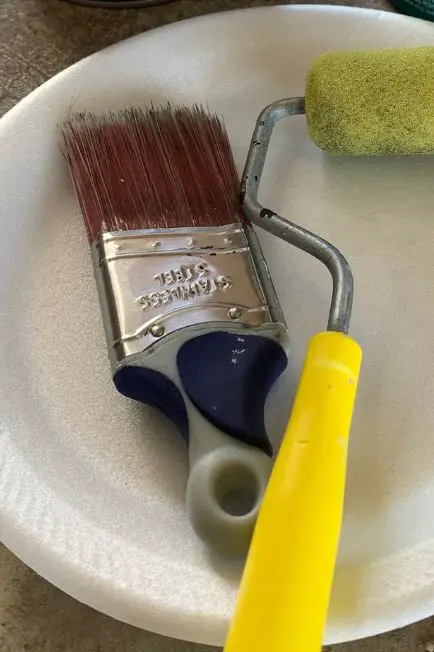
- 2” Angled Paintbrush
- 2” Foam Paint Roller
How To Paint Bathroom Cabinets Like A Pro
- Remove Old Cabinet Hardware
- Remove All Cabinet Doors And Drawers
- Wipe Down Doors, Drawers, And Cabinet With Kitchen Degreaser
- Fill In Dings And Old Cabinet Hardware Holes With Wood Filler (Optional)
- Sand Down All Doors, Drawers, And The Cabinet With 80-220 Grit Sandpaper
- Wipe Everything Down Again
- Paint The Doors, Drawers, And Cabinet With Primer, Sand With 220 Grit Sandpaper, And Wipe Down Again
- Paint The Doors, Drawers, And Cabinet With Cabinet, Trim, & Door Paint, Sand Between Layers Once Again With 220 Grit Sandpaper And Wipe Down
- Reattach All Doors And Drawers To The Cabinet
- Drill New Holes For The New Cabinet Hardware (Optional) And Attach
Step One: Remove Old Cabinet Hardware
First off, let’s remove all of that old cabinet hardware with your screwdriver or a drill. Whether you’re keeping and reusing them or replacing them, they need to be removed from the doors and drawers. This way, we will have plenty of room to make beautiful paint strokes.
Plus, now is a great time to change out the style of your cabinet hardware if it’s outdated because we can easily switch how many holes are in the cabinet (more on this later).
Nothing makes a bathroom cabinet look brand new like fresh paint and modern hardware!
Want to see what other updates I made to this bathroom? I used these 10 easy steps to refresh this outdated bathroom, and let me say, it made a HUGE difference!
Step Two: Remove All Cabinet Doors And Drawers
Next, we need to take off the cabinet doors and drawers, so we can paint them in another room.
We want to do this for two reasons:
- You won’t make a mess in your bathroom/house.
- You can paint each piece while it’s laying down, so you can avoid drip marks (gravity is not your friend when it comes to painting!)
Taking off all the hinges, labeling them with what door they go to (don’t forget this step otherwise you might have a hard time finding which door they belong to!), and setting them to the side in a baggie will let us sand and paint without any obstacles in our way.
NOTE
Some drawers let you remove the face for refinishing. If there is a screw on the backside of the drawer face, unscrew that and only paint the face! (That’s the only part anyone sees anyway.) On the other hand, if your drawer is nailed or stapled together, then just remove the entire drawer for painting.
Step Three: Wipe Down Doors, Drawers, And Cabinet With Kitchen Degreaser
After everything is out of your way, it’s time for us to wipe those babies down! Tons of gunk and filth are probably covering your cabinet, and you might not even notice it depending on the color (it’s okay, all of our vanities look like that, it’s life!).
Paint is a fickle little diva though, so all that gunk is going to cause some problems if we don’t get rid of it before we sand. You want to do this before you sand, otherwise you’ll just rub all of that dirt and grime into your cabinet, which is the opposite of what we want.
Take out your handy-dandy kitchen degreaser (I like this Easy-Off kitchen degreaser found at Amazon) and scrub every inch of the doors, drawers, and cabinet – especially around heavy use areas like the handles.
Even the whitest cabinets shouldn’t take that long to wipe down. I promise the benefits will be completely worth it though if you take the time to do this step.
Step Four: Fill In Dings And Old Cabinet Hardware Holes With Wood Filler (Optional)
While you’re taking the time to refinish your bathroom cabinet, I highly recommend swapping out your old hardware for new. If the new cabinet handles are the same size and hole placement as your current ones then lucky you, you’ve saved yourself a step! Go ahead and move on to the next step.
If, on the other hand, you’re like me and are dying to swap those old, single-hole knobs for long, elegant, 2-hole pulls, then you’ve got an extra step on your hands. (No need to worry though, it’s an easy step!)
Grab your wood filler and a small putty knife. Scoop a hearty amount of wood filler onto the corner of your putty knife and push the filler into your old hardware holes. Run your blade down over the hole, then run your blade across the hole from left to right (or vice versa).
Only do this once or twice per hole, so you don’t run the risk of overworking the filler. It’s okay if it’s not perfectly smooth right now. You want to leave a little extra on top of the holes to allow for sanding. Otherwise, you’ll end up with a divot from sanding that you won’t notice until after you’ve started painting (guilty as charged).
Nobody’s got time for redoing steps! Also, don’t forget to do the holes on the backside of your doors and the inside of your drawers.
NOTE
Don’t fill in the holes where your hinges go. Unless you’re replacing them, you’ll want to use the same holes to reattach the doors to the cabinet.
Step Five: Sand Down All Doors, Drawers, And The Cabinet With 80-220 Grit Sandpaper
Let’s get down to (some sandy) business!
The rule about sandpaper – the smaller the grit size, the more coarse the paper. For example, if you’re wanting to rough something up, take layers off, or strip paint, 60-80 grits are great. If you’re sanding bare surfaces, 100-150 grits do the job. And if you’re sanding between layers or doing a final pass, 180-220 do the best.
To paint your bathroom cabinets like a pro, it’s crucial that you sand between layers and use the correct sandpaper grit size each time. All that sanding will give you a beautiful, smooth finish that’ll make people believe you bought a brand new bathroom cabinet!
Since this is the first round of sanding, we need to assess our cabinet in its current state.
Is your cabinet:
- Painted already?
- Use 60-80 grit sandpaper and strip it off.
- Liquid sandpaper might be worth giving a try to save some time and effort
- Stained already?
- Use 80-120 grit sandpaper and strip the top layer off.
- Made of MDF?
- Use 120 grit sandpaper by hand (not a mechanical sander) so the surface doesn’t get damaged.
- Bare wood?
- Use 120-220 grit sandpaper to smooth the surface and prepare it for primer.
It’s your choice whether you sand by hand or use a mechanical sander. If you have a mechanical one, it can save you time and effort. (I absolutely love my DeWalt mechanical sander! I can whip through all the sanding so fast! And believe me, I’m not a big fan of the sanding steps at all. I just know it’s a necessary evil, and I get through it as fast as possible!) But if you don’t have one already, a couple of small packs of sandpaper will do the trick for this job.
Step Six: Wipe Everything Down Again
Grab a clean, soft cloth or paper towel, and start wiping. We need this surface to be free and clear of all dust, so our primer and paint and stay nice and happily stuck onto our smooth surface.
Don’t be afraid to use multiple cloths or paper towels because the last thing we want is for all of our hard work to go to waste when our paint starts to peel off.
Step Seven: Paint The Doors, Drawers, And Cabinet With Primer, Sand With 220 Grit Sandpaper, And Wipe Down Again
Finally…. It’s time to paint. First, we must use our trusty primer. I love this primer by Zinsser found at Amazon because it dries super fast (in 30 minutes), blocks stain and graffiti, and sticks to all surfaces even if you didn’t sand them very well. (I still would sand because this is how to paint bathroom cabinets like a pro. We want a paint job that lasts for years to come, not a shoddy DIY “quick-as-I-can-get-it-done” job.)
Second, lay your doors and drawers on the ground and start painting. Use your angled paintbrush to get in all the corners and detail-work first, then go over the larger, smooth surfaces with your foam roller.
PAINTING TIP
Less is more. Try to avoid dipping your paintbrush directly into the paint can. Instead, pour an inch of paint into a cup and tap your brush into the paint hitting the bottom of the cup to get the excess paint off. Put the short end of the angled brush into the corner (not the flat, wide side) and pull down in one fluid motion.
You’ll make your paint last longer, and you’ll avoid drips that you’ll have to sand off later.
If your cabinet is a dark color (pretty much any color except white) OR if it’s bare wood (especially redwood, cedar, or any other oil-heavy wood), you’ll want to put 2 or 3 coats of primer. If your cabinet is already white, you can probably get away with 1 coat.
Luckily, this primer dries fast, so once you’ve got a coat on one side of everything, they should be dry to flip them over and paint the other side. While the second side is drying, go inside and paint the cabinet. Then come back out, flip everything over, lightly sand with 220 grit sandpaper, wipe down, and start again.
NOTE
Lightly sanding between coats of primer will give your cabinet that smooth, professional finish you’re looking for. It doesn’t take much, just a quick run over everything (especially any area that has a drip or imperfection in the paint), then wipe it down thoroughly (you know the drill!).
Step Eight: Paint The Doors, Drawers, And Cabinet With Cabinet, Trim, & Door Paint, Sand Between Layers Once Again With 220 Grit Sandpaper And Wipe Down
Now for the fun part, time to paint the new, pretty color you’ve picked!!!
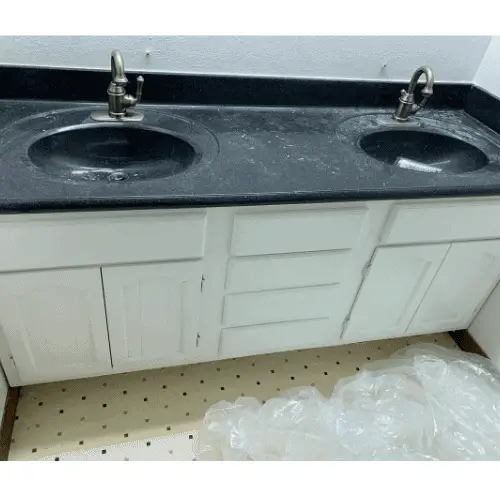
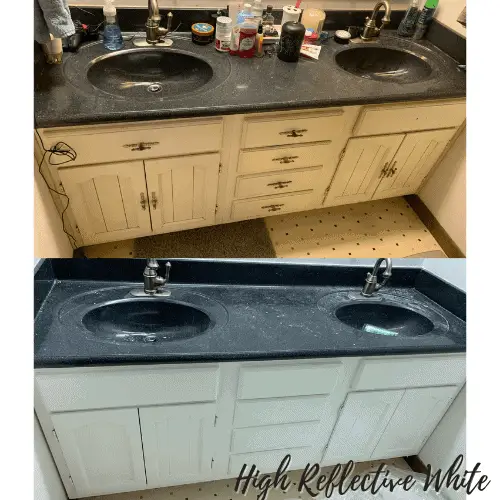
For a durable water-based paint that’s excellent for cabinets, I recommend a Cabinet, Trim, & Door Paint from your favorite paint brand. You can have this paint tinted whatever color your heart desires. For my cabinet, I just left it in the Ultra Bright White it came in because I wanted a stark, bright white on my cabinet.
Just like the primer, paint one side of all the doors and drawers, and while they’re drying, go and paint the cabinet. Flip them over and paint the other side. Two coats of this paint will be perfect.
This time, sand very lightly between each layer with 220 grit sandpaper. This will take out any brushstrokes left behind without completely taking off the new paint. If you’re only doing 2 coats then this is your !!LAST!! time sanding! *Don’t sand after the last layer of paint.*
I know, I know. You’re tired of me telling you to sand and wipe down lol. Well, guess what! You’re in the home stretch!! Let’s finish this baby!!
Step Nine: Reattach All Doors And Drawers To The Cabinet
Remember how I said to label and bag all hinges and knobs/pulls for your cabinet? Well, you’re about to find out why that was important!
Grab your first bag, the door it belongs to, and your screwdriver or drill. Screw the hinges back on the door, then screw the door back onto the cabinet (I recommend doing it in this order, it’s easier to hold with one hand while screwing with the other).
If you labeled everything, then the holes should line up perfectly (because they belong together), and this part should be a breeze. If you didn’t label everything, your holes may or may not line up correctly, and it might take some time to sort through.
Then reattach the drawer faces to the drawers with their screws, or slide the drawers back into their homes.
Step Ten: Drill New Holes For The New Cabinet Hardware (Optional) And Attach
Last, but not least, if you’re using your same hardware or bought new hardware with the same holes, screw them back into place.
If you bought new hardware with new holes, it’s time to drill. To do this easily, I recommend using this cabinet hardware template found at Amazon. These are so easy! You just find the holes that line up with the center-on-center size of your new cabinet hardware and that line up with the center of your cabinet.
Mark the holes with a pencil, drill, and screw in new hardware. Easy-peasy!
If the holes on the template don’t line up perfect for your doors and drawers though (sometimes mine have and sometimes they haven’t), then it’s still pretty easy.
Here’s what you do:
- Mark a dot in the center of the width of the drawer and the center of the height of the drawer. This is your center point.
- Take your hardware center-on-center measurement and divide by 2 (for example: 3-inch center-on-center divided by 2 = 1.5 inches).
- Measure out that distance from either side of your center point and mark a dot (for example: measure 1.5 inches to the left of your center point and mark a dot then measure out 1.5 inches to the right of your center point and mark a dot).
- Take your level and make sure the dots are level (adjust as necessary).
- Drill one hole and check to make sure both holes are still going to line up with your hardware.
- If they do, drill the next hole. If they don’t, re-mark your dot and drill the second hole.
- Screw-in your hardware.
Final Thoughts On How To Paint Bathroom Cabinets Like A Pro
There you have it! That’s all it takes to paint your bathroom cabinets like a pro. And it sure as heck saves you a ton of money while giving you a major confidence boost that you can tackle anything in life. How cool!
Once you’re done, take a picture and show it off to the world because you’ve worked hard to create a beautiful and professional-looking bathroom cabinet! And you did it all by yourself! You #Handywoman, you!
If you’re a beginner, you might be thinking I’m crazy for calling this an “easy project”, but trust me, once you start, you’ll see how truly easy it is.
If you’re still nervous you might destroy your bathroom cabinet and be forced to buy a new one (no worries, we’ve all had that fear), just practice on a small piece of trim that’s similar material (you can buy small trim pieces of most materials at your local hardware).
Or even practice on an inconspicuous spot (like the inside of the drawer or back of the door) first to get your feet wet. Before you know it, you’ll be ready to tackle every home improvement project in your home, and I’ll be here cheering you on the whole way!!
Catch you in my next post!
The Best Paint Supplies I’ve Used
Wooster Shortcut Angle Sash Paintbrush (2-Inch)
This is my all-time favorite paintbrush because it is so lightweight! The short handle takes the pressure off your wrist and creates an extremely comfortable grip, so you can paint longer without feeling the weight on your wrist. I use this paintbrush on 99% of my paint projects. You can find this paintbrush here on Amazon.
FoamPRO 164 Fine Finish Roller (4-Inch)
If you want the least amount of paint texture left from a roller (such as on metal or furniture), then this is the best roller you can use. The fine finish in the foam leaves the tiniest bit of texture that can easily be sanded between coats to get a finish almost as good as a sprayed finish. You can find this awesome foam roller here on Amazon.
If you’ve been curious about how we are decorating our 1950s Ranch, you should check out our “Shop Our Home” page. You can find products that we’ve personally bought to decorate our home.

By Christine
Christine is a blogger and DIYer who tackles home renovation and decorating projects alongside her husband, Adam, for their personal residence and rental properties. Although she successfully tackles large renovation projects to avoid expensive contractor fees and bring her vision to life now, her path to success was not easy.
Go here to read her story, “From a Clueless First-Time Homebuyer To A Confident DIYer Creating Her Dream Home One Project At A Time“.
Popular Posts


DIY With Christine is a participant in the Amazon Services LLC Associates Program, an affiliate advertising program designed to provide a means for sites to earn advertising fees by advertising and linking to Amazon.com.