*My posts may contain affiliate links, which means I may receive a small commission, at no cost to you, if you make a purchase through a link! Thank you for supporting my website!*
Last updated on February 28th, 2024 at 04:29 pm
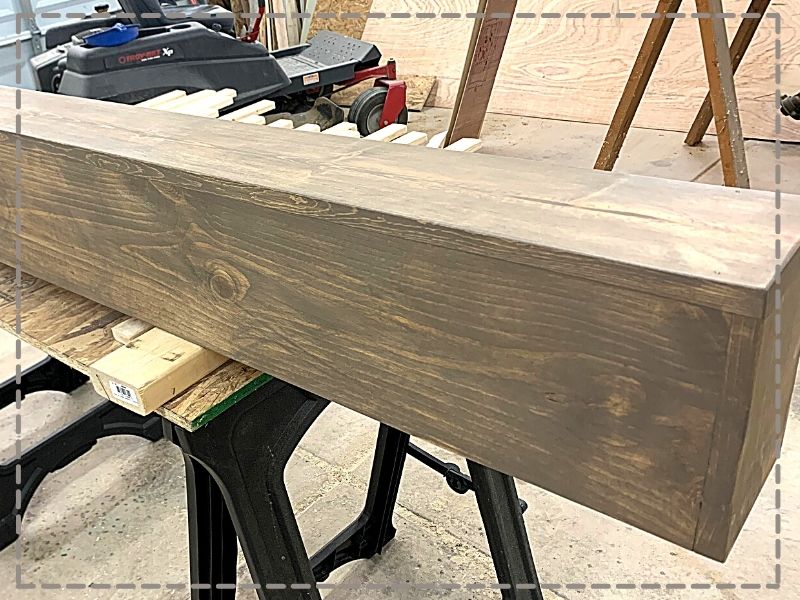
Just stained your beautiful wood furniture, wood fence, or hardwood floors and wondering if you have to seal it? Well, look no further because I have your answer!
After staining wood, you should seal it. Failing to seal the wood after staining leaves it vulnerable to water damage and scratches/gouges. Many sealers also add vibrancy to the color of stained wood and make it appear shinier. To protect stained wood for years, apply 2-3 coats of high-quality sealer.
Luckily, sealing stained wood is not hard. This guide explains everything you need to know about sealing your stained wood and why you should do it. It also dives into some specific tips about using sealers. That way, you can get the most beauty out of your wood furniture and flooring.
Let’s dive in!
Quick Navigation: Sealing Wood After Staining
- What Happens If You Don’t Seal Stained Wood?
- What Are The Benefits Of Sealing Wood?
- What Are The Downsides Of Sealing Wood?
- Other FAQs About Sealing Wood After Staining It
- Final Thoughts
What Happens If You Don’t Seal Stained Wood?
Sealing your stained wood prevents numerous things that you don’t want to happen from happening.
For one, clear coat sealers are the shield between your stained wood and Mother Nature.
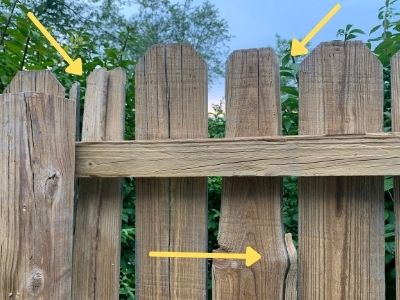
Rain and moisture seep into unsealed wood, causing it to warp and rot over time. And the sun’s UV rays can dramatically dull the color of woods that aren’t stained and sealed.
As a result, you should almost always seal your wood furniture or wood fence that’s outdoors.
However, that doesn’t mean you shouldn’t seal your interior hardwood floors and furniture too.
Unsealed wood is more susceptible to physical damage from sharp objects, pets’ claws, and heavy foot traffic. Without sealer, the damage will typically be more apparent and likely to cause visible chipping.
Finally, over time, stained wood without sealer will degrade faster. Wood that isn’t sealed loses color quality and stain uniformity much more quickly due to direct air and light exposure. It also warps and cracks faster.
What Are the Benefits of Sealing Wood?
Now that you know what happens if you don’t seal stained wood, you might wonder what exactly the benefits of sealer are.
Here’s a brief rundown of the pros of wood sealer:
- Protects against water/ice damage
- Preserves color over time
- Helps restore rotting wood
- Add vibrancy to stains
- Adds barrier to physical damage
- Makes wood look shinier, more polished
- Comes in various types and styles
- Finish is easier to apply to sealed wood
As you can see, sealer offers a lot of versatility. It not only protects your wood but often makes it more visually appealing.
The benefits of sealer pretty much always outweigh the cons. Still, that doesn’t mean there are no drawbacks to using it.

What Are the Downsides of Sealing Wood?
Below are some of the downsides of sealing wood that you should consider.
- Sealing wood can get expensive
- It takes time to apply
- Some sealers, like polyurethane and varnish, can yellow over time
- Improper application leaves noticeable blemishes
- Sealer accentuates flaws on wood surfaces
- Excessive layers may cause a cloudy appearance
You should almost always seal your wood if you can. Especially if it sees heavy use or exposure to the outdoors.
But you should remain mindful of these potential pitfalls and factor them in the next time you plan a woodworking project.
How Do You Seal Stained Wood?
Next, let’s go through the basic steps for sealing your wood with a brush sealer (sealer meant to be brushed-on wood).
- Sand the wood you want to seal until it’s smooth. Both stain and sealer will accentuate any flaws in a wood surface. They both also absorb easier and more evenly on smooth surfaces.
- Remove any leftover sawdust or residues. Excess dust and wood chips can get stuck under a coat of sealer.
- Apply any stains you want to use and give them time to dry.
- After opening your can of sealer, make sure it’s mixed and stirred well. If the components of your sealer have separated, it won’t work well when applied.
- Apply an even, thin coat of your sealer using a brush meant for varnishes or polyurethane. Try to flatten any bubbles or noticeable drips carefully.
- Allow the sealer to dry 24 hours after the first coat. Sealers may soak in and feel moistureless after a couple of hours, but it’s best to let it sit a day for the best results.
Here’s a great visual demonstration from YouTube on how to apply sealer. Everyone does it a little differently, but this video offers some great tips.

Additionally, while your wood dries between sealer coats, try to keep loose debris away. Dust and hair can easily get stuck to a coat of sealer and dry into it.
Other FAQs About Sealing Wood After Staining It
Here are the answers to some other frequently asked questions about sealing wood that will help you have the best application of sealant possible!
How Long After Staining Should You Apply Sealer?
The time it takes for a stain to dry varies between stain types.
Water-based stains will ordinarily dry in only 2-10 hours. Meanwhile, oil-based stains can take up to 24-48 hours.
Either way, you should wait a day or two before applying sealer to be safe.
The time it takes a stain to dry also depends on the humidity around it. More humidity means a longer dry time.
A final point: ensure that your stain is dry before you apply anything to it. If it still looks and feels moist or slick, then it needs more time.
How Many Sealer Coats Should I Apply?
Generally, you should expect to add 2-4 layers of sealer to your wood.
However, the optimal number of coats will depend on the specific sealer.
Some thick sealers like polyurethane may only need two even layers. Meanwhile, thinner water-based varnishes may require three or four coats, particularly if the wood is rougher and absorbs lots of sealer.
When applying layers of sealer, make sure the wood is completely dry.
Applying layers on top of a stain or sealer that isn’t dry will leave noticeable flaws in the coat, such as cloudiness or smearing.
I actually ran a test to see how the finish of stained wood turns out with no coats of sealant, 1 coat, 2 coats, 3 coats, and some of the coats sanded between. To see how big of a difference the finishes turned out, check out this article here.
When Should You Use a Wood Sealer?
Below, we listed some of the situations where you should strongly consider using wood sealer:
- You should seal any stained wood outside. Decks, outdoor furniture, and sheds all face constant exposure to the elements. As a result, sealers will protect them and keep their colors vibrant.
- Consider sealing heavily trafficked areas of hardwood flooring. Without any varnish or protection, the stain can quickly wear away and reveal bare wood.
- Seal furniture that sees regular use. Scraping television bases or dishes on unsealed wood-tops may leave visible scratches on that furniture.
These aren’t the only times you would use a sealer. However, they’re some of the most common motivations.
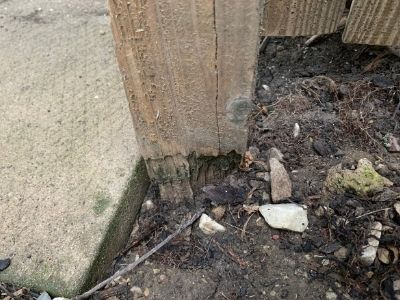
Should You Seal Pressure-Treated Wood?
If you’re planning on building an outdoor deck or wood fence, you may have come across the term pressure-treated wood.
Pressure-treated wood is much harder than standard lumber since it resists decay and water damage. Some types of pressure-treated wood are even fire-resistant.
While pressure-treated is more durable than most conventional woods, it still benefits significantly from a sealer.
According to Archadeck, pressure-treated wood is porous if not somehow sealed. Meaning moisture will warp and crack the wood over time.
Plus, sealer not only extends the longevity of your outdoor wood but also brings out its color and shine in the sun.
Can You Seal Wood Without Stain?
Most sealers work perfectly fine on wood without any stain.
If your wood possesses naturally beautiful colors and patterns, you may not want to stain it. However, sealing it will still protect the wood.
Sealing wood without stain can also still make it appear more vibrant and finished.
Plus, some sealers come mixed with stains to save you time and money. These mixes are a solid option if you want to spare yourself the effort spent adding a sealer separately.
Can You Apply Water-Based Sealant Over Oil-Based Stain?
Normally, water and oil don’t mix. But in this instance, water can be applied over oil if you do it in the correct way. To make sure you’re applying your water-based sealant properly, check out my other article here.
Final Thoughts On Sealing Wood After Staining It
Sealing your wood is an excellent idea in most circumstances. It extends the longevity of your furniture and flooring while also enhancing their colors and characteristics.
However, make sure you understand how and when to apply sealers properly. That way, you can get the most value out of using them on your wood.
Here’s to you having the best-looking and long-lasting woodworking projects out there!


By Christine
Christine is a blogger and DIYer who tackles home renovation and decorating projects alongside her husband, Adam, for their personal residence and rental properties. Although she successfully tackles large renovation projects to avoid expensive contractor fees and bring her vision to life now, her path to success was not easy.
Go here to read her story, “From a Clueless First-Time Homebuyer To A Confident DIYer Creating Her Dream Home One Project At A Time“.
Popular Posts


DIY With Christine is a participant in the Amazon Services LLC Associates Program, an affiliate advertising program designed to provide a means for sites to earn advertising fees by advertising and linking to Amazon.com.