*My posts may contain affiliate links, which means I may receive a small commission, at no cost to you, if you make a purchase through a link! Thank you for supporting my website!*
Last updated on February 28th, 2024 at 04:28 pm
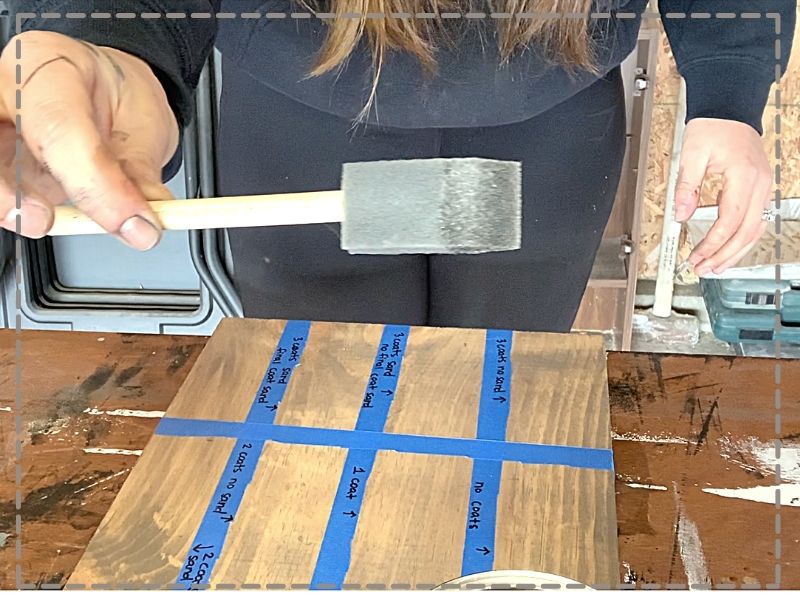
Wondering what will happen if you apply a water-based polyurethane over an oil-based stain, and whether this is something that you can/should do, or not? Well, look no further because I have your answer!
Water-based polyurethane can be applied over an oil-based stain as long as the stain is completely dry. Applying the polyurethane onto the stain too early can result in the polyurethane rubbing off and/or the stain being damaged underneath. To fix this, the finish will need to be sanded off and the process restarted.
Let’s dive in!
Quick Navigation: Using Water-Based Polyurethane Over Oil-Based Stain
- What Happens If You Apply A Water-Based Polyurethane Over An Oil-Based Stain?
- Will The Polyurethane Alter My Stain Color?
- How Do I Know If The Stain Is Dry?
- Do I Need Any Other Coating?
- Other FAQs About Using Water-Based Polyurethane Over Oil-Based Stain
- Final Thoughts
What Happens If You Apply A Water-Based Polyurethane Over An Oil-Based Stain?
So you already know you can apply a water-based polyurethane over an oil-based stain, but you’re wondering what the actual risks are. Well, let’s break it down further.
If the stain is not dry, you are likely to get adhesion problems, and this will result in the polyurethane rubbing off fairly quickly and possibly even damaging the stain beneath it.
However, there are some things that you can do to avoid issues and make sure that the polyurethane sticks to the stain properly.
The most important of these is to allow the oil-based stain to thoroughly dry before you put the polyurethane on it. This means leaving it for a minimum of four days, allowing all the minerals to evaporate off the surface. And if you’re doing this in cold or damp conditions, give it longer to dry.
It is better to be patient than to rush it because if you put the polyurethane on too early, it is likely to cause issues down the road, even if it looks fine to start with.
It is also a good idea to raise the grain of the wood before you stain it because the water-based polyurethane will raise the grain whether you want it to or not. (Raising the grain opens up the wood and lets the stain soak in better.)
To raise the grain, take a damp, clean rag and wipe the wood down completely. Let the wood dry completely, sand it smooth, and then apply your stain and the polyurethane coat for the best results.
If you don’t do this, you may find your wood ends up rough, and you’ll have to sand it down – losing both your polyurethane coating and your stain.
Skipping this step won’t ruin your wood project, but it can level up your woodworking game and help you to achieve a flawless finish.
Will The Polyurethane Alter My Stain Color?
Another valid concern you could have is whether water-based polyurethane will affect your stain color or not. I was worried about this as well, but no need to fear.
Again, if the stain is still damp when applied, the polyurethane can alter the color of the stain. The wet stain will wipe off with the brush as the polyurethane is applied.
Before you cover the piece of wood with polyurethane, make sure you test it in a small area first, preferably somewhere inconspicuous.
To avoid this, however, just make sure the oil-based stain has cured before adding a thin coat of polyurethane. It will change the color while it is still wet. However, in many cases, this change should revert once the polyurethane has dried.
As long as the stain is completely dry before you start adding the polyurethane, any water-based polyurethane should dry clear and not affect the color of the stain.
Another tactic you could use to ensure the stain will be completely dry before the application of water-based polyurethane is to use mineral spirits.
This video does a great job of explaining the benefits of wiping the oil-based stain with mineral spirits before applying poly.
The mineral spirits will help remove any tacky spots on the wood and help the stain dry faster.

How Do I Know If The Stain Is Dry?
An oil-based stain can look dry long before it is, and if you aren’t sure, you might end up waiting far longer than you need to just to try and be safe about it. So, how can you check?
You can test if the stain is dry by running a mineral spirit-soaked cloth over the stained wood. If the cloth picks up any color, the stain is not yet dry, and you should wait at least one more day. After a day, repeat this test. If no color shows up on the cloth, do a couple more tests in a few more areas to confirm. Then the stain should be considered dry.
According to WoodWorkingClarity, the best way to do this is to use 100% mineral spirits, and soak a lint-free cloth (preferably white or a pale color). Then lightly run the cloth over the stained wood, and see if it absorbs any color from the stain.
At the end of the day, if you still aren’t sure. Just be on the safe side and wait another day. The stain should have a timeframe on the instructions that will tell you what “full cure time” to expect.
Do I Need Any Other Coating?
You don’t need another coating between oil-based stain and water-based polyurethane, but some people do choose to add one. This reduces the risk of the oil-based stain not having dried fully and makes it easier to speed up the whole process.
If you’re in a hurry, using a coating between the oil and water layers is a great idea because it cuts down the curing time significantly and makes it faster to get your polyurethane coating on.
The downside is that you have to do more hands-on work and buy more materials. However, if that seems worth it to you, consider a shellac coating, which can be applied directly to the oil-based stain without having to wait for it to dry.
You will need to allow the shellac to dry, of course, but this should only take an hour or two, and then you can add your polyurethane coating. Compared with waiting days for your oil-based stain to dry, this can be preferable.
You should note that shellac coatings often have a slightly yellow tint to them, which might be annoying if you have chosen your stain with great care. However, because the layer will be very thin, this should not make a difference to the overall aesthetic of the wood when you have finished.
To apply polyurethane to the shellac coating, simply paint it over the top once the shellac is dry. Lightly sand your first coat of polyurethane and add another, just as you would if you were applying it directly onto the stain.
Other FAQs About Applying Water-Based Polyurethane Over Oil-Based Stain
Here are some other frequently asked questions that will help you better apply water-based polyurethane to your woodworking projects!
Do I need to sand the polyurethane?
Sanding the polyurethane is recommended to remove any air bubbles, dust particles, or rough spots. When you have finished sanding, use a vacuum cleaner and a damp lint-free cloth to pick up the dust residue before you apply further coats.
However, I did a thorough test on what happens if you DO NOT sand between coats of polyurethane, and the results might surprise you. You can check out my article here (and likely save yourself some valuable time!)
What factors affect how long the stain takes to dry?
Numerous factors will affect the drying time of the stain. These factors include ventilation, humidity, and the temperature surrounding the wood. Less ventilation, higher humidity, and colder temperatures elongate the time it takes stain to dry.
Also, take into consideration how much stain you have used and how much wood it covers – large pieces will take longer to dry than small pieces.
Is water-based polyurethane better than oil-based polyurethane?
Water-based polyurethane is better than oil-based polyurethane for wood projects that need a clear topcoat, quicker dry-time, and harder finish.
Water-based polyurethane dries clear, while the oil-based version has an amber tint. If you have taken care in selecting a specific stain color, the chances are that you don’t want an amber hue messing that stain up.
Oftentimes, that amber hue is so faint, you wouldn’t notice it. But for certain stain colors, it can be more prominent.
Oil-based polyurethanes also have an unpleasant and strong smell and tend to be thicker and dry softer, meaning that they dent easily. They also dry more slowly than water-based options, so with water-based polyurethane, you can finish your project off more quickly.
Of course, the type of wood project you are working on and the type of finish you want can change which type of polyurethane is better.
This video does a fantastic job of explaining the pros and cons of water-based and oil-based polyurethane.
That will help you better choose which type of poly is best for you and your wood project!

Final Thoughts On Using Water-Based Polyurethane Over Oil-Based Stain
There you have it! You can apply a water-based polyurethane over an oil-based stain as long as you ensure that the stain is completely dry.
If you don’t wait long enough, the polyurethane will not adhere properly and will likely rub off over time, leaving the stain and the wood unprotected.
If you are trying to determine what to do for a large project, then I highly recommend testing your specific stain and polyurethane on a small piece of wood to make sure the finish comes out the way you want before tackling the large project.
Good luck with your project!

By Christine
Christine is a blogger and DIYer who tackles home renovation and decorating projects alongside her husband, Adam, for their personal residence and rental properties. Although she successfully tackles large renovation projects to avoid expensive contractor fees and bring her vision to life now, her path to success was not easy.
Go here to read her story, “From a Clueless First-Time Homebuyer To A Confident DIYer Creating Her Dream Home One Project At A Time“.
Popular Posts


DIY With Christine is a participant in the Amazon Services LLC Associates Program, an affiliate advertising program designed to provide a means for sites to earn advertising fees by advertising and linking to Amazon.com.