*My posts may contain affiliate links, which means I may receive a small commission, at no cost to you, if you make a purchase through a link! Thank you for supporting my website!*
Last updated on February 28th, 2024 at 04:25 pm
Wondering if you need to use wood conditioner before staining? Well, look no further because I have your answer!
Wood conditioner is not required before staining, however, it is recommended with softer, more porous woods if you want an even, less blotchy finish. Wood conditioner opens the pores of the wood to help it accept stains better.
Now that we’ve got the basics out of the way, let’s break into the details a little further so you can properly prep your wood project for stain.
Let’s dive in!
Quick Navigation: How To Use Wood Conditioner
- What Is a Pre-Stain Wood Conditioner?
- Using Water As A Wood Conditioner
- Using Water-Based Wood Conditioners
- Using Oil-Based Wood Conditioners
- How To Use Wood Conditioners Before Staining
- Results From Not Using Wood Conditioner Before Staining
- Benefits Of Using A Pre-Stain Wood Conditioner
- Drawbacks Of Using A Pre-Stain Wood Conditioner
- Other FAQs About Using Wood Conditioner Before Staining
- Final Thoughts
What Is A Pre-Stain Wood Conditioner?
A wood conditioner is a liquid that woodworkers apply to raw wood before staining, and it prepares the wood by opening the pores of the wood.
Using a wood conditioner before staining helps the wood avoid blotchiness and uneven absorption of the stain, giving the wood a more even overall color and appearance.
There are several forms of conditioners used in different applications. These include:
- Plain, old water
- Water-based wood conditioners
- Oil-based wood conditioners
Using Water As A Wood Conditioner
Instead of using a commercial product, some woodworkers prefer to condition the wood with distilled water, especially with softer woods.
As with other conditioners, but without any additives, the water opens the wood’s pores for more even absorption of the stain. The process is known as “popping the grain”.
When using water, the wood must dry completely before the stain is applied, and this could take several hours.
Using Water-Based Wood Conditioners
If you’re working with a water-based stain, it is better to use a water-based wood conditioner.
Water-based conditioners are less expensive than oil-based ones, less harmful to the environment, and are suitable for most wood types and laminates.
Using Oil-Based Wood Conditioners
Oil-based wood conditioners are more expensive but are more durable and suitable for hardwood floors, decking, other high-traffic areas, and where the wood is more exposed to direct sun and harsh weather.
It is best to use an oil-based conditioner with an oil-based stain.
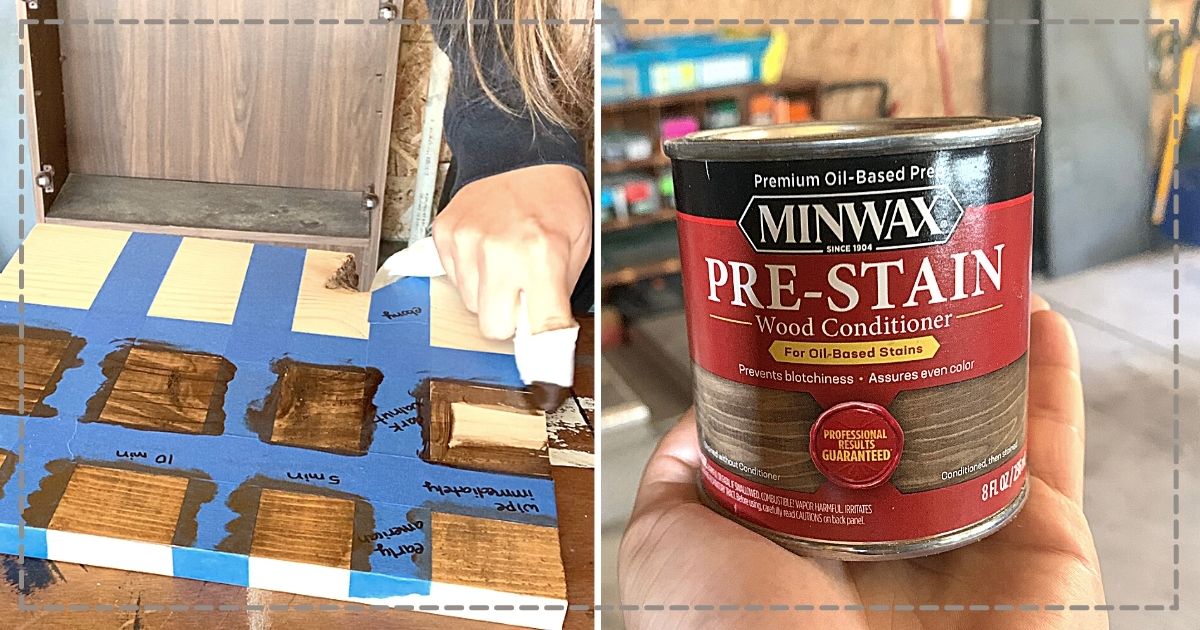
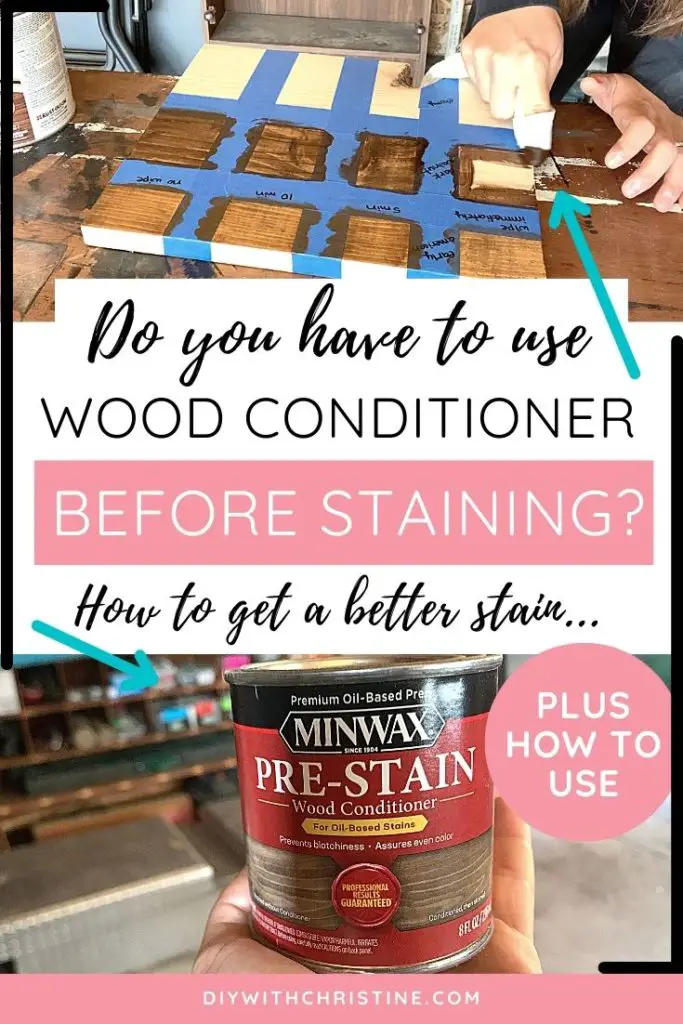
My favorite oil-based wood conditioner is MinWax’s Pre-Stain Wood Conditioner found at Amazon. It makes a HUGE difference in the stain’s ability to absorb into the wood.
Plus, a little bit of it goes a long way. Only half of a 1/2 pint container let me condition an entire nightstand.
How To Use Wood Conditioner Before Staining
Staining the wood as evenly as possible requires first the preparation of the surface of the wood, followed by sanding and cleaning, and then the proper application of the conditioner.
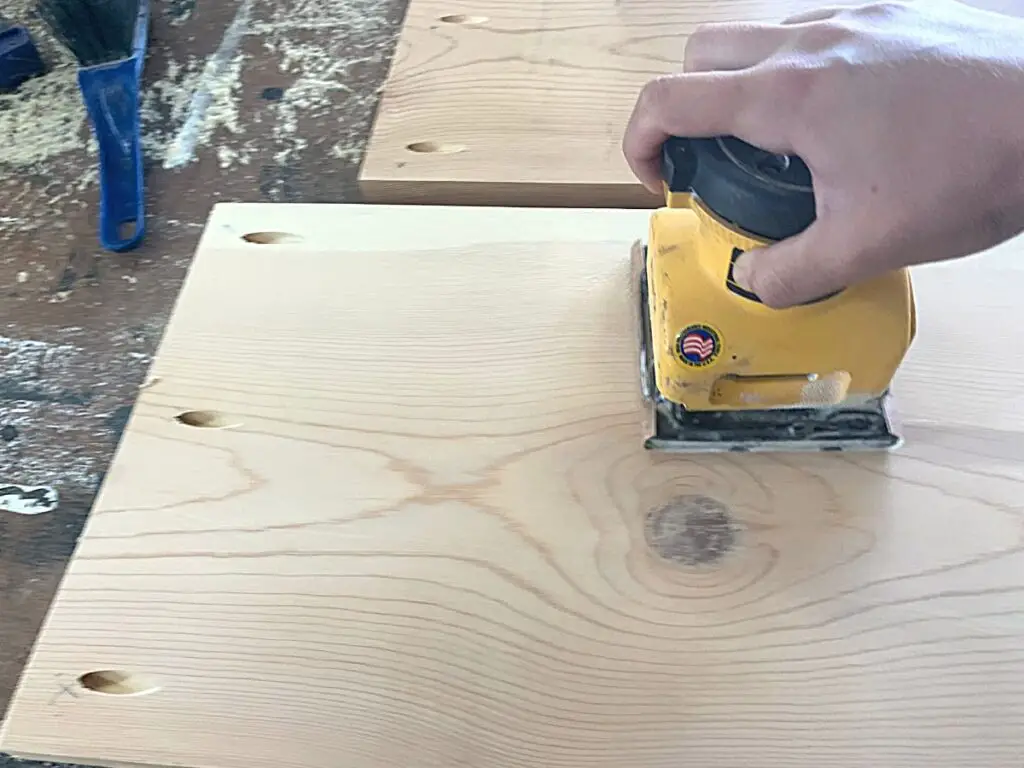
- Preparing the surface of the wood removes loose fibers, smooths knots and other imperfections in the wood, and cleans it of dirt, grease, and other impurities. Before sanding, it is also necessary to fill in holes, scratches, and cracks with a color-matched wood filler.
- Sanding with 100-grit sandpaper followed by a second and even third sanding with 200-grit sandpaper is recommended. After this, the next step is to give the wood a really good clean with a slightly damp cloth to remove all the loose material and sawdust that the sanding has created.
- Applying the wood conditioner is simple because it’s a thin, watery liquid. Apply a thin coat evenly, using a soft cloth or a brush. Ensure that you go with the grain to have uniform coverage and that the wood conditioner has filled all the pores in the wood. Then, after a few minutes to let the conditioner soak in, wipe any excess off the surface.

- Allowing the wood conditioner to dry correctly is essential, so follow the manufacturer’s instructions on the container. Timing varies depending on the type of conditioner, and it’s as easy to leave it too long as it is not to let it dry sufficiently. Typically, the period for the conditioner to dry is between fifteen minutes and two hours. If you leave it longer than that, the conditioner may become less effective, and you may even get a worse result than not using one at all.
- After applying the wood conditioner, re-sanding the surface with fine 320-grit sandpaper is recommended, particularly with a water-based wood conditioner. It will have caused the pores to open and the surface to become slightly rough. This final sanding will allow the stain, when you apply it, to soak more evenly into the surface you are treating.
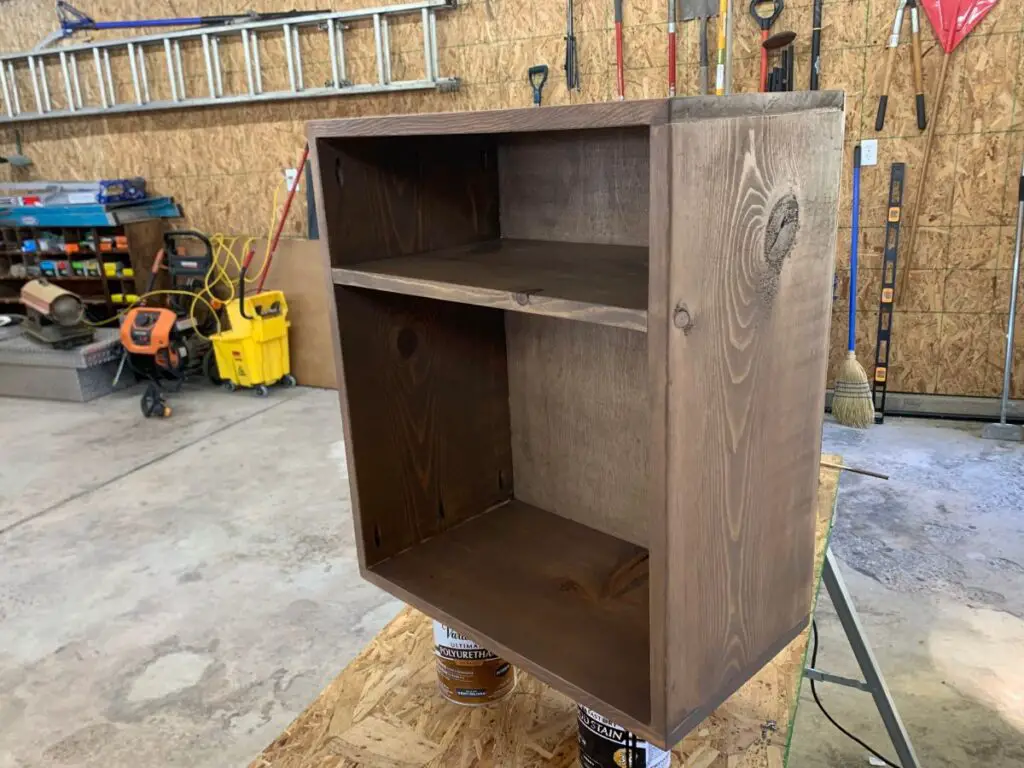
By allowing the wood to absorb the stain more efficiently, the application of wood conditioner will result in a slightly lighter color once you have applied the first coat of the stain.
If you prefer a darker stain, you will need to apply further coats until you are satisfied with the color. A light sanding between coats will result in a perfect finish.
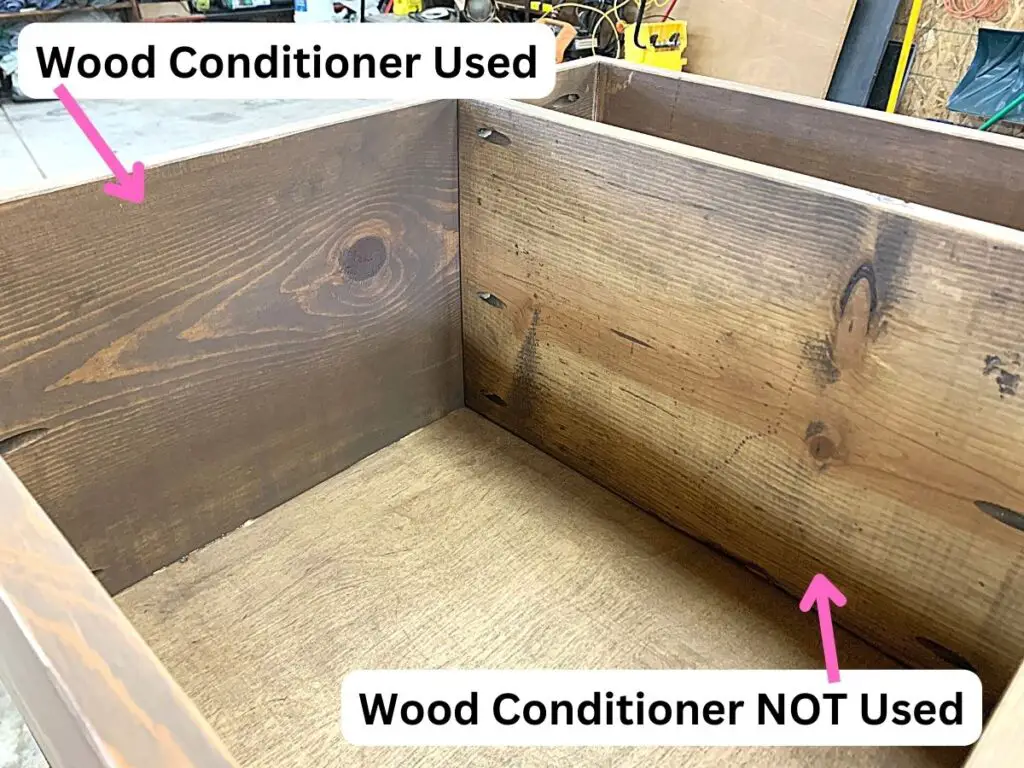
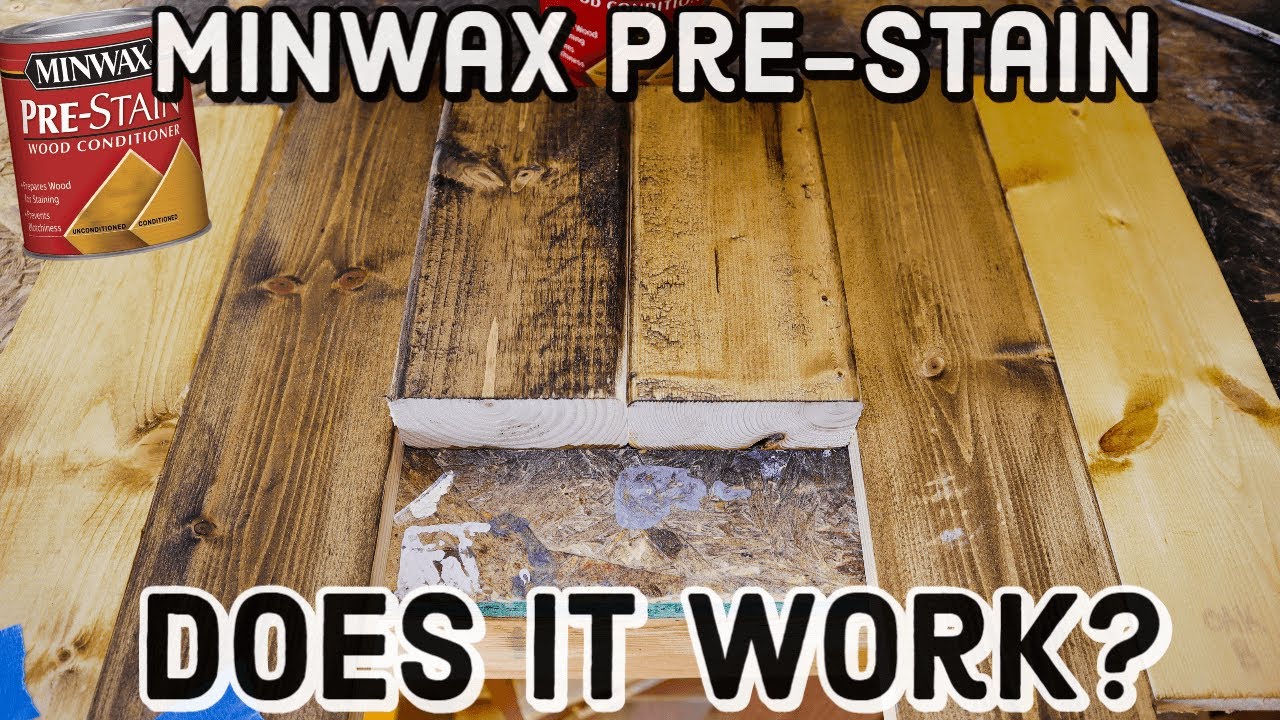
Results From Not Using Wood Conditioner Before Staining
Because wood is a natural product, unlike a factory-produced one, it has imperfections and blemishes, making each piece unique.
Some sections of the wood are more porous, and there are differences in density, knots, cracks in the surface, and other flaws.
If the wood is not correctly conditioned, these irregularities will result in a blotchy, uneven stain absorption.
Softwoods, such as pine, cedar, spruce, and certain hardwoods like maple, are porous.
As a result, both types of wood will get that blotchy, unprofessional stain if they are not treated beforehand with a suitable wood conditioner.
Here is a fantastic video that shows you the difference between using a wood conditioner and not using it.
Benefits Of Using A Pre-Stain Wood Conditioner
Staining a piece of wood can turn a mundane, dull object into a unique and beautiful item, whether it’s a hardwood floor, door frame, or decorative piece.
However, that’s only true if the stain has depth and uniformity and shows off the grain and beauty of the wood to its fullest extent.
That’s only possible if the wood is conditioned before staining.
Another benefit of using an oil-based conditioner is that it helps preserve the wood, preventing it from drying or rotting for longer than untreated timber.
However, it is still essential that wood used in outdoor areas, such as wooden decking and garden furniture, be protected by a more effective coating such as wood sealer or varnish.
Drawbacks Of Using A Pre-Stain Wood Conditioner
There are no significant disadvantages to using a pre-stain conditioner before staining wood.
Still, some experts believe that using a gel stain, which doesn’t require a conditioner, will result in a more evenly-stained surface.
Using a wood conditioner involves taking more time to complete the staining task, and there is a small cost involved.
Using a wood conditioner before staining, particularly an oil-based one, will result in a lighter tone than you would get on untreated wood.
As a result, you may use a second or even third coat of stain to achieve the desired color.
As we’ve mentioned, if you get the timing wrong, your conditioner may dry out before you apply the stain.
When this happens, the stain won’t be adequately absorbed and will be as blotchy as with unconditioned wood, if not worse.
It will mean that you will have to sand everything down to bare wood and start again.
Other FAQs About Using Wood Conditioner Before Staining
Here are some other frequently asked questions about using wood conditioner to help you get a better stain application on your wood project!
What Can I Use Instead Of Wood Conditioner?
Many professional woodworkers use water to open the pores of softwoods instead of store-bought wood conditioners. Simply wipe on some water and let the wood dry before staining.
Do I Need Wood Conditioner Before Polyurethane?
Wood conditioner is applied before staining wood, not before polyurethane. Once the wood has been stained, you can no longer use a wood conditioner to fix blotchiness in the wood stain. If no stain is being used, then you do not need a wood conditioner to apply a coat of polyurethane.
How Long Do You Leave Wood Conditioner On Before Staining?
Oil-based and water-based wood conditioner is left on the wood for 15-30 minutes before staining. Use a clean rag to wipe on a thin layer of wood conditioner on the entire piece of wood and let that dry before using a new clean rag to wipe the stain on the wood.
How Many Coats Of Wood Conditioner?
Only one coat of wood conditioner is applied to the wood before a stain is applied. Use a clean rag to wipe on a thin layer of wood conditioner on the entire piece of wood and let that dry before using a new clean rag to wipe the stain on the wood.
Final Thoughts On Using Wood Conditioner Before Staining
There you have it!
Staining wood provides you with an exciting range of possibilities in terms of color and finishes, allowing ordinary wooden objects to take on an entirely new look and become centers of attraction.
But it’s vital that you do this transformation well and that the job looks professional.
While some experts maintain that wood conditioners do not always prevent woodworkers from getting a blotched effect when staining wood, the consensus is that they are definitely successful in preventing uneven staining if used before staining and used correctly.
Catch you in my next post!

By Christine
Christine is a blogger and DIYer who tackles home renovation and decorating projects alongside her husband, Adam, for their personal residence and rental properties. Although she successfully tackles large renovation projects to avoid expensive contractor fees and bring her vision to life now, her path to success was not easy.
Go here to read her story, “From a Clueless First-Time Homebuyer To A Confident DIYer Creating Her Dream Home One Project At A Time“.
Popular Posts


DIY With Christine is a participant in the Amazon Services LLC Associates Program, an affiliate advertising program designed to provide a means for sites to earn advertising fees by advertising and linking to Amazon.com.