*My posts may contain affiliate links, which means I may receive a small commission, at no cost to you, if you make a purchase through a link! Thank you for supporting my website!*
Last updated on February 29th, 2024 at 05:01 pm
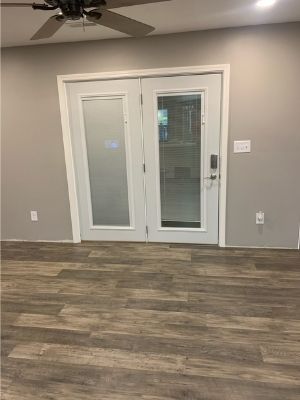
Wondering what the most common mistakes when laying laminate flooring are and how to fix them or avoid them? Well, look no further because I have your answer!
The most common mistakes when laying laminate flooring are not leaving a gap between the wall and flooring, not installing in a staggered pattern, not installing underlayment, not leveling the subfloor before installation, and not installing baseboards, quarter-round, or transition strips after installation.
Now that we’ve got that covered, let’s go over each mistake in detail and describe how to potentially fix it.
Let’s dive in!
Quick Navigation: How To Fix Common Laminate Flooring Installation Mistakes
- Mistake One: Your Laminate Flooring Is Buckling
- Mistake Two: Your Laminate Flooring Is Spongy
- Mistake Three: Your Laminate Flooring Is Moving
- Mistake Four: Your Laminate Flooring Is Gapping
- How To Fix Most Laminate Flooring Problems
- Other FAQs About Fixing Laminate Flooring Installation Problems
- Final Thoughts
Mistake One: Your Laminate Flooring Is Buckling
The first common installation mistake is buckling, bulging, or lifting in your laminate flooring.
This mistake is often caused by:
- Not leaving a gap
- Not creating a staggered pattern
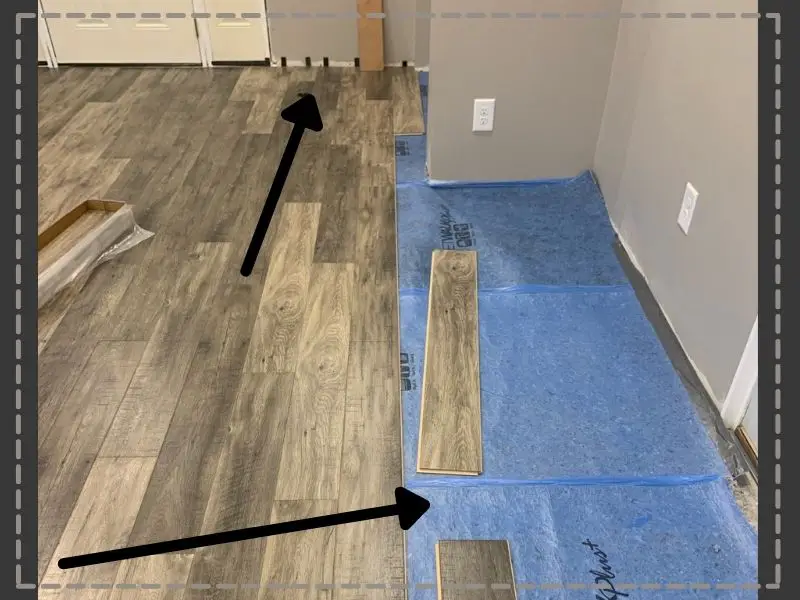
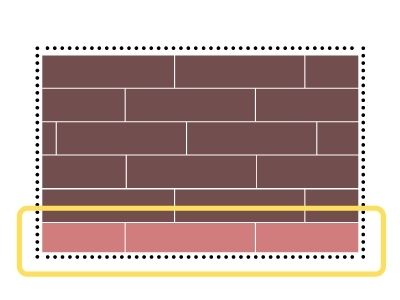
Not Leaving A Gap During Laminate Flooring Installation
If you remove the baseboard and transition strips and see the laminate flooring pressed up against the wall or the transition strip, then your laminate flooring has no room to “float” or move when it needs to.
Laminate flooring needs room to expand and contract during temperature and humidity fluctuations. Without that gap along the walls, the flooring doesn’t have room to expand and buckles or bubbles upward to create the space it needs.
This buckling breaks the lip that holds the flooring, which will also lead to the floor separating when it ultimately contracts again.
Once that lip breaks, your flooring is likely ruined and will need to be replaced.
Not Creating A Staggered Pattern
Additionally, your laminate floor could be buckling because it was installed in an H-pattern.
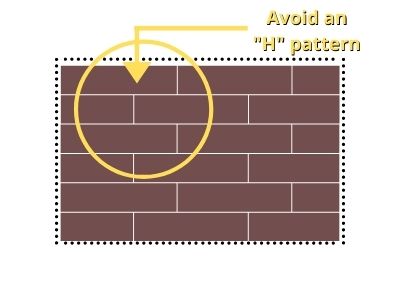
This symmetrical pattern also prevents the flooring from having room to expand and contract, so it causes the flooring to buckle up for release.
If your laminate flooring is installed in this H-pattern, then you should remedy it immediately because it will lead to more areas buckling over time.
Instead, your flooring should be installed in a staggered pattern. Not only does this pattern allow the flooring to move, but it also helps limit the amount of waste you have during the installation process.
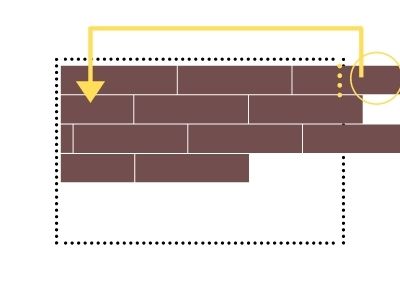
To learn how to properly install your laminate flooring in a staggered pattern and how to easily calculate the pattern for your own room, check out my article here.
How To Fix Buckling Laminate Flooring
To fix laminate flooring that is buckling because there was no gap left during installation, use an oscillating multi-tool to cut back a gap between the flooring and the wall. If any of the tongues in the planks are damaged, then they should be replaced with new pieces.
To fix laminate flooring that is buckling because it was installed in an H-pattern, the boards must be pulled up and re-installed with the correct staggered pattern to prevent future damage. If any of the tongues of the laminate planks are damaged, then they should be replaced with new pieces.
Again, with help to calculate the correct staggered pattern, check out my tutorial here.
Mistake Two: Your Laminate Flooring Is Spongy
The next common installation mistake is spongy or squishy feeling in your laminate flooring when you walk on it.
This mistake is often caused by:
- Not leveling the subfloor
- A moisture problem
Not Leveling The Subfloor
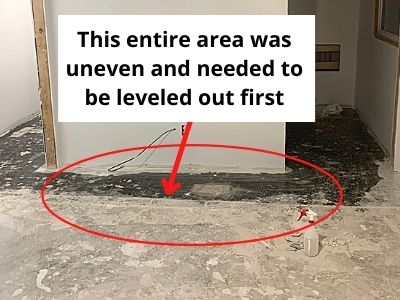
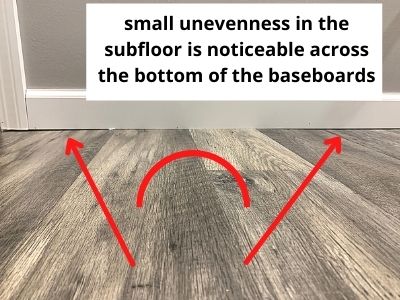
The likely problem with a spongy laminate floor is that the subfloor is not level.
If there are spots in your subfloor that are a little higher than the rest (even if it’s a couple of centimeters), then the floor will feel squishy when you walk on it.
This might not seem like a big deal, but if the height difference is significant enough and it’s stepped on often, then the tongue in the laminate planks will break and gapping will occur or buckling can occur.
The planks will be broken and they will need to be replaced. So it is crucial to level the subfloor properly before installing new laminate flooring to make the flooring last for 25-30 years.
Having A Moisture Problem
The other problem that could be causing a spongy laminate floor is a moisture problem.
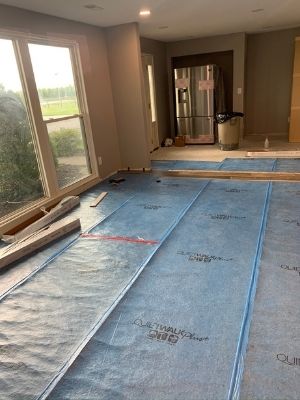
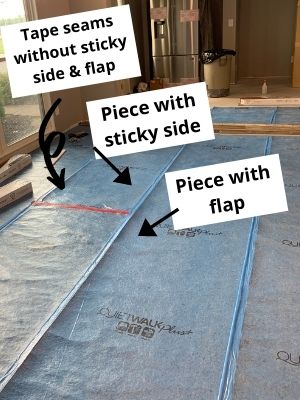
If underlayment was not installed under the laminate floor planks (especially on a concrete subfloor), then moisture could be accumulating underneath your floor and slowly making it disintegrate.
Or if you have laminate flooring installed in a high-moisture area (such as a bathroom or kitchen) and water frequently sits on it, then the seams could be disintegrating as well.
Moisture is not laminate flooring’s friend.
How To Fix Spongy Laminate Flooring
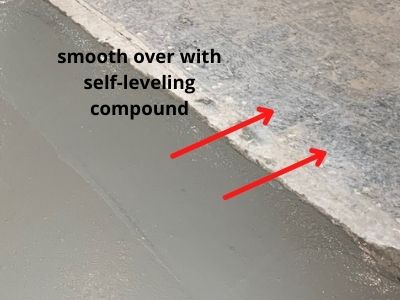
To fix laminate flooring that is spongy because the subfloor isn’t level, pull up the boards and use a self-leveling compound to level the subfloor before re-installation. If any of the tongues in the planks are damaged, then they should be replaced with new pieces.
To fix laminate flooring that is spongy because no underlayment was installed, pull up the boards and install underlayment before re-installation. If any of the tongues in the planks are damaged, then they should be replaced with new pieces.
To help you choose which underlayment would be best for your house, check out my article here.
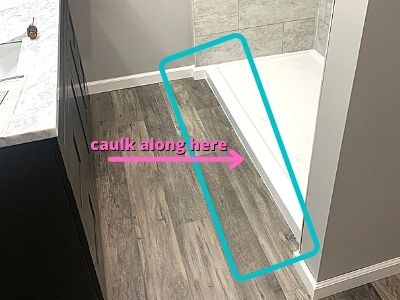
To fix laminate flooring that is spongy because the area sees a lot of water, run a bead of caulk along the edge of the laminate and the base of a tub or cabinet to help water stay on top of the boards. If any of the planks are damaged, then they should be replaced with new pieces.
Mistake Three: Your Laminate Flooring Is Moving
The next common installation mistake is movement in your laminate flooring.
This mistake is often caused by:
- Not installing baseboard or transition strips over the laminate edges
- Not creating a staggered pattern
- Not leveling the subfloor
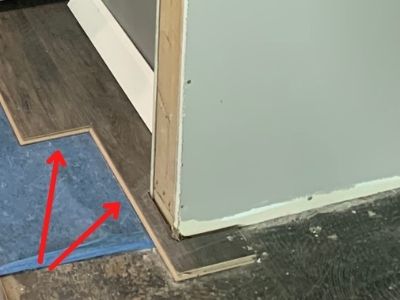
Not Installing Baseboard Or Transition Strips Over The Laminate Edges
If your laminate flooring keeps coming “unclicked” or “unlocked”, then it could be that the edges are not secured down.
After installing laminate flooring, baseboard or quarter-round should be installed overtop the edges around the entire room to hold the edges down.
These edges should not be pinned down tightly because the floor still needs to be able to move a little bit from humidity, but they do still need something to sit on top of them to prevent them from unlocking during regular use.
The baseboard should be enough to prevent this problem from happening. However, if you didn’t remove your baseboard before installation, then you’ll need to use a quarter-round to cover the expansion gap and hold the edges in place.
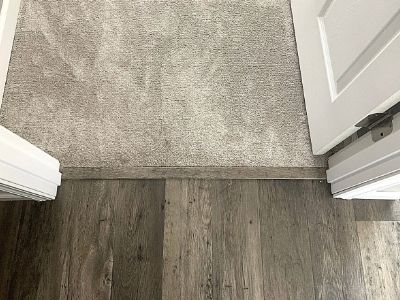
Additionally, laminate flooring that ends in a doorway needs to be held in place as well. This is where transition strips will help.
To learn where to place and how to install transition strips in a doorway, check out my tutorial here.
Not Creating A Staggered Pattern
As we’ve discussed previously, installing laminate flooring in the correct pattern is crucial to its longevity as well.
If your flooring is installed in an H-pattern, then your flooring could be moving as you walk on it because it’s trying to find space to expand and contract.
Eventually, the tongues in the planks will break, and you will have to replace them sooner than they should need to be to prevent further damage.
Not Leveling The Subfloor
Your laminate flooring can also be moving because the subfloor wasn’t leveled prior to installation.
As we’ve discussed above, even the smallest difference in flooring heights can cause the laminate flooring to move when you walk on it.
It creates this “spongy” feeling that over time, will cause the tongues of the planks to break, and once that happens, those planks will have to be replaced to prevent further damage.
How To Fix Moving Laminate Flooring
To fix laminate flooring that is moving because the edges aren’t covered, install baseboard, quarter-round, or transition strips to hold the edges down. If the edges cannot be covered by those trims (such as along a bathtub base), then caulk along the seam to help prevent it from unlocking. If any of the tongues in the planks are damaged, then they should be replaced with new pieces.
To fix laminate flooring that is moving because the subfloor isn’t level, pull up the boards and use a self-leveling compound to level the subfloor before re-installation. If any of the tongues in the planks are damaged, then they should be replaced with new pieces.
To fix laminate flooring that is moving because it wasn’t installed in a staggered pattern, the boards must be pulled up and re-installed with the correct pattern to prevent future damage. If any of the tongues of the laminate planks are damaged, then they should be replaced with new pieces.
Mistake Four: Your Laminate Flooring Is Gapping
The first common installation mistake is a gap in the seams of your laminate flooring.
This mistake is often caused by:
- Broken tongues in the laminate flooring planks
- Humidity
Broken Tongues In The Laminate Flooring Planks
Most of the above installation mistakes or problems ultimately lead to broken tongues in the planks. This is the number one problem in laminate flooring because the boards are ruined once they get to this point.
Without the tongues, nothing will hold the boards together anymore and gaps will form between the planks.
The only thing that can be done at this point is to remove the damaged boards and replace them with new boards.
Humidity
Gaps can also occur because of humidity. When this type of gapping occurs, it’s not because of any mistake you made.
Laminate flooring just naturally moves with humidity. This type of gapping is the easiest to fix because the tongues are still intact and can be “re-clicked” together.
How To Fix Gapping Laminate Flooring
To fix laminate flooring that is gapping, use a rubber mallet and gently tap one board in the direction of the gap to minimize or close it. If any of the tongues of the laminate planks are damaged, then they should be replaced with new pieces.
If you’re struggling to get your laminate floorboards to snap together during installation then check out my picture tutorial here to help you learn how to snap the flooring together with ease!
How To Fix Most Laminate Flooring Problems
As you can see, most laminate flooring problems are solved by pulling up the floor, removing any damaged areas, fixing the problem that caused the damage, and re-installing the boards.
If everything is installed properly, then your laminate flooring should last 25-30 years without major problems.
If you’re new to the laminate flooring installation process and want help making sure you don’t miss any steps or make any mistakes, then check out my full tutorial here.
It will walk you through the entire laminate flooring installation process and save you a ton of time!

Other FAQs About Fixing Laminate Flooring Installation Problems
Here are some other frequently asked questions about laminate flooring to help you fix any problems you have or might have in the future!
Why Won’t My Laminate Floor Stay Together?
Laminate flooring that has broken tongues will not stay together. If the tongue breaks on a plank, then that plank must be replaced. In addition, if the laminate flooring edges are not held down by baseboard, quarter-round, or transition strips, then the flooring will unsnap and not stay together.
What Do You Do When Laminate Flooring Won’t Snap Together?
If laminate flooring won’t snap together, check that nothing is blocking the groove and that the tongue is still intact on the connecting planks. To help it snap together, lean one board up at a 45-degree angle, slide the tongue into the groove, gently tap the edge of the top board with a rubber mallet, and push the top board down until it snaps into place.
Should Laminate Flooring Move When You Walk On It?
Laminate flooring should not noticeably move when you walk on it. The flooring could be moving because the subfloor wasn’t leveled, the pattern wasn’t staggered, an expansion gap wasn’t installed, or the edges aren’t held down by baseboard or transition strips. This movement can cause future problems.
Final thoughts On Common Laminate Flooring Problems
There you have it!
Small mistakes can cause laminate flooring to break down sooner than it should, but luckily, if you catch it early enough, you can minimize the damage and prevent it from happening again.
Hopefully, this article helped you narrow down what could be causing a problem in your laminate flooring or will help you avoid these mistakes altogether!
Catch you in my next post!

By Christine
Christine is a blogger and DIYer who tackles home renovation and decorating projects alongside her husband, Adam, for their personal residence and rental properties. Although she successfully tackles large renovation projects to avoid expensive contractor fees and bring her vision to life now, her path to success was not easy.
Go here to read her story, “From a Clueless First-Time Homebuyer To A Confident DIYer Creating Her Dream Home One Project At A Time“.
Popular Posts


DIY With Christine is a participant in the Amazon Services LLC Associates Program, an affiliate advertising program designed to provide a means for sites to earn advertising fees by advertising and linking to Amazon.com.