*My posts may contain affiliate links, which means I may receive a small commission, at no cost to you, if you make a purchase through a link! Thank you for supporting my website!*
Last updated on February 28th, 2024 at 04:29 pm
Have you ever wondered how long you should let the stain dry before wiping it off? Well, I did too, so I decided to run a little experiment to help me better answer that question.
I found exactly how long you should let the stain dry before wiping it off to get the exact color shade you want from my experiment. Here is what I found:
Apply and wipe the stain off immediately for a light color shade. Let the stain dry for 5-10 minutes before wiping off for a medium color shade. Let the stain dry for 20-30 minutes before wiping off for a dark color shade.
Now that I’ve fully tested my theory, I never have to worry about whether I’m letting the stain sit for too long to get the shade that I want for my wood project.
Below, I broke down my findings and how I ran the test (I even used 4 different stain colors!), so you can determine which shade and stain dry time is best for your next wood project.
Let’s dive in!
Quick Navigation: Length Of Time For Stain To Sit Before Wiping Off
Stain Color Drying Time Results
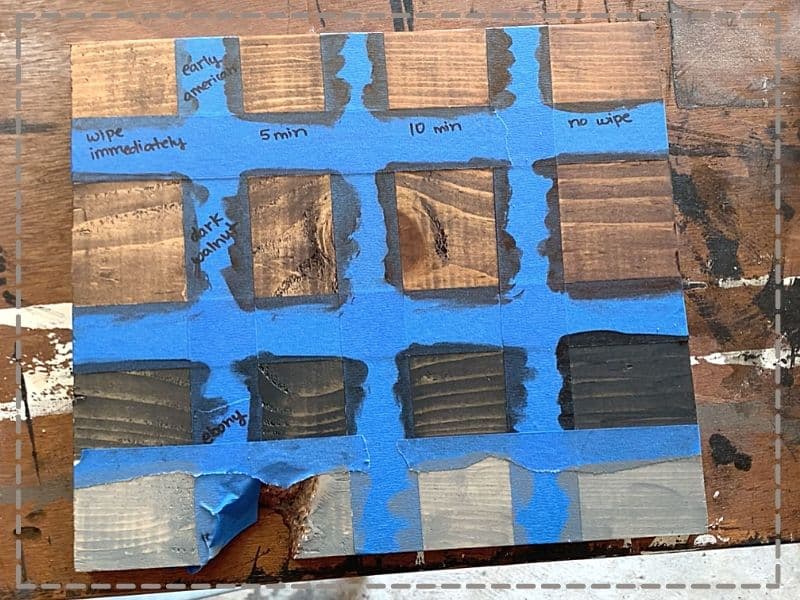
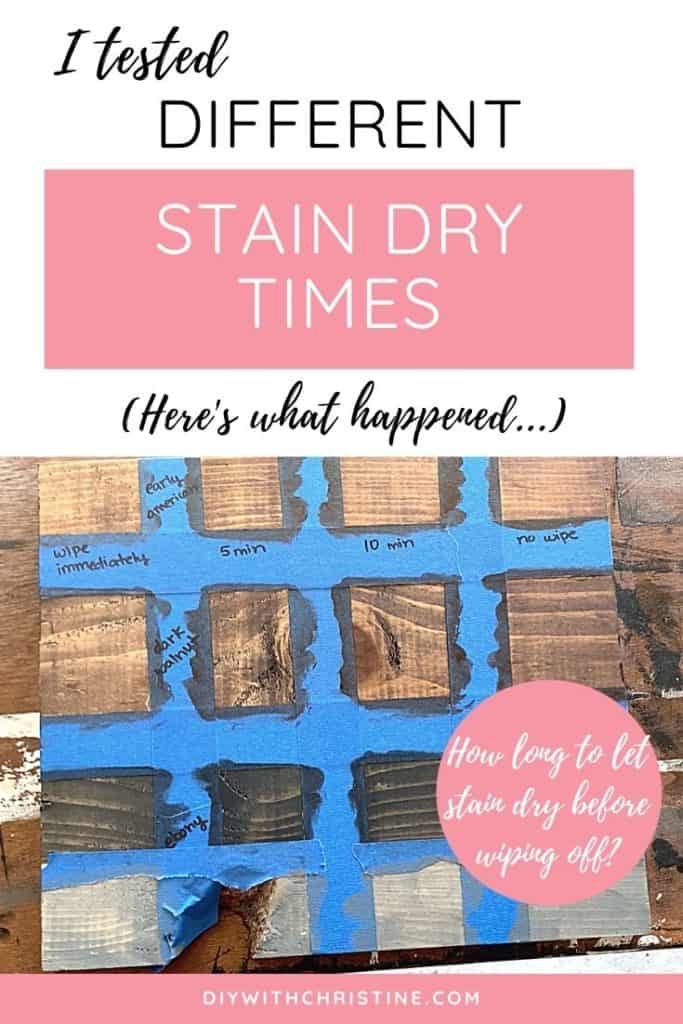
To test how long you should let the stain dry before wiping off, I sanded down and sectioned off a piece of pinewood into 16 different areas using painter’s tape.
The goal was to apply various colors of stain to each section and time how long the stain sat on the wood before wiping off to get a clear answer.
For my test, I used my favorite stain, Varathane Fast Dry, in the colors Early American, Dark Walnut, Ebony, and Weathered Gray.
I love this Varathane stain found at Amazon because it can be recoated in an hour (which beats the standard Varathane wood stain recoat time of 2 hours), and it gives a rich color in one coat. I don’t know about you, but I don’t have time to wait around for multiple coats of stain to dry forever before moving on.
Now, that 1 hour recoating time helps us determine when the entire project will be ready for a coat of polyurethane, but that doesn’t help us determine how long to let the stain sit on the wood before wiping off to get the desired color that we want.
That’s where my experiment will help you!
Here are the results that I found.
| Amount Applied | Darkness/Shade | Time Before Wiping Off |
|---|---|---|
| Generous/Medium | Light | Wipe off immediately |
| Generous/Medium | Medium | 5-10 minutes before wiping off |
| Generous/Medium | Dark | 30+ minutes |
Now, let’s dive into the results a little further!
Amount Applied
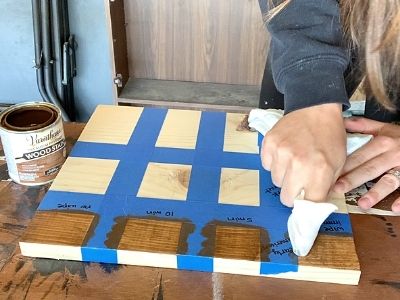
To start this test to determine how long you should let the stain dry before wiping off, I applied a generous amount of stain to all sections and started my timer.
When I say a generous or medium amount, I mean that I fully coated the area without leaving pools of stain on top. I dipped my rag directly into the can of stain and applied an even amount across the whole square before moving on.
Time Before Wiping Off
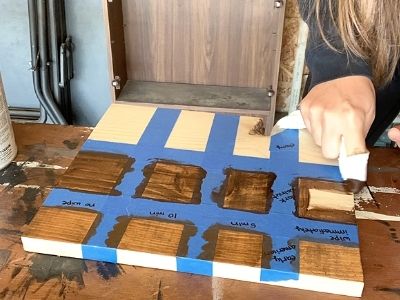
The next thing I did to determine how long you should let the stain dry before wiping off was to set a timer and wipe off each square depending on their dry time.
My wipe-off times were as follows: immediately, 5 minutes, 10 minutes, or 30+ minutes/never wiped off.
Darkness/Shade
The next thing I did to determine how long you should let the stain dry before wiping off was to analyze the color variation from each dry time.
Some of my results were kind of surprising, while others were to be expected.
To Achieve A Light Shade
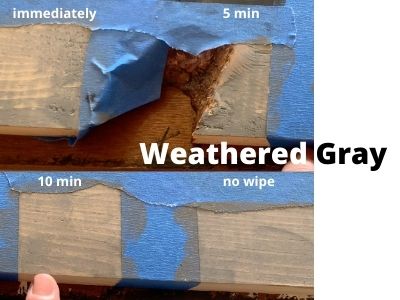
Even though I applied the same amount of wood stain on all squares, the color still turned out significantly lighter when I wiped it off immediately.
That stayed true whether I was using a lighter color like Early American or the darkest color, Ebony.
So if your goal is a light shade of the stain you are using, apply the stain in small sections and wipe it off immediately as you go.
To Achieve A Medium Shade
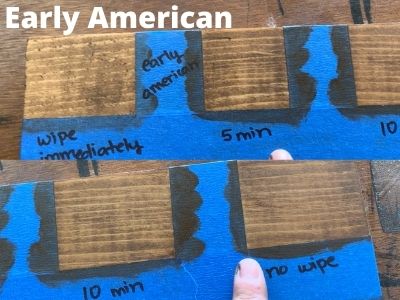
The part of the experiment that I found most interesting was the 5-10 minute period to let the stain sit before wiping off.
Honestly, I expected a significant color/shade variance between 5 and 10 minutes because that is a decent amount of time for the stain to sit.
I mean, the difference between 0 minutes and 5 minutes was significant, so I would assume that would stay consistent for another 5 minutes, but that is not what I found.
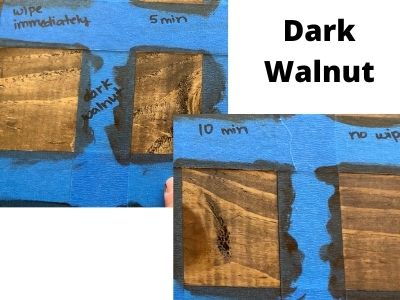
Of course, if you had the tools to analyze the colors down to a scientific level, then I’m sure the color is slightly darker if you let it sit for 10 minutes as opposed to 5 minutes.
However, to the naked eye, the colors look pretty much the same. That is great to know though because if you are trying to achieve a medium shade of your stain, you don’t have to fret about whether your stain has sat there for too long or not.
That means you can work in larger sections on your project without having to worry about the shade variation in your stain application.
To Achieve A Dark Shade
The easiest to achieve a consistent color shade in my opinion is if you are trying to go for a rich, dark shade of your stain color.
When I applied the stain, I didn’t wipe off the color. I let it sit there for over 30 minutes, and you can tell that it is darker than the rest of the dry times.
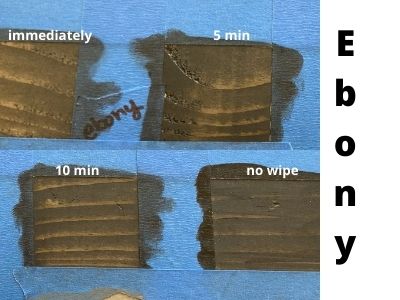
Why would you want your stain this dark, you ask? Well, maybe you don’t want the wood grain to show through as prominently as if you applied the stain lighter.
For example, when I was finishing the back panel of our kitchen island, I trimmed it out with wood that I stained to match my store-bought cabinets. (You can check out that awesome tutorial here. It’ll save you a lot of pain and money if you’re trying to figure out how to finish or upgrade the backside of a kitchen island.)
My cabinets didn’t have a prominent wood grain showing throughout them, so I didn’t want my wood trim to either. So I applied Ebony stain as heavily as a could and left it to sit for the full hour without wiping off.
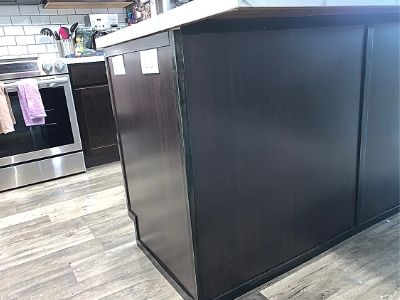
Letting the stain sit for that long definitely helps hide those wood grains. Also, because you aren’t wiping the stain off or are wiping off very little, you can stain your entire project without worrying about color variation.
That’s the easiest way to stain a project in my book haha!
Other FAQs About Stain Drying Time Before Wiping Off
Here are a few other frequently asked questions about stain drying time. Use these answers to apply stains to your wood projects like a pro!
Can You Leave Stain On Without Wiping Off?
Stain can be left on without wiping off. However, the heavier the application of stain, the longer it takes to fully dry before a topcoat can be applied. Typical stain dry time before recoating is 1-2 hours. Leaving stain on without wiping off creates the richest, darkest shade of the stain on the wood.
After Staining Wood, Do You Have To Seal It?
Stained wood should be sealed to protect the stain and wood from scratches and moisture damage. Sealing stained wood also showcases the wood grain and richens the stain color.
I have a full article on this topic showcasing all the damage that could be done to your wood if you haven’t sealed it. Check it out here.
How Long Should Stain Dry Before Applying Polyurethane?
Here is a list of the most popular stains and how long you should let the stain dry before applying polyurethane. (This is why Varathane Fast Dry Wood stain is my favorite! It has one of the fastest drying times with one of the richest colorings!)
| Stain Brand | Dry Time Before Applying Polyurethane |
|---|---|
| Varathane Fast Dry Wood Interior Stain | 1 Hour |
| Varathane Classic Wood Interior Stain | 8 Hours |
| Minwax Wood Finish | 4-6 Hours |
| Minwax Gel Stain | 24 Hours |
| General Finishes Oil-Based Interior Wood Gel Stain | 24 Hours |
| Rust-Oleum Ultimate Stain | 1 Hour |
| BEHR Water-Based Fast Drying Interior Wood Stain | 1 Hour |
| ZAR Oil-Based Multi-Surface Interior Wood Stain | 3 Hours |
Can You Mix Stain Colors?
Stain can be mixed to create custom stain colors! Mixing stain colors is a great way to add a unique twist to your wood project and achieve the perfect stain color for your home.
You can check out my full guide on mixing several of the Varathane Fast Dry stain colors to see if any of the mix combinations would suit your style better.
(P.S. My favorite custom stain mix is 50% Early American, 50% Weathered Gray! You can also see how it turned out on our floating mantel here.)
Final Thoughts On How Long To Let Stain Dry Before Wiping Off
There you have it! Now you can confidently stain your future wood projects and know exactly how long to let the stain sit before wiping it off.
Having that knowledge gives you power! Power to create more amazing wood projects and showcase your awesome talents.
Catch you in my next post!

By Christine
Christine is a blogger and DIYer who tackles home renovation and decorating projects alongside her husband, Adam, for their personal residence and rental properties. Although she successfully tackles large renovation projects to avoid expensive contractor fees and bring her vision to life now, her path to success was not easy.
Go here to read her story, “From a Clueless First-Time Homebuyer To A Confident DIYer Creating Her Dream Home One Project At A Time“.
Popular Posts
DIY With Christine is a participant in the Amazon Services LLC Associates Program, an affiliate advertising program designed to provide a means for sites to earn advertising fees by advertising and linking to Amazon.com.

