*My posts may contain affiliate links, which means I may receive a small commission, at no cost to you, if you make a purchase through a link! Thank you for supporting my website!*
Last updated on September 18th, 2024 at 12:23 pm
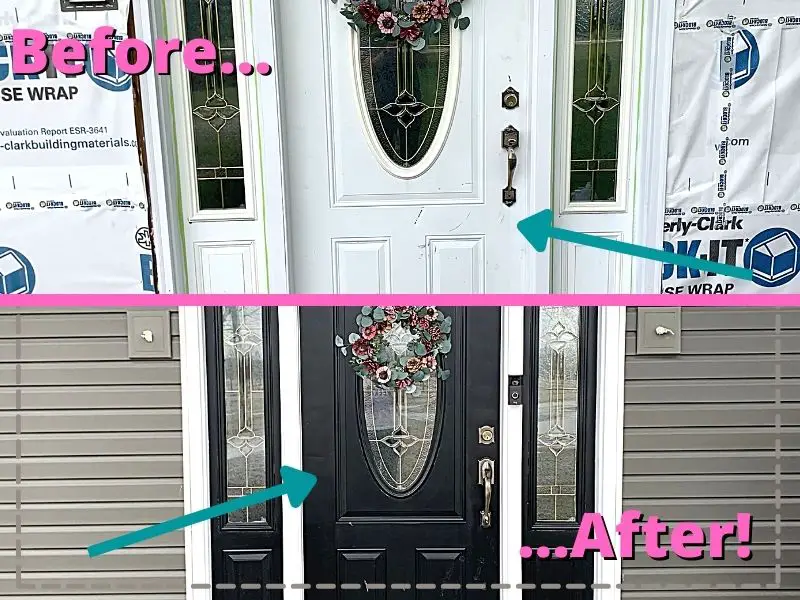
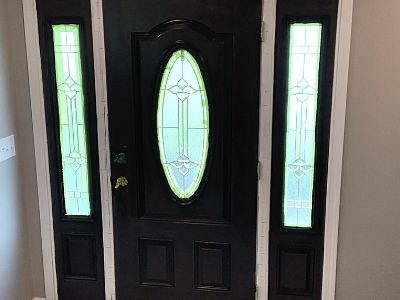
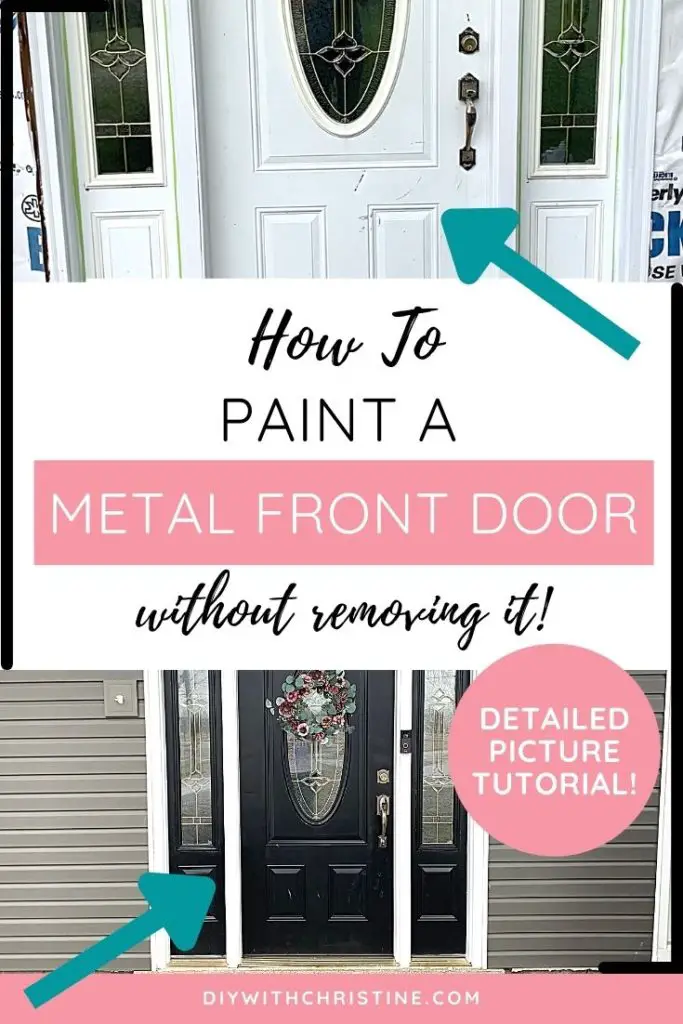
Wondering how to paint your front door without removing it? Well, look no further because I have your answer!
To easily paint a front door without removing it, remove the door handle and tape the hinges with painter’s tape prior to painting. The benefits of painting while the door is still hung are that both sides can be painted in the same session and clean up is faster (just remove the tape and you are done).
Now that we have the basics covered, let’s go over some more details so you can paint your front door with confidence.
Let’s dive in!
Quick Navigation: How To Paint A Metal Door Without Removing It
- Remove Flaking Or Peeling Paint From Door & Clean Door
- Repair Dents, Dings, Or Scratches On Door
- Remove Door Handle & Tape Hinges / Trim
- Apply 1-2 Coats Of Primer (SAND Between Coats)
- Apply 2-3 Coats Of Paint (SAND Between Coats)
- Remove Tape & Re-Install Door Handle
- Common Mistakes To Avoid When Painting A Front Door
- FAQs About Painting A Metal Door Without Removing It
- Final Thoughts
| Level Of Difficulty | Time To Complete |
|---|---|
| Medium | 2-3 Days |
| Material List | Tool List |
|---|---|
| Bondo Repair Kit | Flexible Putty Knife (Comes With Bondo Repair Kit) |
| Rustoleum Metal Primer | Clean, Flat Mixing Surface (Drywall Hawk Works Well) |
| Rustoleum Front Door Paint | Mechanical Sander (If Repairing Using Bondo Or Removing Old, Flaking Paint) |
| 80 Grit Sandpaper (Comes With Bondo Repair Kit) | Fine-Texture Foam Roller |
| 180 Grit Sandpaper (Comes With Bondo Repair Kit) | Paintbrush |
| 320 Grit Sandpaper (Comes With Bondo Repair Kit) | Paint Tray |
| Painter’s Tape (Delicate) | Clean Microfiber Rags |
| Dawn Dish Soap | Screwdriver (If Removing The Handle) |
How I Painted Our Metal Front Door Without Removing It – Video Tutorial

See the full tutorial on my YouTube Channel – DIY With Christine!
Step One: Remove Flaking Or Peeling Paint From Door & Clean Door
The first step to painting a metal front door without removing it is to prep the door for paint.
Door prep is going to look different for you based on the level of disrepair that your door is currently in.
If your door is in excellent shape (i.e. no dents, scratches, or flaking paint), then all you need to do in this step is clean the door using soap, water, and a clean microfiber rag.
This microfiber rag set found at Amazon is awesome because it prevents scratches while cleaning and easily picks up dust particles to make sure you have the cleanest door before painting.
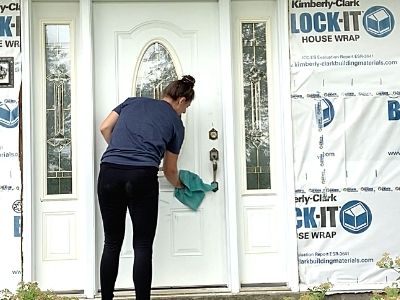
Make sure to remove any dirt thoroughly and rinse off all soap before moving to the next step.
Now, if your door has flaking paint, then your first step will be to sand off all of the flakes.
To accomplish this, use a mechanical sander and 80 grit sandpaper. Sand the entire door and remove the large chunks of paint that are peeling off with the sander and/or a putty knife.
Once the door is relatively smooth and flake-free, clean the door with soap, water, and a clean microfiber rag to remove any dust left behind while sanding.
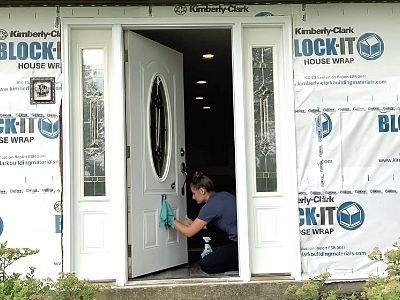
If you are also painting the inside of your door, then be sure to sand and clean that side as well.
Once the door is clean and dry, it’s time to move on to the next step.
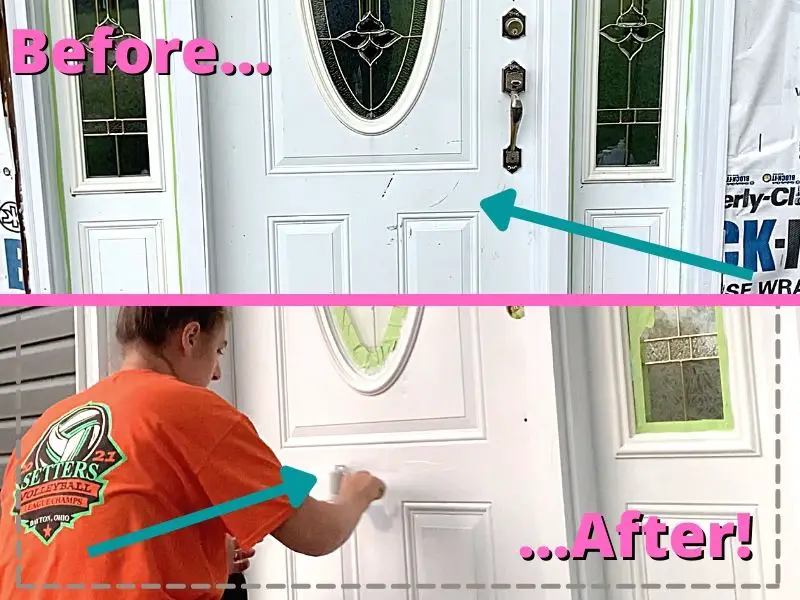
Step Two: Repair Dents, Dings, Or Scratches On Door
The next step to painting a metal front door without removing it is to repair any damage.
If your door is in good shape, then skip to step three.
However, if your door has major scratches or dents in it (as ours did), then you need to repair them now.
To accomplish this step, you will need this Bondo Repair Kit found at Amazon.
This kit will supply you with all of the materials you will need to fix dents or scratches in metal or wood doors.
How To Repair A Dent/Scratch In A Metal Or Wood Front Door
- Mix Bondo body filler with red cream hardener on a flat, clean surface using the Bondo speader tool
- Spread the mixed Bondo filler across the dent or scratch (go wider than the dent so you can sand evenly)
- Wait for the filler to dry
- Sand the filler using 80 grit sandpaper until smooth with the surrounding door
- Sand a little more using 180 grit sandpaper to smooth out the entire area
- Wipe down the entire area with a clean microfiber rag
- If there are tiny imperfections, spread the Bondo red glazing and spot putty over the imperfections
- Wait for the red glazing and spot putty to dry
- Sand the red spot glaze with 320 grit sandpaper until the entire area is smooth
- Wipe down the entire area with a clean microfiber rag
For a more detailed tutorial on how to fix a dent in a front door, check out my article here.
Once all of the damaged areas are repaired, it’s time to prep for primer!
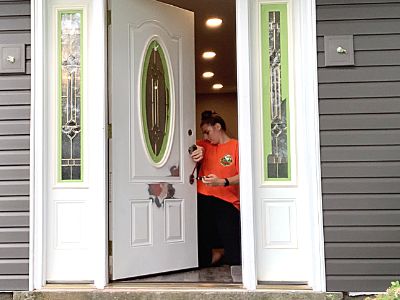
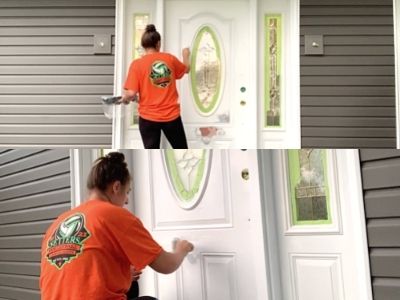
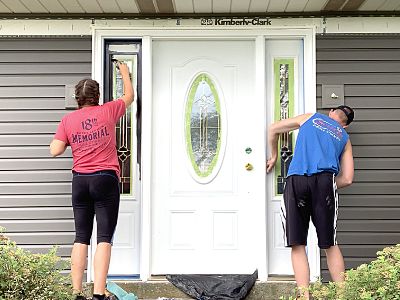
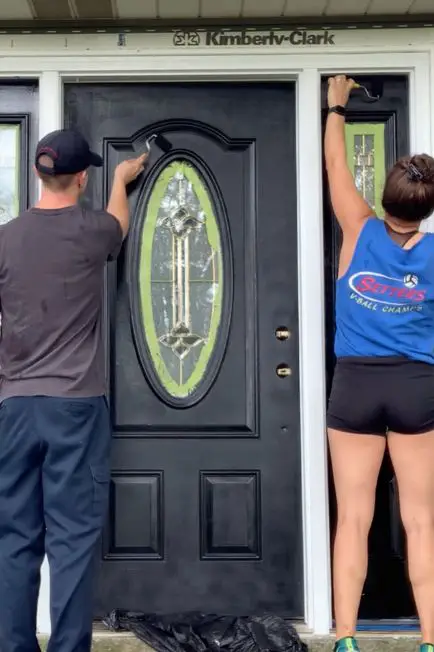
Step Three: Remove Door Handle & Tape Hinges / Trim
The next step to painting a metal front door without removing it is to remove the door handle and tape.
Save yourself some time and just paint your front door while it’s still hanging.
This method of painting is beneficial for a few reasons:
- You can paint both sides in the same painting session
- You don’t have to waste time removing the door and putting it back up
- You can keep the door semi-shut while it is drying to keep bugs out and the heat or air conditioning in
It is a little more difficult to paint the door while it’s hanging though because gravity will inevitably lead to a few potential drips and the hinges are slightly annoying to paint around.
To minimize some of these problems, you should remove the door handle first.
The handle and deadbolt easily unscrew, so remove them now and leave yourself plenty of room to paint.
Then, take some painter’s tape and wrap it around the hinges on the inside of the door.
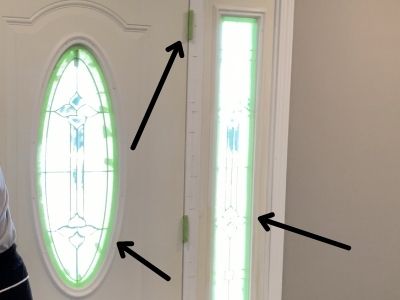
This trick will leave you with a perfectly covered hinge, and you can paint much faster around these areas without worrying about getting paint on any hardware.
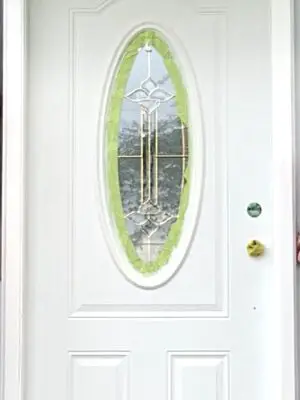
Additionally, if you have glass inserts in your front door, then you will want to cover the part of the glass that touches the trim with painter’s tape as well.
Any sidelights that will be painted will need the glass, trim, and the ground taped off as well.
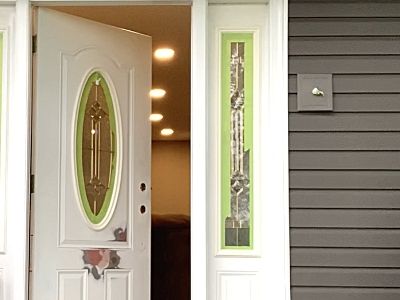
Taking this little bit of time up front will save you tons of time while painting.
Once you have everything taped, it’s time to move on to the next step!
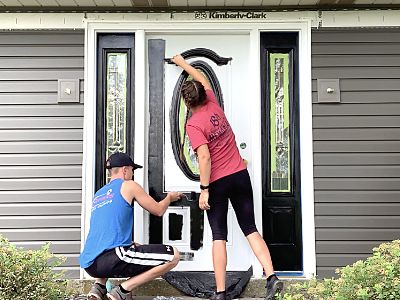
Step Four: Apply 1-2 Coats Of Primer (SAND Between Coats)
The next step to painting a metal front door without removing it is to apply primer.
Finally, we are on to the painting!
Front doors should be painted with primer first to help the paint adhere to the door better.
If you used the Bondo Repair Kit or have bare metal or wood on the door from sanding, then it is especially important that you prime first.
Also, if you are changing the door color from a dark color to a lighter color then it is easier to paint with primer first as well.
This Rustoleum Metal Primer found at Amazon is made specifically to adhere to bare metal better than other types of paint. This primer will help you get the best painting results.
There are a few tips you need to know before painting to get the best finish (especially if you have a metal front door):
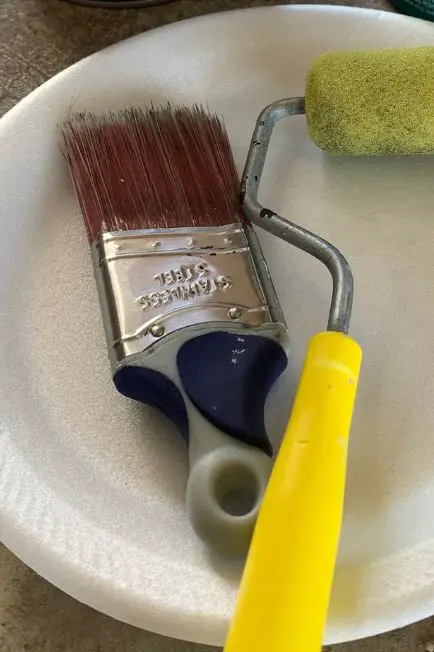
- The type of paint brush/roller you use matters
- Sanding between coats of paint is extremely helpful
What Type Of Paint Brush Or Roller Should You Use On A Metal Door?
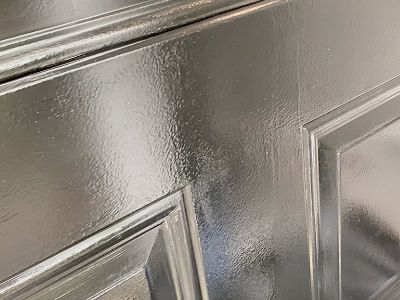
The best type of paintbrush to use on a metal door is an angled soft-tip brush. Rollers tend to leave a small amount of texture, but if you use a fine-texture foam roller and sand between coats, the texture will be minimal.
The best paintbrush is this Wooster Angled Short Paint Brush found at Amazon. And the best fine-textured roller is this FOAMPRO Fine Foam Roller found at Amazon.
For the first few coats of paint, I used a medium textured foam roller and could not hide the texture it left behind.
To fix my mistake, I had to sand a good portion of the paint off and apply additional coats of paint.
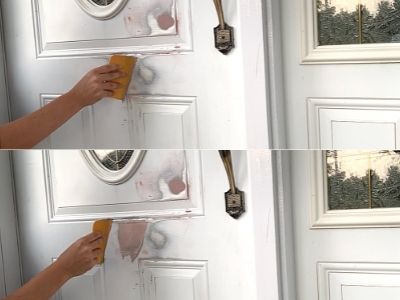
Do You Have To Sand Between Coats Of Paint On A Metal Front Door?
To get the smoothest finish on a painted metal door, sand between coats with 320 or higher grit sandpaper.
I figured out the hard way that metal doors show texture extremely easily (especially when you use high-gloss paint as you should on a front door).
I didn’t notice the texture while painting the flat, white primer, but this was the stage where I needed to sand between coats to minimize the texture.
To combat this problem, I used the finest texture foam roller and used a 320 grit sandpaper between coats of paint to get the smooth finish I was looking for.
After you sand, be sure to wipe away any dust with a clean, damp microfiber rag, and let the door dry completely before adding any more coats of paint.
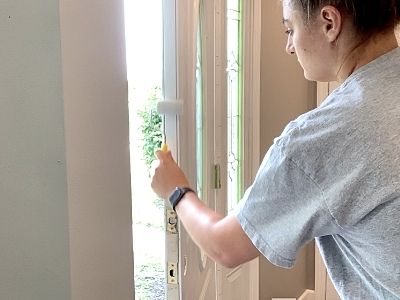
Paint the detailed areas and along the edges of the door first with your paintbrush, then roll the rest of the door with your foam roller.
Once you have a coat or two of primer on the door, and you’ve sanded it and wiped the dust away, it’s time to move on to the next step.
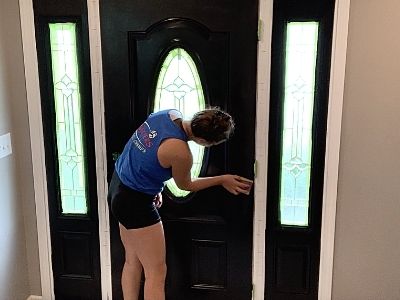
Step Five: Apply 2-3 Coats Of Paint (SAND Between Coats)
The next step to painting a metal front door without removing it is to paint 2-3 coats of paint.
The best paint to use on a front door (metal or wood) is Rustoleum Front Door paint found at Amazon.
This paint is durable and adheres to metal and wood front doors. It is an oil-based paint, so it dries slower, which helps minimize drips and brush marks.
Just like the primer, the brush you use and the level of sanding you do make a difference.
Follow the same steps as the primer to get a smooth finish on your front door.
Pro tip: To minimize the number of bugs that try to infiltrate your home while painting, point a giant box fan out the door. Bugs have a hard time flying in strong winds, so they will have a hard time getting in.
Or you can block the door with a giant sheet of plastic to help keep bugs out.
Once you have 2-3 coats of paint on the door and it’s dry, it’s time to move on to the final step.
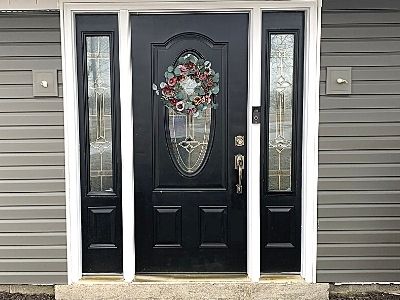
Step Six: Remove Tape & Re-Install Door Handle
The final step to painting a metal front door without removing it is to remove the painter’s tape and re-install the door handle.
This is where you get to reap the rewards of painting your front door without removing it!
Gently peel the tape away from the paint at a 45-degree angle. (Use a razor blade to separate any paint that gets stuck to the tape if it doesn’t peel away easily.)
Then re-attach your door handle and deadbolt to your front door.
Ta-da! You now have a beautifully painted front door that didn’t have to be removed!
Common Mistakes When Painting A Front Door
There are several mistakes that I (and most people) ran into during my first try painting a metal front door using Rustoleum Front Door Paint.
- Skipping Surface Prep: Not cleaning and sanding the door properly can lead to poor adhesion and a rough finish – I made sure I sanded the door first and between each coat of paint to get the best adhesion and the smoothest finish. It is an extra pain, but worth the outcome once you’re finished! I’ve made the mistake of not sanding very well on other projects and the paint peeled after a few years – that hasn’t happened to our front door (3 years and counting!)
- Not Priming (if needed): If the door has bare metal spots or rust, skipping primer can cause paint to peel – Since I had to repair that dent in the front door, I had a huge spot with bare metal. Since I was spending all this time to fix the door, I wanted to do it right by priming before painting.
- Painting in Extreme Weather: Painting in very hot, cold, or humid conditions can affect the drying process and result in an uneven finish – I chose to paint in the middle of summer where it was forecasted to be dry for several days. The door was cured and dried properly.
- Applying Thick Coats: Thick layers can cause drips and uneven drying; use thin, even coats instead – For some spots on the door, I went a little too thick with the paint. Luckily, since I sanded between coats of paint, I smoothed out most of the drips. But alas, without using a paint sprayer, the finish is not 100% perfect (way better than it was though!)
- Not Allowing Proper Drying Time: Rushing between coats or handling the door too soon can smudge the finish – Since it took me about an hour between each coat of paint, I didn’t want to mess up anything by rushing the next coat. So I just cleaned up and waited til the next day to do the next coat.
Hopefully, I can help you avoid some of the struggles I experienced so you can have a better outcome!
FAQs About Painting A Metal Door Without Removing It
Here are other frequently asked questions about painting front doors without removing them to help you get a better result!
- Do I need to prime the door first? If the door has rust, bare spots, or is a lighter color, priming may be necessary for better adhesion.
- How long does Rust-Oleum Front Door Paint take to dry? It typically dries to the touch in 1-2 hours, but you should wait 24 hours before closing the door.
- Can I use a roller or just a brush? You can and should use both! A fine-finish foam roller for larger areas and a short-handled brush for details and edges.
- What weather conditions are ideal for painting? Paint in temperatures between 50°F and 90°F, avoiding extreme heat, cold, or humidity.
- How many coats should I apply? Usually, 2 thin coats provide the best coverage.
- Do I need to remove the door from the hinges to paint it? No, but removing the door allows for easier access to edges and prevents drips. Alternatively, you can tape around the hinges and hardware.
- Can I paint over rust? You should remove any rust first and apply a rust-inhibiting primer before painting to prevent it from spreading.
- Can I paint over an existing painted surface? Yes, as long as the previous paint is sanded lightly and cleaned for good adhesion.
- How should I clean the door before painting? Use soapy water or a degreaser to clean off dirt, dust, and oils before painting.
- How do I avoid brush strokes or roller marks? Use a high-quality brush or foam roller and apply thin, even coats for a smooth finish.
Do You Have To Remove Old Paint Before Repainting A Steel Door?
Old paint should be removed before painting a steel door only if it is chipping or flaking. Leaving the old, flaking paint will result in the new layer of paint flaking off as well. To prevent this, sand down the old paint until smooth and apply a coat of primer to the entire door before painting.
Otherwise, if the old paint is in good condition, then the paint does not need to be removed in order to paint the steel door.
What Kind Of Paint To Use On A Metal Front Door?
The best kind of paint to use on a metal front door is high-gloss, oil-based paint such as Rustoleum Front Door Paint line. This paint is easy to keep clean and is extremely durable against the harsh outside elements. It also dries more slowly, which helps brush marks and drips level out.
Do You Paint Both Sides Of A Front Door?
For a cohesive look on the interior and exterior of your home, you should paint both sides of a front door. However, if the new color of your front door does not complement the interior of your home, then it is acceptable to paint each side of the front door a different color.
How Do You Clean A Front Door Before Painting?
To clean a front door before painting, simply use dish soap and a clean, wet rag to wipe down the entire door and let air dry before painting. If any old paint is chipping, then sand the door before cleaning and apply a coat of primer prior to painting to get the best paint adhesion on the front door.
Final Thoughts On Painting A Door Without Removing It
There you have it!
Painting a metal front door can be a little time-consuming, but the transformation can be so dramatic that it’s worth it!
Plus, paint is so much cheaper than buying a new front door. It’s kinda hard to pass up those kinds of savings!
Hopefully, this post helped you paint a beautiful, new color on your front door.
Catch you in my next post!
The Best Paint Supplies I’ve Used
Wooster Shortcut Angle Sash Paintbrush (2-Inch)
This is my all-time favorite paintbrush because it is so lightweight! The short handle takes the pressure off your wrist and creates an extremely comfortable grip, so you can paint longer without feeling the weight on your wrist. I use this paintbrush on 99% of my paint projects. You can find this paintbrush here on Amazon.
FoamPRO 164 Fine Finish Roller (4-Inch)
If you want the least amount of paint texture left from a roller (such as on metal or furniture), then this is the best roller you can use. The fine finish in the foam leaves the tiniest bit of texture that can easily be sanded between coats to get a finish almost as good as a sprayed finish. You can find this awesome foam roller here on Amazon.
If you’ve been curious about how we are decorating our 1950s Ranch, you should check out our “Shop Our Home” page. You can find products that we’ve personally bought to decorate our home.

By Christine
Christine is a blogger and DIYer who tackles home renovation and decorating projects alongside her husband, Adam, for their personal residence and rental properties. Although she successfully tackles large renovation projects to avoid expensive contractor fees and bring her vision to life now, her path to success was not easy.
Go here to read her story, “From a Clueless First-Time Homebuyer To A Confident DIYer Creating Her Dream Home One Project At A Time“.
Popular Posts


DIY With Christine is a participant in the Amazon Services LLC Associates Program, an affiliate advertising program designed to provide a means for sites to earn advertising fees by advertising and linking to Amazon.com.