*My posts may contain affiliate links, which means I may receive a small commission, at no cost to you, if you make a purchase through a link! Thank you for supporting my website!*
Last updated on March 4th, 2024 at 01:26 pm
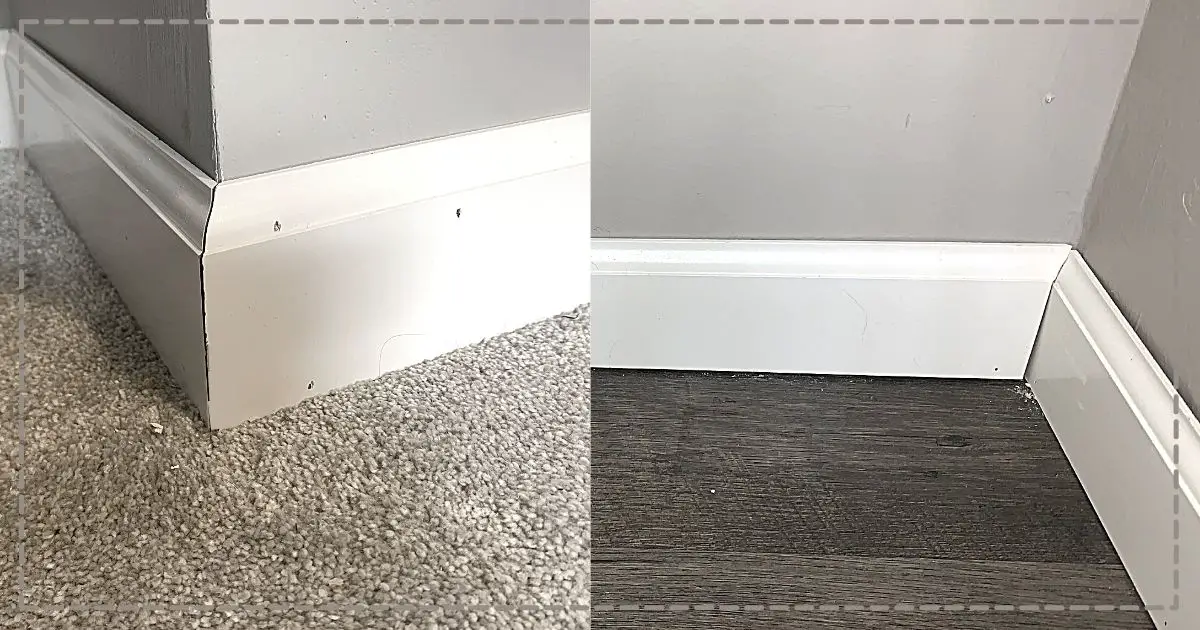
Wondering whether coping or mitering baseboard corners is better? Well, look no further because I have your answer!
Baseboard is mitered when two pieces meet at a 45-degree angle on an outside corner, and baseboard is coped when two pieces meet at a 45-degree angle in an inside corner. A miter saw is easiest to use to cut mitered corners while a hacksaw is easiest to use to cut coped corners in the baseboard.
Now that we’ve got the basics out of the way, let’s break the details down further so you can better understand the difference between mitered and coped corners and when it’s best to use them.
Let’s dive in!
Quick Navigation: Coping Vs. Mitering Baseboard
- What Is Coping In Trim?
- What Are Mitered Joints In Trim?
- When To Miter Vs When To Cope Baseboard Joints
- How To Cope Baseboard Inside Corners
- How To Miter Baseboard Outside Corners
- Cutting Baseboard Cheat Sheet (Free PDF Printable)
- Other FAQs About Coping Vs. Mitering Trim Joints
- Final Thoughts
What Is Coping In Trim?
Coping in trim is when one piece of baseboard is cut so that the intricate detail fits perfectly against the intricate detail on another piece of baseboard within an inside corner.
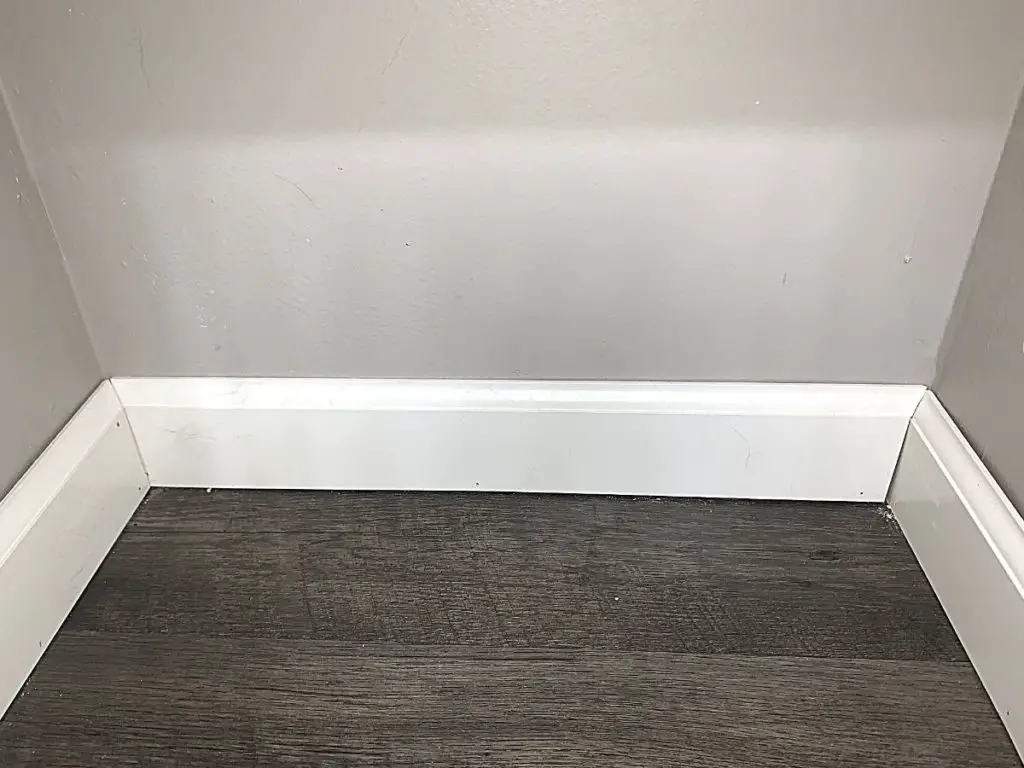
There are a few benefits and drawbacks to coping trim for inside corners instead of cutting 45-degree angles:
| Pros Of Coping Baseboard Inside Corners | Cons Of Coping Baseboard Inside Corners |
|---|---|
| The two pieces fit together without a visible gap regardless of the design on the front | More time consuming to cut because the corner is cut by hand with a hacksaw |
| The cut doesn’t have to be perfect to make the corner look perfect |
Coping is a cut that is typically used to fit together two pieces of baseboard on inside corners (not outside corners or connecting cuts).
What Are Mitered Joints In Trim?
Mitered joints/cuts in trim are when two pieces of baseboard are cut at 45-degree angles so that they meet together on an outside corner.
Baseboard inside corners can be mitered as well, but it is generally a more difficult cut than coping the inside corners (which we will discuss further below).
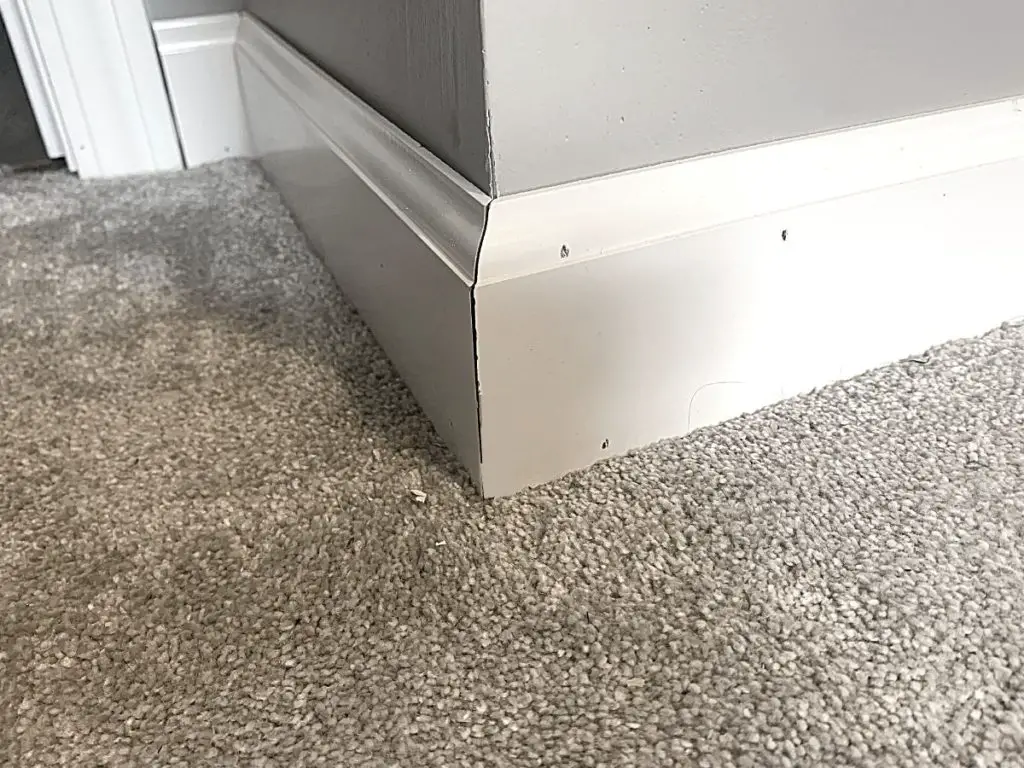
There are a few benefits and drawbacks to mitered trim joints for outside corners instead of just butting the two pieces up against each other:
| Pros Of Mitering Baseboard Outside Corners | Cons Of Mitering Baseboard Outside Corners |
|---|---|
| The finish looks more professional because there are no cut edges visible | If the corner of your wall is not a perfect 90-degree angle (which most aren’t), the angle will need to be adjusted to minimize any visible gap |
| Can be cut quickly with a miter saw or miter box |
When a “mitered joint” is being referred to, these cuts are typically talking about 45-degree angled cuts for two pieces of trim to meet at outside corners.
However, they can sometimes refer to inside corners that are cut at 45-degree angles as well (although, not typical).
There are a few benefits and drawbacks to mitered trim joints for inside corners instead of coping:
| Pros Of Mitering Baseboard Inside Corners | Cons Of Mitering Baseboard Inside Corners |
|---|---|
| Can be quickly cut on a miter saw or miter box | If the corner of your wall is not a perfect 90-degree angle (which most aren’t), the angle will need to be adjusted to minimize any visible gap (which can be tedious) |
Any time you have to make a 45-degree angle cut and your walls aren’t actually 90-degree angles, the mitered cut becomes increasingly difficult.
(The inside corners of walls typically are not perfectly square because of the buildup of drywall that occurs naturally in these areas during construction.)
This little bit of extra difficulty can be more easily hidden on an outside corner than it can on an inside corner.
When To Miter Vs When To Cope Baseboard Joints
Miter baseboard joints when:
- You’re installing on an outside corner
- You’re installing baseboard on an inside corner, using a plain, rectangular style, and want to install without coping
Cope baseboard joints when:
- You’re installing baseboard on an inside corner
- You don’t want to have to fight with a non-square inside wall corner
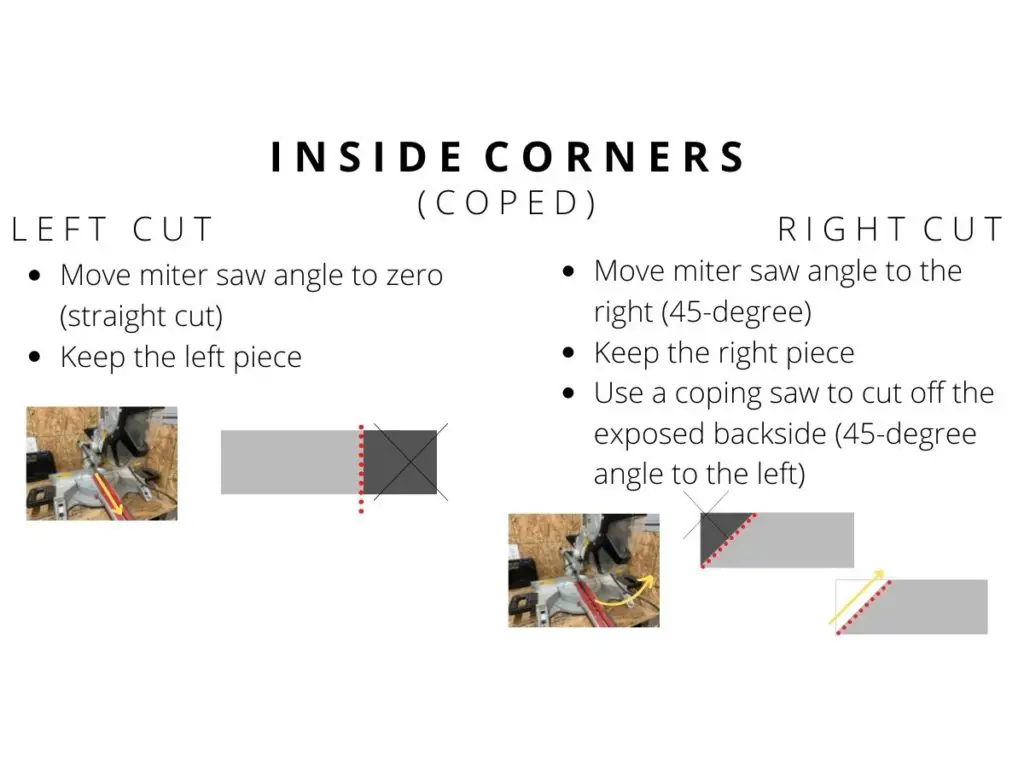
How To Cope Baseboard Inside Corners
To cope baseboard inside corners, complete the following steps:
- Install one piece of baseboard on one of the walls that meets in the corner (make the end that meets the inside of the wall a flat cut with a miter saw)
- Measure the length of the wall ending on the already installed piece of baseboard in the inside corner (this measurement is the length of the inside of the first cut
- Mark the measurement on the top part of the piece of baseboard
- Set the miter saw at a 45-degree angle opposite the way the piece will fit into the corner (move the saw blade to the left for a right coped joint and move it to the right for a left coped joint)
- Line the saw blade up so the most inside cut is just outside of the mark
- Stand the baseboard up, cut the baseboard, and slowly continue sliding the baseboard over while making cuts until the cut meets the mark
- Clamp the piece of baseboard against a sturdy table
- Use a hacksaw to cut the angled edge at a 45-degree angle backward to reveal the design on the back
- Clean up the backside of the edge with a piece of 120 grit sandpaper
- Test the piece of baseboard to make sure the coped cut fits against the already installed piece of baseboard on the wall
How To Miter Baseboard Outside Corners
To miter baseboard outside corners, complete the following steps:
- Measure the length of the wall ending on the outside corner (this measurement is the length of the inside of the mitered corner
- Mark the measurement on the top part of the piece of baseboard
- Set the miter saw at a 45-degree angle (move the saw blade to the right for a right mitered joint and move it to the left for a left mitered joint)
- Line the saw blade up so the most inside cut is just outside of the mark
- Stand the baseboard up, cut the baseboard, and slowly continue sliding the baseboard over while making cuts until the cut meets the mark
- Test the piece of baseboard to make sure the inside corner of the mitered cut lines up with the outside corner of the wall
- Move the saw to the opposite 45-degree angle to cut the other piece of baseboard that will meet in this outside corner
- Repeat steps 1-6 to cut the second piece of baseboard
- Adjust your angle as necessary to get a press fit on the corner of the wall
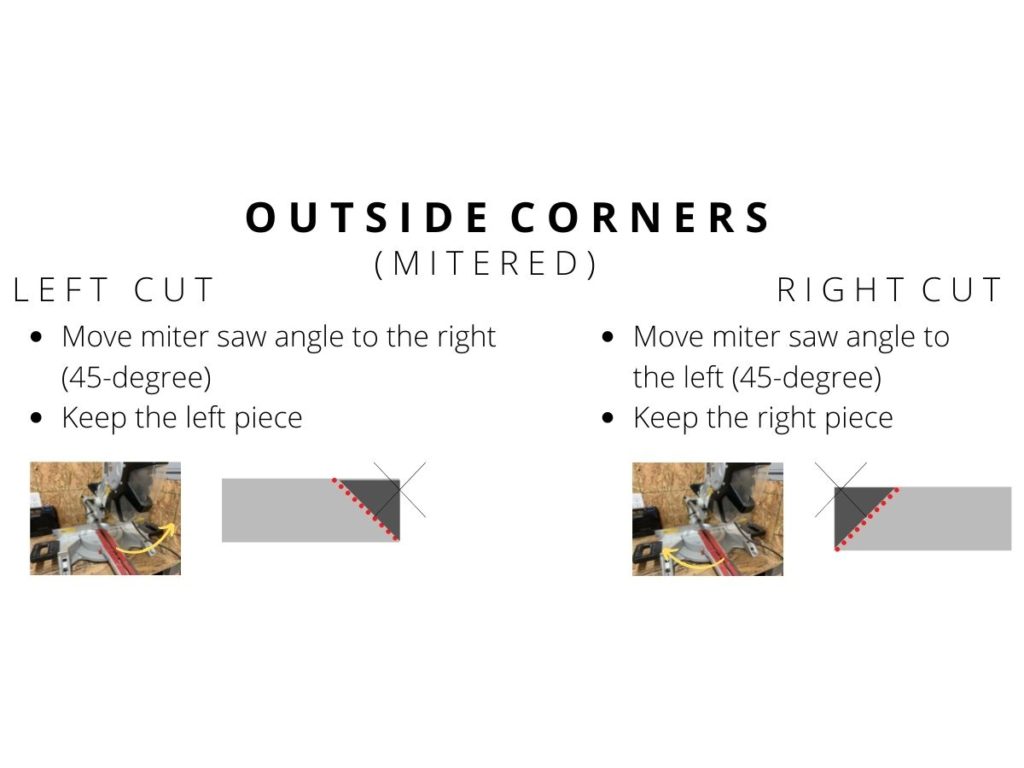
Cutting Baseboard Cheat Sheet (Free PDF Printable)
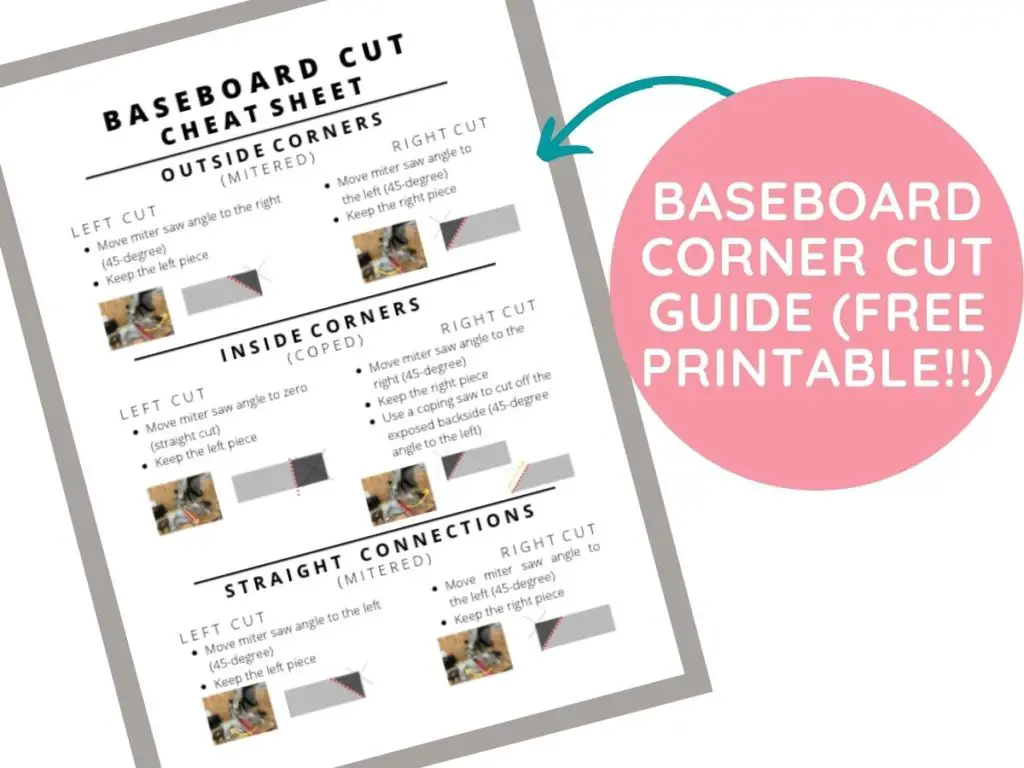
Don’t worry, it’s hard to remember which way to move the saw and what angles to set up when you’re cutting a ton of baseboard.
That’s why I made this handy cheatsheet (which you can download for free here), so you can print it off and lay it next to your saw.
It’ll make your cuts go so much faster!
Other FAQs About Coping Vs. Mitering Trim Joints
Here are some other frequently asked questions about coping vs. mitering baseboard to help you get a professionally installed finish!
Can You Cope With A Miter Saw?
You can cope with a miter saw. To do this, make slow tiny cuts until the cut is the correct length that you want.
Do Baseboards Have To Be Mitered?
Baseboards do not have to be mitered, but the butt-cuts will need to be painted or restained and refinished to hide the cut edge. Mitering and coping baseboard corners make installation easier and give a professional finish to any baseboard.
Do You Cope Baseboard Outside Corners?
Baseboard outside corners are mitered, not coped. Baseboard inside corners are coped.
Final Thoughts On Coping Vs. Mitering
There you have it!
Knowing the difference between coping and mitering baseboard corners will make your baseboard installation go so much easier.
And it will look exactly like a pro installed it for half the cost!
Hopefully, these tips help you tackle your baseboard installation with ease.
Catch you in my next post!

By Christine
Christine is a blogger and DIYer who tackles home renovation and decorating projects alongside her husband, Adam, for their personal residence and rental properties. Although she successfully tackles large renovation projects to avoid expensive contractor fees and bring her vision to life now, her path to success was not easy.
Go here to read her story, “From a Clueless First-Time Homebuyer To A Confident DIYer Creating Her Dream Home One Project At A Time“.
Popular Posts
DIY With Christine is a participant in the Amazon Services LLC Associates Program, an affiliate advertising program designed to provide a means for sites to earn advertising fees by advertising and linking to Amazon.com.

